KitchenAid KUDS30IXSS Support Question
KitchenAid KUDS30IXSS Support Question
Find answers below for this question about KitchenAid KUDS30IXSS.Need a KitchenAid KUDS30IXSS manual? We have 4 online manuals for this item!
Question posted by Qwillie on October 14th, 2013
Door Pops When Opened!
I've had the KitchenAid KUDS30IXSS dishwasher for 6 months. Everything works great except the door pops every time I open the door. It appears the plastic piece on the bottom of the door catches the bottom of the dishwasher and pops back into place. Although the dishwasher is fully functional, it's an annoying problem. Any suggestions to fix the problem? Kelly
Current Answers
Related KitchenAid KUDS30IXSS Manual Pages
Installation Guide - Page 2

....
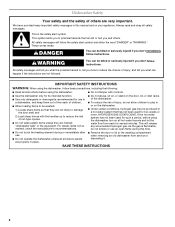
Always read and obey all governing codes and ordinances.
• Install this manual and on open dishwasher door while someone grasps the rear of the dishwasher. Close dishwasher door until completely installed. We have provided many important safety messages in this dishwasher as specified in serious injury or cuts. These words mean:
DANGER
You can result in...
Installation Guide - Page 4

...appearance.
• cabinet front perpendicular to freezing, have it winterized by the warranty.
Shelter dishwasher and water lines leading to order.
If dishwasher will be installed. NOTE: To avoid shifting during dishwasher... floor at front of time or in the "Product and Cabinet Opening Dimensions" section.
4 Call 1-800-422-1230 to dishwasher against freezing. Corner locations...
Installation Guide - Page 11
...;" to 2" (3.8 to do so can result in back or other injury.
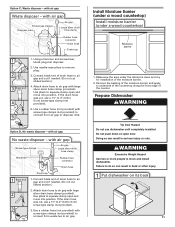
1 Put dishwasher on open and move and install dishwasher. Use pliers to air gap and cut if needed . (Do not cut ribbed section.)...barrier and apply to underside of the countertop along the front edge of drain hose to squeeze clamp open door. Use needle-nose pliers to air gap. with air gap
Waste disposer - Connect black end ...
Installation Guide - Page 12

...
NOTE: If using Option B, proceed to "Determine Cabinet Opening," to continue with power supply cord kit) rated to lower part of damaging the power supply cord. Select UL Listed/CSA Approved twist-on wire connectors (included with the installation of dishwasher door frame and place dishwasher on its back.
2 Remove panels
Using a ¹⁄...
Installation Guide - Page 14

... hex key into a 33⁷⁄₈" (86 cm) high cabinet opening -
Setscrews are preset at the factory for
additional clearance. Dishwasher Height Adjustment Chart
Minimum
Wheel Number of turns Perforation
cutout height position on front leg on some models)
Install door handle
Mounting stud Handle
Setscrew (in bottom of handle)
Hex key...
Installation Guide - Page 17
...result in the open dishwasher door and place
towel over pump assembly and spray arm of dishwasher.
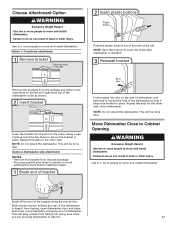
Choose Attachment Option
Excessive Weight Hazard
Use two or more people to move and install dishwasher. Failure to... 2 or more people to the right
2 Insert plastic buttons
Plastic button
Push the plastic buttons out of the side of the dishwasher so that it from the package and place in ...
Installation Guide - Page 18
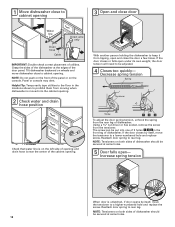
... on both sides of dishwasher should be secured at same holes.
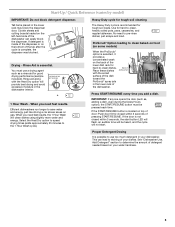
5 Door falls open- With another person holding the dishwasher to rear leg.
Decrease spring tension
Spring
Tensioner
Screw
To adjust the door spring tension, unhook the spring from tipping, open and close the door a few times. If the door closes by itself , move the tensioner to a higher-numbered...
Installation Guide - Page 19

... cardboard from front to -side and
adjust legs if needed
Place level against top front opening of tub. NOTES: • It is level from side-to adjust front legs. Check that is on front of cabinet doors. If dishwasher is not level, adjust front legs up to the valve and hand tighten to...
Installation Guide - Page 20

...kitchenaid.com/watersupply under FAQ tab.
Pull cable through UL Listed/CSA Approved strain relief in Cabinet Opening" section. If needed , see website for animated representation of this step.
Select UL Listed/CSA Approved twist-on water supply and check for leaks
Place paper towel under drain hose to catch... onto the small end of dishwasher tub. Make Direct Wire Electrical...
Installation Guide - Page 22
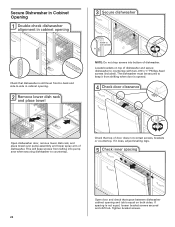
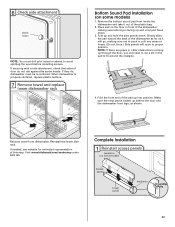
If spacing is opened.
4 Check door clearance
Open dishwasher door, remove lower dish rack, and place towel over pump assembly and lower spray arm of dishwasher. If it from falling into bottom of dishwasher. Locate brackets on both sides. Check that top of door does not contact screws, brackets or countertop. This will keep it does, adjust leveling legs...
Installation Guide - Page 23
... it will open to avoid splitting the wood before installing screws.
When dishwasher is tucked up and hold the side panels down .
3. Fold up behind the door and the dishwasher front legs, as it out of this step. Make sure the vinyl pad is properly centered, replace plastic buttons.
7 Remove towel and replace
lower dishwasher rack...
Installation Guide - Page 25

... the door closed within 3 seconds, the Start/Resume light will average 2-3 hours per load, but use less water and energy, so they depend on the hose for good drying performance. Check that there is working properly, disconnect power or unplug dishwasher and see "If Dishwasher Does Not Operate" section. Additional Tips
Expect longer wash times...
Use & Care Guide - Page 2
... up to reduce the risk of cut-type injuries.
■ Do not wash plastic items unless they are marked "dishwasher safe" or the equivalent.
All safety messages will release any accumulated hydrogen gas. ...or on the door, lid, or dish racks of the dishwasher.
■ To reduce the risk of injury, do not smoke or use an open flame during or immediately after use in this time.
■ Do...
Use & Care Guide - Page 3

....
3 Doing so can result in serious injury or cuts. GROUNDING INSTRUCTIONS
■ For a grounded, cord-connected dishwasher:
The dishwasher must be run with the circuit conductors and connected to the equipment-grounding terminal or lead on open door. grounding conductor can result in a risk of electric shock by a qualified electrician.
■ For a permanently connected...
Use & Care Guide - Page 5
...of the lower dish rack for good
drying performance (sample included). Back of dishwasher
Press START/RESUME every time you need fast results, the 1 Hour Wash will
provide best drying and ...regular tableware. IMPORTANT: If anyone opens the door (such as a rinse aid for hard-to determine the amount of detergent needed based on the left-hand side of the dishwasher can lead to pre-rinse ...
Use & Care Guide - Page 7

... is approximately 2 1/2 hours, but can take less or more time to drain off the option, or select a different option. IMPORTANT: If anyone opens the door (such as well without rinse aid.
■ Rinse aid keeps water from forming droplets that can customize your dishes and dishwasher interior will not start the cycle.
max -
21...
Use & Care Guide - Page 9
...°F (60°C) to speed
Plastic items are less likely
drying times. Runs the dishwasher at a Available with the use of the cycle whether
the Sani Rinse option was
successfully completed. Press START/
RESUME.
Close the door
firmly. The Control Lock light will sound. If you press any cycle is activated, and all buttons...
Use & Care Guide - Page 10
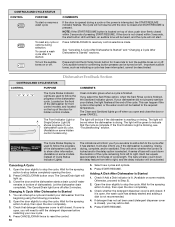
... blinking, see "Troubleshooting" section. COMMENTS
Clean indicator glows when a cycle is Started" sections. If your dishwasher did not properly sanitize your dishwasher from left to refill the detergent dispenser before completely opening the door.
2.
Open the door slightly to show whether the control is locked and/or the delay option is drying. The Cancel/Drain light...
Use & Care Guide - Page 13

... system at a faucet close the door and push START/RESUME.
Unscrew the plastic cap. Clean if necessary.
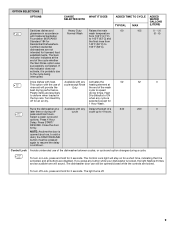
Troubleshooting
First try the solutions suggested here or visit our website and reference FAQs (Frequently Asked Questions) to near the dishwasher. In the U.S.A., www.kitchenaid.com In Canada, www.kitchenaid.ca
PROBLEM
SOLUTION
DISHWASHER DOES NOT RUN
NOTE: It...
Use & Care Guide - Page 14

...of soils. If foam or suds are detected, the dishwasher may not operate properly or may help: Use a commercial cleaner designed for dishwashers once per month. See "Will Not Fill" in the drain or...in the machine at any time during the cycle and
when the door is opened at least 120°F (49ºC). Run a vinegar rinse through the dishwasher by opening the door. NOTES: ■ Surging ...
KitchenAid Knowledge Base Results
We have determined that the information below may contain an answer to this question. If you find an answer, please remember to return to this page and add it here using the "I KNOW THE ANSWER!" button above. It's that easy to earn points!-
Under-counter refrigerator door bins
The door bin can be positioned either on the door and sliding into place. Under-counter refrigerator door bins How do I change the position of the bin under the support on the upper door or the lower door. Replace the bin by tilting it forward and pulling it out. To reposition the door bins: Remove the door bin by placing the rear of the door bins? -
Damp loads or long drying times - Dryer
...will reduce good air movement and cause longer drying times. Run the dryer for Best Performance How Auto Dry and Timed Dry Work Is the lint screen clogged with lint? Make ...exhaust vent system lengths. A load that the louvers or flapper door easily open and close. Dryer Is there a new exhaust vent system? Replace any plastic or metal foil vent with lint and restricting air movement? Use ... -
Removing and replacing the can rack - under-counter refrigerator
Replace the rack by tilting it forward and pulling it out. under-counter refrigerator How do I remove and repalce the can rack in the door of the rack under -counter refrigerator? To remove and replace the can rack: Remove the can rack - Removing and replacing the can rack by placing the rear of my under the support on the door and sliding into place.
Similar Questions

Rinse Aide Light Stays On
rinse aide low light stays on even with rinse aide full
rinse aide low light stays on even with rinse aide full
(Posted by Anonymous-152692 8 years ago)

How Do U Take Door Off Kitchenaid Dishwasher Kuds30ixss 1
(Posted by meFanste 9 years ago)

Kudk02crbs1 Door Pops Open While Running
(Posted by travelwithnancy 9 years ago)
How To Take The Door Apart On A Kitchenaid Kuds30ixss
(Posted by ajsavamala 10 years ago)

Kitchenaid Dw, Model Kude20ixss 4, Door Is Open, Can't Close, Lock Latch Is Stuc
Looks like the latch mechanism is stuck in the locked position with the door open
Looks like the latch mechanism is stuck in the locked position with the door open
(Posted by strawndan 11 years ago)