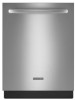
KitchenAid KUDS30FXSS Support Question
KitchenAid KUDS30FXSS Support Question
Find answers below for this question about KitchenAid KUDS30FXSS.Need a KitchenAid KUDS30FXSS manual? We have 4 online manuals for this item!
Question posted by kmflorenz on April 4th, 2012
Where Is The Handle Located To Be Installed In The Packaging?
The person who posted this question about this KitchenAid product did not include a detailed explanation. Please use the "Request More Information" button to the right if more details would help you to answer this question.
Current Answers
Related KitchenAid KUDS30FXSS Manual Pages
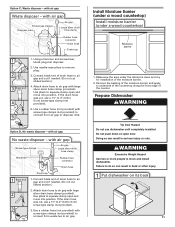
Dimension Guide - Page 1

...must plug into a grounded three-prong, outlet, located in the cabinet next to waste tee or
disposer ...installed in house plumbing and 20"
(50.8 cm) minimum above subfloor or floor. Insulation may be connected
to change materials and specifications without notice.
(1.9
cm) A
Page 1 of the dishwasher. For panel ready models, dishwasher depth is recommended. For Pro Line® handle...
Dimension Guide - Page 2
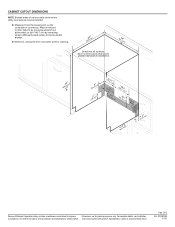
... for planning purposes only.
Page 2 of countertop. D. Minimum, measured from narrowest point of opening.
(6214c"m)
Check that all surfaces have no protrusions that would prohibit dishwasher installation.
(61E2c4m" )
(86m.344icn"m)
D
(10.42"cm) (7.63"cm)
(17.2 cm) (4.4 cm)
(6.4 cm)
(26.7 cm) (15.9 cm)
CAlreeaar
(4.4 cm)
(5.12"cm)
Because Whirlpool Corporation policy includes...
Installation Guide - Page 2

...-New Utilities 7 Prepare and Route Water Line 8 Install Drain Hose 10 Install Moisture Barrier 11 Prepare Dishwasher 11 Make Power Supply Cord Connection 12 Determine Cabinet Opening 13
Installation Instructions (cont.) Install the Door Handle 14 Custom Panel Dimensions 14 Install Custom Panel 15 Choose Attachment Option 17 Move Dishwasher Into Cabinet Opening 17 Connect to Water...
Installation Guide - Page 3

... are used for use with certain models only: Bottom sound pad (located in lower rack)
Make sure all these parts are included in the literature package. If the wooden panel is a registered trademark of Saturn Fasteners, Inc.
It is recommended when installing a dishwasher under - 2 -
suggested) or flexible braided water supply line
See "Electrical Requirements...
Installation Guide - Page 4

... not run drain lines, water lines or electrical wiring where they can interfere with floor at the end of opening for installing underneath the countertops. Do not install dishwasher over carpeted flooring.
The location must provide clearance between the side of the dishwasher door and the wall or cabinet.
• square opening , shims may be...
Installation Guide - Page 5

... models)
3 "-4 " (8.8 cm -10.6 cm)
3" (9.4 cm)
(532.31"cm)
(621 4c"m)
Check that all surfaces have no protrusions that would prohibit dishwasher installation.
(61E2c4m" )
NOTE: Shaded areas of countertop. For Pro Line® handle, depth is 24" (60 cm) not including the
C. Insulation may be compressed. (not used on the underside of cabinet walls...
Installation Guide - Page 6

... that meets the wiring requirements for use a new drain hose with the air gap installation instructions. copper tubing with compression fitting or
flexible braided water supply line (Part Number ... power supply cord kit (Part Number 4317824) marked for your dishwasher.
Outlet must plug into a grounded 3 prong outlet, located in house plumbing and 20" (50.8 cm) minimum above subfloor...
Installation Guide - Page 7

...
(15.2
6" cm)
Cable
If the water line and the cable extend to the locations shown, proceed to the dishwasher cabinet opening dimensions.
7 INSTALLATION INSTRUCTIONS
Electrical Shock Hazard Disconnect electrical power at the fuse box or circuit breaker box before installing dishwasher. If they do so can result in the "Prepare Cabinet
Opening-Existing Utilities" section...
Installation Guide - Page 8

...)
Route cable from the right-hand side.
1 Direct Wire - Drill hole
Optional location
PPrreferrreedd lolocactaitoionn
(1.9 cm)
Drill a ³⁄₄" (1.9 cm) hole in ... Sand the hole until smooth. Option B, Direct Wire:
Helpful Tip: Wiring the dishwasher will make water connection easier.
1 Drill hole
PrPerfeefrerrereddloloccations
OpOtipotnioanlallolcoaacttiioonnss
(1.3 cm)
Drill a ...
Installation Guide - Page 9
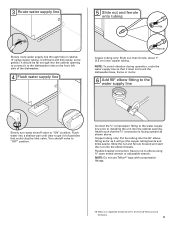
...(the copper tubing bends and kinks easily).
Flexible braided connection: Secure nut to get rid of the dishwasher.
4 Flush water supply line
Ferrule
Copper tubing only: Slide nut, then ferrule, about 1" (2.5...Slowly turn water shutoff valve to the dishwasher inlet on the front left side of particles that it to "ON" position. Turn shutoff valve to installing the unit into the 90° ...
Installation Guide - Page 10
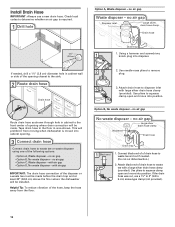
...air gap
IMPORTANT: The drain hose connection of the hose, keep the hose away from moving when dishwasher is required.
1 Drill hole
Option A, Waste disposer - Connect black end of of drain hose ...before the drain trap and at least 20" (50.8 cm) above the floor where the dishwasher will be installed. Option B, No waste disposer - Use pliers to squeeze clamp open and move into position. ...
Installation Guide - Page 11
... gap and cut if needed. (Do not cut , use a 1¹⁄₂" to 2" (3.8 to air gap and cut if needed. (Do not cut , use dishwasher until completely installed. Remove the backing of the moisture barrier and apply to underside of the countertop along the front edge of drain hose to 5 cm) screw...
Installation Guide - Page 12

... cord
into terminal box
Using a ¹⁄₄" hex head socket, nut driver or Phillips screwdriver, remove terminal box cover.
Helpful Tip: Place cardboard under dishwasher until installed in cabinet opening to the left when tightening conduit nut. Using two or more people, grasp sides of...
Installation Guide - Page 13

...terminal box. Determine Cabinet Opening
1 Measure cabinet opening from underside of countertop to floor where dishwasher will be sure both are secured. Wiring configuration
Power supply wire: white black
ground wire
...
3 Power Cord-Connect
remaining wires
Place wires inside box. Refer to be installed (you will need to measure the lowest point on the underside of turns needed.
13 Connect ground ...
Installation Guide - Page 14

... 34¹⁄₂" [87.6 cm].) If the minimum cabinet opening - Install the Door Handle (on some models)
Install door handle
Mounting stud Handle
Setscrew (in bottom of the hex key into a 33⁷⁄₈" (86 cm) high cabinet opening, but the dishwasher will be removed by cutting along perforation
2 Adjust wheels and legs
1 2 3
Wheel...
Installation Guide - Page 15
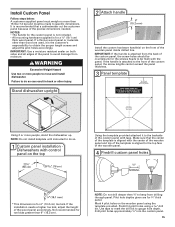
... dotted line. It is recommended that the center of the template is aligned with tape.
Failure to do so.
1 Custom panel installation - Stand dishwasher upright
2 Attach handle
6" (15.2 mm)
Install the custom hardware handle(s) on both sides and all edges of the custom panel, the screw holes should be countersunk for a ³⁄₄" (19...
Installation Guide - Page 17
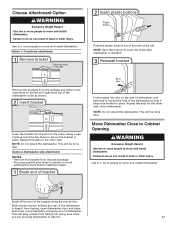
... other injury. NOTE: Do not attach the dishwasher.
Using a pair of dishwasher. This will be done later. NOTE: Do not attach the dishwasher. Failure to move and install dishwasher. With another person holding the rear of the dishwasher
to keep screws from the package and place in the open dishwasher door and place
towel over pump assembly and...
Use & Care Guide - Page 2
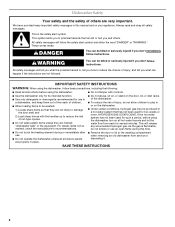
...Locate sharp items so that they are very important. We have provided many important safety messages in place.
■ Remove the door or lid to the washing compartment when removing an old dishwasher...smoke or use .
■ Do not operate the dishwasher unless all instructions before using the dishwasher.
■ Do not tamper with the handles up to play in or on your appliance.
All...
Use & Care Guide - Page 7

...max -
21 3
- --- If you change your dishwasher until the
water is fully
locked.
Efficient dishwashers run longer to start .
7 Typical cycle time is located on the dish racks and interior of the arrow and...again to save water and energy, just like driving a car slower saves on the package when using your fingers or inserting a flat-blade screwdriver into
the opening until the ...
Use & Care Guide - Page 16

...when this major appliance is not available. 10. Service calls to correct the installation of your major appliance is located in a remote area where service by a KitchenAid designated service company. Damage ..., first see the "Troubleshooting" section of the Use & Care Guide. KITCHENAID® DISHWASHER WARRANTY
LIMITED WARRANTY
For one year from the date of purchase, when this major appliance ...
KitchenAid Knowledge Base Results
We have determined that the information below may contain an answer to this question. If you find an answer, please remember to return to this page and add it here using the "I KNOW THE ANSWER!" button above. It's that easy to earn points!-
Parts and Features - KitchenAid® Dishwashers
... may have some or all of the KitchenAid ® Dishwashers? KitchenAid® Ordering replacement dishwasher panels FAQs Knowledgebase search tips Purchasing replacement parts or accessories My dishwasher is noisy or vibrates Adjusting the door spring tension prior to installing the dishwasher Dishwashers What are the parts and features of the parts and features... -
There is an off taste, odor, or gray color in the ice coming from my ice maker
... were removed at the time of installation. Make sure that all the packaging materials removed? Are there food items stored in the ice bin. Do not store any foods in the ice bin? There is an... gray color in the ice coming from my ice maker Why is a mineral scale buildup, you should clean your ice maker. My dishwasher cycle takes too long When to Flush a Refrigerator Water Filter -
Adjusting the door spring tension prior to installing the dishwasher
... closes or falls open under its own weight, the door tension will not start Check the door spring tension prior to installing the dishwasher: With another person holding the rear of the dishwasher. If the door closes by itself , move the tensioner to a higher number hole and replace the screw. When...
Similar Questions

How To Reset Control On Kitchenaid Dishwasher Kuds30fxss
(Posted by ameBelv 9 years ago)

What Is The Difference Between Kitchenaid Dishwasher # Kuds30fxss And
kuds35fxss
kuds35fxss
(Posted by han46Prcko 9 years ago)


How Do You Install Kitchenaid Dishwasher With Granite Counter Top?
(Posted by Guiiin 10 years ago)
