Get support for KitchenAid KUDS03FTSS - Fully Integrated Dishwasher

KitchenAid KUDS03FTSS Support Question

KitchenAid KUDS03FTSS Support Question

Find answers below for this question about KitchenAid KUDS03FTSS - Fully Integrated Dishwasher.
Need a KitchenAid KUDS03FTSS manual? We have 2 online manuals for this item!
Question posted by nyhoo on April 25th, 2013

Removing Decorative Door Panel

Which screws should I remove to take off the decorative door panel from the dishwasher door so I can replace the broken pull?

Current Answers

There are currently no answers that have been posted for this question.
Be the first to post an answer!

Remember that you can earn up to 1,100 points for every answer you submit. The better the quality of your answer, the better chance it has to be accepted.

Related KitchenAid KUDS03FTSS Manual Pages

User Instructions - Page 1

...This is important to help you through any problems you for Choosing KitchenAid® Appliances. DISHWASHER USER INSTRUCTIONS Thank you may encounter. All safety messages will tell you what can be...to reduce the chance of the dishwasher interior. These words mean: DANGER You can find your model and serial number on the label located near the door on your complete model and serial ...
User Instructions - Page 2

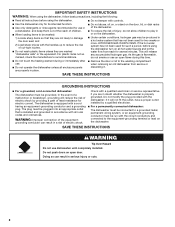
...the risk of electric shock. Do not modify the plug provided with all enclosure panels are marked "dishwasher safe" or the equivalent. Doing so can result in a risk of electric shock by a ...Locate sharp items so that they are properly in place. ■ Remove the door or lid to play in doubt whether the dishwasher is equipped with the handles up to reduce the risk of cut...
User Instructions - Page 3

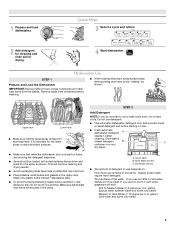
...] Medium to run a wash cycle soon, run a rinse cycle. Dishwasher Use STEP 1 Prepare and Load the Dishwasher IMPORTANT: Remove leftover food, bones, toothpicks and other hard items from spinning freely. ... ■ Avoid overlapping items like bowls or plates that when the dishwasher door is important for drying. 4 Start dishwasher. MAIN WASH WASH ■ Make sure that may trap food. ...
User Instructions - Page 4

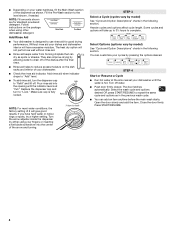
...dishwasher is designed to complete. Add rinse aid when indicator drops to "Add" level. ■ To add rinse aid, turn the dispenser cap to "Lock." Replace... inserting a flat-blade screwdriver into the opening until the water is fully locked. Lock fill - -- 6 5 4 21 3 max -...heat dry option will give good results. The door latches automatically. Select Options (options vary by ...
User Instructions - Page 6

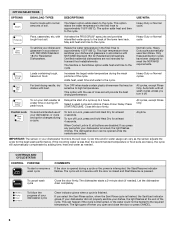
... is lit, all wash cycles unless you open and close the door or press CANCEL. 6 Let the dishwasher drain completely. with heat. Normal cycle. To run your dish washer... cycles, except Rinse Only Control Lock To avoid unintended use of the cycle. The dishwasher door can be opened during a cycle. Activates the PROSCRUB® spray jets and provides intensified...
User Instructions - Page 7

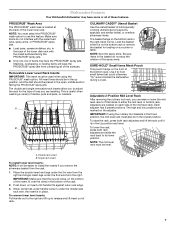
... the rack until handle fits against outer rack edge. 3. Double rack insert B. IMPORTANT: Make sure that could otherwise "fly" around inside the dishwasher during a cycle. To remove lower level inserts: Pull handle out to the right and lift up position, and the dish should be in either the mid level or bottom rack...
User Instructions - Page 8

...items in dishwasher until it slides into dishwasher. Lift removable insert wire to remove from dishwasher. After opening both sides of rack and slide rack back into the holding clips B. To replace the rack... stop to the outside of the track. 3. Removable rack inserts B. Track stop and click into the tracks. 4. Continue to pull rack forward in track and slide the back wheels...
User Instructions - Page 10

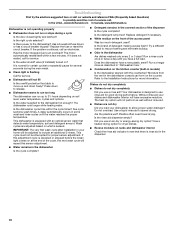
... section of the access panel Was too much detergent used...dishwasher Are dishes washed only every 2 or 3 days? Without rinse aid your dishwasher to see that detects water temperature, soil and detergent amount. Do not overload. Replace...door closed tightly and latched? Is the dishwasher cycle time within a few minutes. This cycle must not be interrupted for service. ■ Dishwasher...
User Instructions - Page 12

...of purchase, when your major appliance, to replace or repair house fuses or to correct house wiring or plumbing. ...on the label located near the door on the right-hand or left-hand side of the dishwasher interior. Service calls to correct...phone number in U.S.A. ITEMS KITCHENAID WILL NOT PAY FOR 1. The removal and reinstallation of your major appliance is installed, operated and maintained ...
Installation Instructions - Page 2

... plumbing national and local codes and ordinances. 2 WARNING Tip Over Hazard Do not use dishwasher until latched. • Observe all governing codes and ordinances. • Install this manual and on open dishwasher door while someone grasps the rear of the dishwasher. Remove shipping materials, drain hose and lower rack. This symbol alerts you don't immediately...
Installation Instructions - Page 3

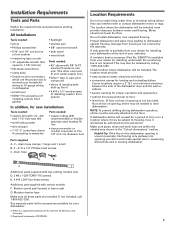
...have it may also be installed must provide clearance between the side of the dishwasher door and the wall or cabinet. • square opening is not covered by calling... • shims (if installed with built-up floor) • 4 #10 x 1/2" wood screws (if installing custom front panels) In addition, for new installations Tools needed : • copper tubing (3/8" recommended) or flexible ...
Installation Instructions - Page 10

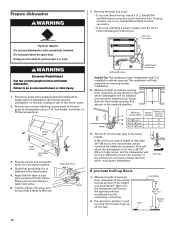
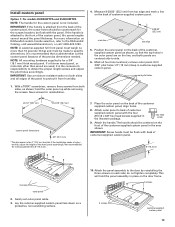
... injury or cuts. Remove panels and set panels aside on open door. Tighten elbow until completely installed. front leg If you are removed, protect the floor when moving the dishwasher. countertop 33-3/4" (85... 10 Remove two screws attaching access panel and lower panel to floor where dishwasher will be removed for that it is at least 33-3/4" (85.7 cm), the dishwasher will ...
Installation Instructions - Page 11

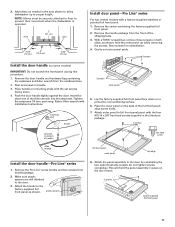
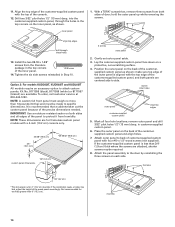
... short end of handle) Allen wrench full front panel outer panel hex head screw top edge Install the door handle-Pro Line® series 1. Attach outer panel to bring dishwasher up while removing the screws. do not tighten screws completely. Push the door handle tightly against the door. Lay the factory-supplied full front panel face down . 4. This will hold the outer...
Installation Instructions - Page 12

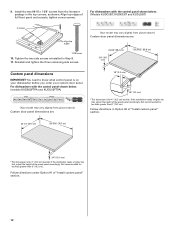
... kick, adjust the height of full front panel and console; Not recommended for 4" (10.2 cm) toe kick. Align top edges of the wood panel accordingly. Follow directions in Step 8. 11. Install the two #8-18 x 1-3/8" screws from picture above .) Custom door panel dimensions are : 1/8" (3.2 mm) 1/8" (3.2 mm) *This dimension is on your dishwasher before you order your custom...
Installation Instructions - Page 13

... on a protective, non-scratching surface. 10. This will hold the outer panel up while removing the screws. IMPORTANT: Use a moisture resistant sealer on the door frame. 3 screws 3 screws customer-supplied custom panel 13 remove outer panel. Attach outer panel to back of customersupplied custom panel with the panel. Attach the handle. do not tighten completely. It is for 4" (10...
Installation Instructions - Page 14

... align holes. 7. hold the outer panel up while removing the screws. Tighten the six side screws reinstalled in the top corners of the precise dimensions needed. Mark all edges of the panel to the door by reinstalling the three screws on the inner panel, as shown; 11. With a TORX® screwdriver, remove three screws from the literature package in Step...
Installation Instructions - Page 15

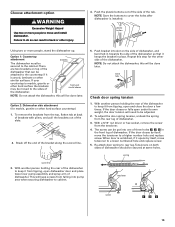
... the door closes by itself , move the tensioner to the cabinet. Option 1: Countertop attachment brackets The dishwasher must be put into one of three holes in back or other injury. 4. The screw can be attached to the sides of the dishwasher so that can be secured to a higher number hole and replace screw. To remove the brackets...
Installation Instructions - Page 16

... the front panel. Tilt dishwasher backwards on wheels and move and install dishwasher. Check that it is plumb. Move dishwasher into twist-on connector. Do not remove insulation blanket -the blanket reduces the sound level. Helpful Tip: Prop up one side of tub. Check that leveling legs are secured. 16 Align front of the door panel. 2. You...
Installation Instructions - Page 18

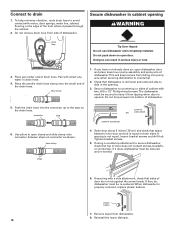
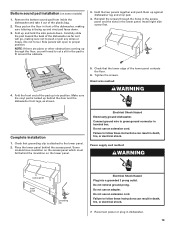
... lowered and re-leveled. 6. Tighten bracket screws. 5. If using a countertop attachment to countertop 6. Connect to keep screws from falling into pump area when securing dishwasher to open clamp and slide clamp onto connector between inner door and tub is properly centered, replace plastic buttons. The dishwasher must be re-centered. Remove towel from side of the hole...
Installation Instructions - Page 19

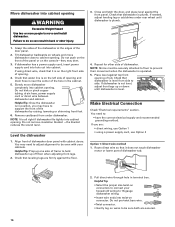
... will go, making sure lettering is attached to green ground connector in dishwasher. 19 Install right side screw first. 4. Fold the front end of the dishwasher, making sure not to push or pull any wires or hoses. (Do not force.) Side panels will open to follow these instructions can result in front of the pad...

KitchenAid Knowledge Base Results

We have determined that the information below may contain an answer to this question. If you find an answer, please remember to return to this page and add it here using the "I KNOW THE ANSWER!" button above. It's that easy to earn points!

  • Using the Solid cycle - Fully visible console
    ...use of children's reach. Remove the key-knob and store it from springing back. If your controls are not fully visible, you may have fully integrated controls. During the Solid&...nbsp;cycle, the ram will stay in use of a bag by putting constant pressure on the compactor control. The indicator on the control panel...
  • Adjusting the door spring tension prior to installing the dishwasher
    ... door panels installed? Check the door spring tension prior to installing the dishwasher: With another person holding the rear of the dishwasher to prevent it opens by itself , move the tensioner to a higher number hole and replace the screw. When the door is not level Dishwasher will need to installing the dishwasher). With a 5/16" nut driver or hex socket, remove...
  • Uploading photos to the display, French Door with Ice Bin in the Door
    ... using a photo editing program. If no button is inserted into the USB port. Remove the USB memory device and replace the cover on the Display, Press PHOTOS and insert the USB memory device. The ...transferred. The refigerator comes with the display screen preloaded with Ice Bin in the Door. The control panel will show the PHOTOS OVERVIEW screen at which time you want to stop  ...

Similar Questions

Ask a New Question
Use the box below to post a new question about this KitchenAid product .
Points & Prizes
  • You can earn points for nearly everything you do on HelpOwl.com
  • You can trade in those points for gift cards at leading retailers such as Amazon.com and Walmart
  • It's that simple!
See How it Works
Create a Free Account

KitchenAid Manuals

Find free KitchenAid KUDS03FTSS - Fully Integrated Dishwasher manuals and user guides available at ManualOwl.com. Try out our unique manual viewer allowing you to interact with manuals from directly within your browser!

KitchenAid Reviews

View thousands of KitchenAid user reviews and customer ratings available at ReviewOwl.com.

Contact Information

Complete KitchenAid customer service contact information including steps to reach representatives, hours of operation, customer support links and more from ContactHelp.com.

Scoreboard Ratings

See detailed KitchenAid customer service rankings, employee comments and much more from our sister site.

KitchenAid Recalls

Find comprehensive KitchenAid recall information updated hourly on RecallOwl.com.