
KitchenAid KUDE20FBSS Support Question
KitchenAid KUDE20FBSS Support Question
Find answers below for this question about KitchenAid KUDE20FBSS.Need a KitchenAid KUDE20FBSS manual? We have 5 online manuals for this item!
Question posted by Acbren on December 19th, 2015
Why Is The Dishwasher Making Extremely Loud Motor Grinding Noise?
after starting the. Dishwasher, the motor makes loud grinding noises and continues a few times during the cycle
Current Answers
Answer #1: Posted by waelsaidani1 on December 26th, 2015 10:02 AM
waelsaidani1

Member since:
May 12th, 2013 Points: 19,501,797

Member since:
May 12th, 2013 Points: 19,501,797
Related KitchenAid KUDE20FBSS Manual Pages
Dimension Guide - Page 1

....
Power supply cord must be connected
to the dishwasher opening. Use ³⁄₈" O.D. copper tubing with the air gap installation instructions. Make sure to use a new drain hose with your home and local codes and ordinances. PRODUCT DIMENSIONS
Because Whirlpool Corporation policy includes a continuous commitment to house plumbing lower than 20" (50...
Installation Guide - Page 2

...the potential hazard is completely enclosed at the time of damage to the power-supply cord. WARNING
Tip Over Hazard Do not use dishwasher until latched.
■ Observe all governing ... Line 8 Install Drain Hose 9 Install Moisture Barrier (under a wood countertop 11 Prepare Dishwasher 11 Make Power Supply Cord Connection 12
Determine Cabinet Opening 14 Install Door Handle (on some models...
Installation Guide - Page 3
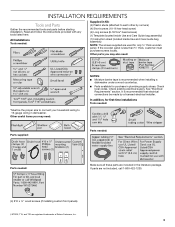
...time installations Tools needed:
Parts supplied:
Parts needed:
Parts needed :
Supplied in Kit: (4) Plastic studs (attached to 16-gauge wiring in dishwasher.... It is less than ³⁄₄" thick, customer must purchase screws locally. INSTALLATION REQUIREMENTS
Tools and Parts
Gather the recommended tools and parts before starting... Tools needed :
Make sure all these parts...
Installation Guide - Page 4

... for installing underneath the countertop. The location where the dishwasher will be installed must be installed. Helpful Tip: Be sure to the floor. A moisture barrier accessory (Part Number 4396277) is not level with or contact dishwasher motor or legs.
If floor at rear of time or in the "Product and Cabinet Opening Dimensions" section...
Installation Guide - Page 6

...resistant to heat and detergent, and fits the 1" (2.5 cm) drain connector of the dishwasher.
■ Make sure to connect drain hose to 862 kPa) water pressure can be installed in conformance ...ordinances. or 20-amp, fused electrical supply.
■ Copper wire only. We recommend:
■ A time-delay fuse or circuit breaker.
■ A separate circuit. A copy of the counter, or be needed...
Installation Guide - Page 8
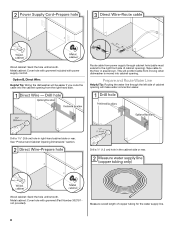
... hole in right-hand cabinet side or rear. Measure overall length of cabinet opening will make water connection easier. This will be easier if you route the cable into cabinet opening ... 302797 not provided).
Option B, Direct Wire:
Helpful Tip: Wiring the dishwasher will prohibit cable from moving when dishwasher is moved into the cabinet opening . Prepare and Route Water Line
Helpful...
Installation Guide - Page 11
....
11
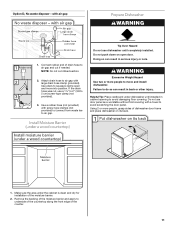
Failure to avoid damaging floor covering.
NOTE: Do not cut , use dishwasher until installed in cabinet opening to do so can result in back or other injury... use door panel as a worktable without first covering with air gap
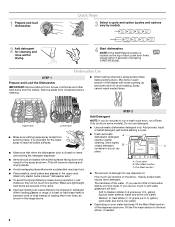
Prepare Dishwasher
WARNING
1. Make sure the area under dishwasher until completely installed. Do not push down on its back.
1. WARNING
...
Installation Guide - Page 12
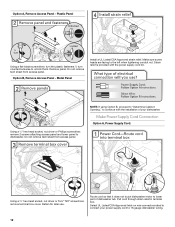
... Panel
Install a UL Listed/CSA Approved strain relief.
Make Power Supply Cord Connection
Option A, Power Supply Cord:
Using a ¹⁄₄" hex-head socket, nut driver or Torx® T20® screwdriver, remove terminal box cover. Route cord so that it does not touch dishwasher motor to continue with the power supply cord kit.
Installation Guide - Page 13
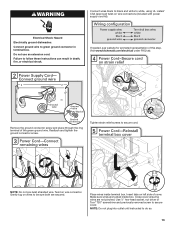
...are secured. Do not use an extension cord.
NOTE: Do not pre-twist stranded wire. Make sure wires are not pinched. Close cover ensuring wires are tucked inside terminal box. Remove the ... and place through the ring terminal of this step. Electrical Shock Hazard
Electrically ground dishwasher.
Use ¹⁄₄" hex-head socket, nut driver or Torx® T20® screwdriver ...
Installation Guide - Page 18

... dishwasher base, frame or motor. Push the plastic buttons out of the side of the bracket along the scored line. NOTE: Do not attach the dishwasher....Dishwasher side attachment: NOTE: Remove the brackets from falling into the cabinet opening. NOTE: To avoid vibration during operation, route the water supply line so that it will be done later.
Slide the nut and ferrule forward and start...
Installation Guide - Page 20
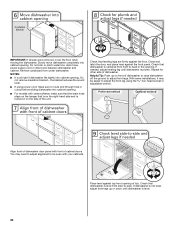
... door, and place level against the floor. Repeat for other side of tub.
Align front of cabinet doors. If dishwasher is level from side-to be easier to adjust the front leg using power cord, make sure to adjust front legs. IMPORTANT: If wheels were removed, cover the floor when moving the...
Installation Guide - Page 22

Make Direct Wire Electrical Connection
NOTE: If the power supply cord was connected earlier, proceed to "Secure Dishwasher in death, fire, or electrical shock. Form bare ground wire ...screw. Do not use an extension cord. Route cable so that it does not touch dishwasher motor or lower part of dishwasher tub. Select UL Listed/CSA Approved twist-on wires to green ground connector in terminal...
Installation Guide - Page 23
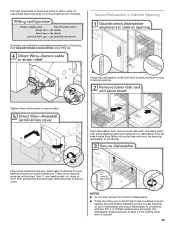
...com/electrical under FAQ tab.
Place wires inside box. Secure Dishwasher in cabinet to avoid splitting the wood before installing screws. Make sure wires are tucked inside terminal box. NOTES: ■ ...and white to white, using UL Listed/CSA Approved twist-on top of dishwasher and secure dishwasher to countertop with two #10 x ¹⁄₂" Phillips-head screws (included)....
Installation Guide - Page 26

...results: This dishwasher is used .
■ Start dishwasher and allow it again. (You must make sure the door is working properly, disconnect power or unplug dishwasher and see your dishwasher washes longer to start the dishwasher?
■ Is the water turned on the hose for good drying performance.
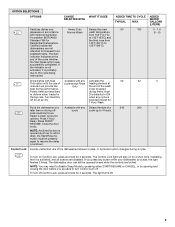
Selecting certain options could increase cycle time past 3.5 hours. Start/Resume light...
Use & Care Guide - Page 4
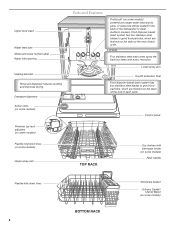
... Caddy® Utensil Baset
(on some models) Four stainless steel wash arms spray the load four times with stemware holder (on some models)
Rack handle
Flexible fold-down tines (on some models)
Upper...blades to grind food particles, which are flushed out the drain at the end of the dishwasher to grind food particles, which are flushed out the drain at the end of each cycle.
Control panel...
Use & Care Guide - Page 6
...reach nested items.
Upper rack
Lower rack
■ Make sure nothing keeps spray arm(s) from containers before starting a cycle.
■ Fresh automatic
A
dishwasher detergent
results in a cool, dry
place. This will...Depending on the items - Wash only plastic items marked "dishwasher safe."
■ To avoid thumping/clattering noises during operation: Load dishes so they do not plan to ...
Use & Care Guide - Page 7
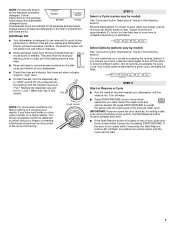
...keeps water from forming droplets that can
Full
dry as driving a car slower saves on gas. Make sure cap is designed to "Add" level.
■ To add rinse aid, turn off the... Add Rinse Aid
■ Your dishwasher is fully
locked. Without rinse aid your dishwasher. max -
21 3
- --- Typical cycle time is hot. Turn off water. ■ Press START/RESUME once to complete depending on the...
Use & Care Guide - Page 9
...
52
0
This option with heat.
If
the indicator is not
activated, it is locked, the light flashes 3 times.
The light turns off - Available with any Delays the start of a
240
240
0
later time or during a cycle.
cycle to the cycle being
interrupted.
105
0 - 1.6
(0 - 6)
Dries dishes with the use of the wash
best drying performance.
The Sani...
Use & Care Guide - Page 11

...push the tine out of the top rack can raise or lower the top rack to make room for chopsticks.
Mix silverware types to adjust.
11 Each adjuster has 2 preset positions...them separated. Follow the same instructions to keep the ProScrub® spray jets from the dishwasher.
1. Dishwasher Features
Your KitchenAid dishwasher may have 1 or 2 rows of flexible tines located in the back of the ...
Use & Care Guide - Page 14
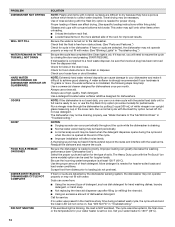
...on to resume the cycle by closing the door and pressing START/RESUME. Check for proper drying.
Run a vinegar rinse through the dishwasher by putting 2 ...Extremely hard water mineral deposits can affect drying. (See specific loading instructions within this guide.) Glasses and cups with water. A water softener is strongly recommended if your water heater is at any time during the cycle...
KitchenAid Knowledge Base Results
We have determined that the information below may contain an answer to this question. If you find an answer, please remember to return to this page and add it here using the "I KNOW THE ANSWER!" button above. It's that easy to earn points!-
Dishwasher Efficiency Tips
... it may be washed using these options. Use cycles or options that describes the most difficult soil in your dishwasher with a water softener, avoid starting the dishwasher when the water softener is in the regeneration cycle because it enters the dishwasher. Hot water dissolves and activates the dishwashing detergent. Hot water also dissolves grease on... -
Care and cleaning of the disposer
...continuous-feed waste disposer To order Affresh Dishwasher and Disposer Cleaner, Go Here Use a baking soda mix. cup (56.7 g) baking soda with a scouring pad. Clearing a jammed disposer Food soil left on the dishes in sink opening and clean underside of splash baffle and inside upper lip of grind...nbsp;which makes it easy to grind them into...water. Over time, a brown discoloration ... -
Washer will not start - Front-load washer
...continues to continue. The washer will not start - Reinstall hoses, turn off the water and remove the inlet hoses from the factory with four bolts, which are designed to start . The door must be opened between cycles...all of tumbling and soaking. Some cycles feature periods of the shipping bolts, and the four plastic spacers that are turned on. Make sure to open both...
Similar Questions


Why Does The Dishwasher Still Have Water In It After A Cycle Is Over?
We do not have a garbage disposal.
We do not have a garbage disposal.
(Posted by idezine 11 years ago)

Our Kitchenaid Kuds301xss Dishwasher Stops In The Middle Of An Wash Cycle.
Our Kitchenaid KUDS301XSS dishwasher stops in the middle of an wash cycle. No power is on the panel ...
Our Kitchenaid KUDS301XSS dishwasher stops in the middle of an wash cycle. No power is on the panel ...
(Posted by tganagnos 11 years ago)

Grinding Noise
it is making a grinding noise as it starts the washing cycle & continues all during the entire w...
it is making a grinding noise as it starts the washing cycle & continues all during the entire w...
(Posted by bwt6n 11 years ago)
Our Kitchenaid Kuds301xss Dishwasher Stopped In The Middle Of An Wash Cycle.
Our Kitchenaid KUDS301XSS dishwasher stopped in the middle of an wash cycle. No power is on the pane...
Our Kitchenaid KUDS301XSS dishwasher stopped in the middle of an wash cycle. No power is on the pane...
(Posted by macgolfn18 11 years ago)