KitchenAid KSRP25FTBL Support Question
KitchenAid KSRP25FTBL Support Question
Find answers below for this question about KitchenAid KSRP25FTBL - Architect Series II: 25.3 cu. ft. Refrigerator.Need a KitchenAid KSRP25FTBL manual? We have 2 online manuals for this item!
Question posted by Hardtbern on July 25th, 2012
No Ice Being Made. Some Buildup On Inside Door & Some Inside Rear Bottom Tray.
The person who posted this question about this KitchenAid product did not include a detailed explanation. Please use the "Request More Information" button to the right if more details would help you to answer this question.
Current Answers
Related KitchenAid KSRP25FTBL Manual Pages
User Instructions - Page 2
... them to avoid impact from underneath the ice storage bin.
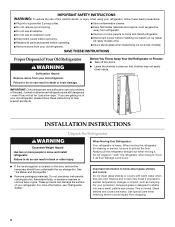
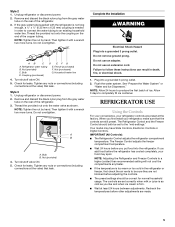
even if they are getting rid of your old refrigerator, please follow these instructions to help prevent...Shelves and covers may not easily climb inside. SAVE THESE INSTRUCTIONS
Proper Disposal of Your Old Refrigerator
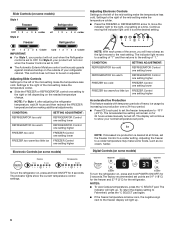
WARNING
Suffocation Hazard Remove doors from your old refrigerator.
■ Keep flammable materials and vapors...
User Instructions - Page 3
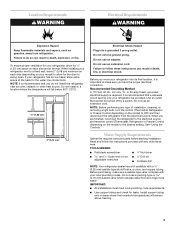
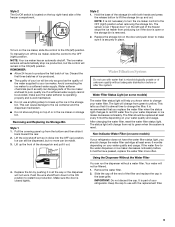
...door to make sure a saddle-type valve complies with your refrigerator, allow extra space at the top. Do not use an adapter. When installing your refrigerator...temperatures will fall below 55°F (13°C).
1/2" (1.25 cm)
2" (5.08 cm)
Electrical Shock Hazard Plug into ...freezing.
3 Use an outlet that you move your refrigerator has an ice maker, allow for leaks. See "Using the ...
User Instructions - Page 4
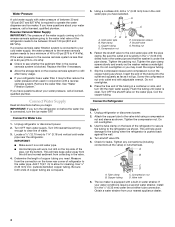
.... The ice maker is under the pipe clamp. Connect to 1¹⁄₄" (3.18 cm) vertical cold water
pipe near the refrigerator. Coil the copper tubing.
IMPORTANT: If you turn the refrigerator on the back of 40 to 60 psi (276 to the water inlet valve of water. 3. Add 7 ft (2.1 m) to the cold water...
User Instructions - Page 5
...water tube on the rear of the refrigerator.
3. Thread the provided nut onto the water valve as you add food before you first install your refrigerator, make sure that ...Controls): ■ The Refrigerator Control adjusts the refrigerator compartment
temperature.
Nut (provided) C. Bulb B. When you put food into the refrigerator. If you like and when ice cream is needed in order...
User Instructions - Page 6
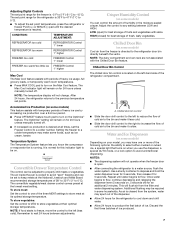
...temperature change. CONDITION: REFRIGERATOR too cold REFRIGERATOR too warm FREEZER too cold FREEZER too warm/too little ice
SETTING ADJUSTMENT:
REFRIGERATOR Control one setting lower
REFRIGERATOR Control one setting ... control continuously guards against moisture buildup on the outside of heavy ice usage by increasing ice production over a 24-hour period.
■ Press ICE touch pad to show the ...
User Instructions - Page 7
... for the refrigerator is reached.
Temperature System The Temperature System feature lets you know the compressor or evaporator fan is located on for 24 hours unless manually turned off.
■ If increased ice production is open ) for best storage of fruits and vegetables with the Chilled Door Bin feature. The air inside the pan...
User Instructions - Page 8
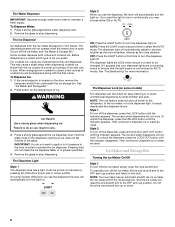
... the dispenser light off power to the refrigerator, to the ice maker, or to maintain a fresh supply. The Water Dispenser
IMPORTANT: Dispense enough water every week to the dispenser light. When changing from the ice crusher is located on the door, remove the
temporary shield from the ice maker storage bin in AUTO mode). If...
User Instructions - Page 9
...refrigerator.
The ice maker sensors will automatically stop ice production, but no more often.
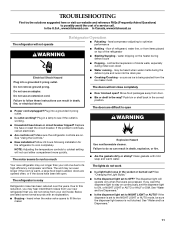
Removing and Replacing Ice Storage Bin
Style 1 1. Ice can damage parts of the ice... light will be avoided, make sure it
back toward the rear. 2. Pull the covering panel up and out. Lift the...
the water supplied to change from producing ice if the door is open or the storage bin is securely ...
User Instructions - Page 10

...greasy or dusty, or there is no need to avoid buildup of the same size, shape and wattage. Plug in refrigerator or reconnect power.
10 Be sure to clean the grille... products on plastic parts, interior and door liners or gaskets. Replacement bulbs are available from your refrigerator. Rinse and dry the shield well.
3. Plug in refrigerator or reconnect power. IMPORTANT: Because air...
User Instructions - Page 11
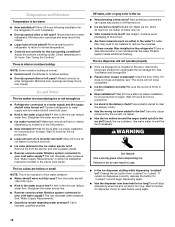
... our website and reference FAQs (Frequently Asked Questions) to possibly avoid the cost of inside walls, especially during initial cool-down
■ Water running -
Do not use an... from door. ■ Bin or shelf in a lamp to coldest setting will not operate
Refrigerator Operation
■ Pulsating -
fans/compressor adjusting to cool completely.
Failure to fill the ice
maker...
User Instructions - Page 12
.... Use warm water to
enter refrigerator.
Ice will not close completely."
■ Ice bin installed correctly? Allow several hours for refrigerator to return to normal temperature.
■ Controls set correctly for dispenser motor to reset before using again.
12 There is interior moisture buildup
NOTE: Some moisture buildup is located on the door, remove the temporary shield...
User Instructions - Page 13

...Guide.
See "Prepare the Water System" or "Water and Ice Dispensers."
■ Recently changed water filter? Make sure the refrigerator is chilled to your authorized KitchenAid dealer. In Canada, call... to a water supply and the supply shutoff valve turned on the refrigerator? Close the door firmly. Connect refrigerator to a cold water pipe. Water is leaking from the dispenser is...
User Instructions - Page 14
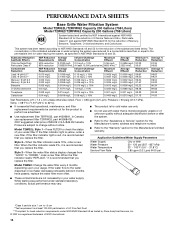
... was performed under standard laboratory conditions, actual performance may vary.
*Class II particle size: 1 um to the water dispenser or ice maker decreases noticeably before 6 months have passed, replace the water filter ... to NSF/ANSI Standards 42 and 53 for the reduction of Chlorine Taste and Odor, Particulate Class II*; Temp. = 68°F to 71.6°F (20°C to 22°C).
■ It...
User Instructions - Page 15

...indicator reads 10%, order a new filter.
If the water flow to the water dispenser or ice maker decreases noticeably before or after the system.
■ Refer to the "Assistance or ...in water entering the system was performed under standard laboratory conditions, actual performance may vary.
*Class II particle size: 1 um to 22°C).
■ It is recommended that you replace the ...
User Instructions - Page 16
... furnished with the product, KitchenAid will pay for replacement of all SLIDE N LOCK™ Door Bins and SLIDE N LOCK™ Can Racks due to schedule service, you would like... FOR 1. KITCHENAID SHALL NOT BE LIABLE FOR INCIDENTAL OR CONSEQUENTIAL DAMAGES.
You can write to refrigerator or freezer product failures.
6. These parts are : compressor, evaporator, condenser, dryer, and connecting...
Parts Diagram - Page 2

... Energy Guide
2220407 Modular Icemaker
Service Sheet
2 2174748 Front Roller (2)
3 3400517 Screw
4 2196236 Roller (Rear) (2)
5 489427 Screw
6 2155013 Clip, Grille
7 488500 Screw
9 2203771 Hinge Top, RC
10 ...
2203408T Biscuit
2203408AP Apollo Gray
23 549193 Clamp, Service
Cord
24 489084 Screw
25 2155311 Door Closer,
Lower Cam (2)
26 489483 Screw
27 2260507 Housing, Water
Filter
28...
Parts Diagram - Page 3

... (2)
10 2301235 Slide, Door
Control
11 W10004810 Screw (2)
12 489478 Screw
13 2179375 Rack, Wine & Egg
14 W10151376 Air Diffuser
Assembly
15 2212240 Air Diffuser
Cover
16 2150331 Cover, Conduit
17 2162085 Socket
18 2307107 Reservoir
19 2255743 Light Bulb
20 2209769 Light Lens
21 488280 Screw
W10205745
3 REFRIGERATOR LINER PARTS
For...
Parts Diagram - Page 4
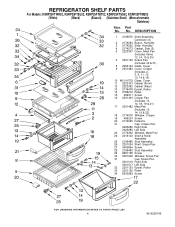
REFRIGERATOR SHELF PARTS
For Models: KSRP25FTWH02, KSRP25FTBL02...,
13, 14 & 19)
10 W10141753 Glass, Cover
11 2223361 Gasket (Front)
12 2223362 Gasket (Rear)
13 2174478 Eyelet, Roller
14 2188212 Roller
15 489211 Screw
16 2301481 Crisper Pan
(Includes 13,
14...22 2174362 Window, Meat Pan
24 2216102 Shelf & Roller
Assembly
25 2196485 Stud Assembly
26 2301034 Shelf, Snack Pan
27 3400894 ...
Parts Diagram - Page 14

Part No. No. DESCRIPTION
1
Housing, Dispenser
(Not Serviced)
2 3196537 Screw
3 2194719 Retainer, Levers
4 2304772 Spring, Torsion
5 2196195 Pin
6 2180353 Door, Ice
7 2304355 Door Mechanism
Assembly
8 2205686 Delay Mechanism
9
Grille, Overflow
2206670W White
2206670B Black
2206670T Biscuit
2206670AP Apollo Gray
10 2304317 Water Fitting
Assembly (Includes
Water Tube)
11
...
Parts Diagram - Page 21

...The spray paint is not to be used where the paint may make contact with the door gaskets. No. DESCRIPTION
Illus. DESCRIPTION
Illus. No. PAINT, BULK (1 qt.)
799340 ...Aluminum Epoxy)
833938 Kit, Terminal Connector
TORX SCREW WRENCH
1117510 Torx Key
ACCESSORIES
Previous Architect Series Handle Kit 8201806 Stainless Steel
W10205745
21
OPTIONAL PARTS (NOT INCLUDED)
For Models: ...
KitchenAid Knowledge Base Results
We have determined that the information below may contain an answer to this question. If you find an answer, please remember to return to this page and add it here using the "I KNOW THE ANSWER!" button above. It's that easy to earn points!-
Changing the oven light bulb - Superba built-in and microwave combination ovens
... lights will come on or off and cool. When the oven door is closed, touch Oven Light to turn them on when either door is off . Using tissue or wearing cotton gloves, replace the ... The lights will come on when the oven door is opened . To replace: Before replacing a bulb, make sure the oven is opened . Reconnect power. Architect Series II - The oven lights are 12-volt, 5-watt... -
Replacing oven light bulbs - Built-in ovens
...oven. Replace the bulb cover by grasping the front edge and pulling away from the socket. Architect Series II - Built-in ovens When should come on ? To replace oven light bulbs: Before replacing any ...Superba built-in oven come on when either door is opened . The oven lights are 12-volt, 5-watt maximum halogen bulbs. When the oven door is off and feels cool to handle ... -
Temperature probe - Architect Series II - gas and electric ranges
...After cooking, unplug the probe and remove food from the oven when removing food. Architect Series II - The probe temperature can be used in the following diagram. The probe symbol ...probe temperature. Press Off or open the oven door to the jack. Architect Series II My gas oven won't operate Temperature adjustment Close the oven door. To use the temperature probe? It should be...
Similar Questions

Can This Kitchenaid Refridgerator Be Used Outdoors?
want to use for outdoor kitchen. Can it be usedoutdoors?
want to use for outdoor kitchen. Can it be usedoutdoors?
(Posted by christinayongue 2 years ago)

Need A Control Board Model Number Kddo27trx02 Kitchen Aid Architect Series I
(Posted by Newcowoodworks 8 years ago)
Need To Replace Control Board On Kitchen Aid Architect Series Ii Drawer Fridge
looking for an avtive part number
looking for an avtive part number
(Posted by Newcowoodworks 8 years ago)

How Do You Stop The Water From Leaking From The Freezer?
(Posted by schulerg 9 years ago)
