KitchenAid KSB5 Support Question
KitchenAid KSB5 Support Question
Find answers below for this question about KitchenAid KSB5.Need a KitchenAid KSB5 manual? We have 1 online manual for this item!
Question posted by abcdetkooy on July 24th, 2012
Kitchen Aid Ksb5er Blender Base Change
Ordered part number 9704254 replacement base (red) for our KSB5ER KitchenAid blender. The part sent has completely different threads where the glass container mates up than the original part. The original part has tripple threads that require only 120 degrees of rotation or lock in place. The replacemnt part has a single thread with three complete thread rotations. Is this a design change that will require the upgraded glass container?
Current Answers
Related KitchenAid KSB5 Manual Pages
Instructions and Recipes - Page 1

5 SPEED ULTRA POWER®
BLENDER
INSTRUCTIONS AND RECIPES
1-800-541-6390 Details Inside
®
FOR THE WA1Y IT'S MADE.™
Instructions and Recipes - Page 2
...not verify your KitchenAid® blender should fail ...replacement unit will assure you use the carton and packing materials to pack-up your "failed" blender returned to have your "failed" blender. Give the consultant your personal records:
Model Number Serial Number Date Purchased Store Name Please follow these instructions to 8 p.m., Monday through Friday, 10 a.m. Please complete...
Instructions and Recipes - Page 3
... Ordering Accessories and Replacement Parts 4 Electrical Requirements 5 Troubleshooting Problems 5 Blender Features 6 Assembling Your Blender 7 To Operate Your Blender 9 Speed Control Guide 11 Care and Cleaning 11 Blender Tips...UNIQUE CONTAINER AND BLADE DESIGN, READ THESE INSTRUCTIONS AND RECIPES BEFORE USING YOUR NEW KITCHENAID® BLENDER TO ACHIEVE MAXIMUM PERFORMANCE RESULTS.
1
Instructions and Recipes - Page 4

... safety precautions should always be used by KitchenAid may cause a risk of injury to reduce the chance of injury, and tell you don't follow instructions. Unplug from outlet when not in use outdoors. 8. Do not operate the blender with cover in this manual and on base without jar properly attached. 12. Do not...
Instructions and Recipes - Page 5
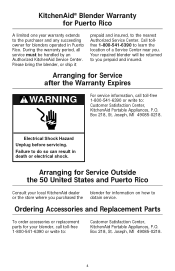
... date of Warranty:
One Year Full Warranty from accident, alteration, misuse or abuse. Any shipping or handling costs to deliver your blender.
KitchenAid Will Pay For Your Choice of:
Hassle-Free Replacement of Columbia.
Replacement parts or repair labor costs for service, or call the Customer Satisfaction Center toll-free at 1-800-541-6390.
Instructions and Recipes - Page 6
..., or ship it
prepaid and insured, to :
Customer Satisfaction Center, KitchenAid Portable Appliances, P.O. Electrical Shock Hazard Unplug before servicing. Ordering Accessories and Replacement Parts
To order accessories or replacement parts for your local KitchenAid dealer blender for information on how to learn the location of a Service Center near you purchased the obtain service. Your...
Instructions and Recipes - Page 7
.... If you have a circuit breaker box, be corrected with the above steps, see the KitchenAid Warranty on page 3. Do not return the mixer to operate, please check the following:
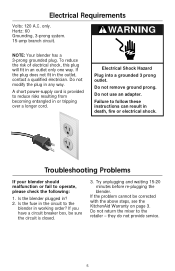
1....and waiting 15-20 minutes before re-plugging the blender. Do not use an adapter. WARNING
NOTE: Your blender has a 3-prong grounded plug. Is the blender plugged in working order? A short power-supply cord is closed.
...
Instructions and Recipes - Page 8
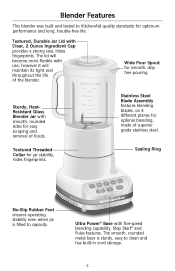
... steel.
Textured Threaded Collar for optimum performance and long, trouble-free life. Sealing Ring
No-Slip Rubber Feet ensures operating stability even when jar is sturdy, easy to capacity. The smooth, rounded metal base is filled to clean and has built-in cord storage.
6 ml
liters
1000
1
Sturdy, HeatResistant Glass Blender Jar with use...
Instructions and Recipes - Page 9

... water. Place lid onto blender jar.
3. ml 1000
liters 1
750
3
4
500
1
2
250
1
4
7 Place the blade assembly with a soft cloth. Assembling Your Blender
1. Place the small sealing ring on the blade assembly.
5. Before assembling your blender wipe blender base with a warm sudsy cloth, then wipe clean with a damp cloth. Be sure to engage threads properly and securely.
Instructions and Recipes - Page 10
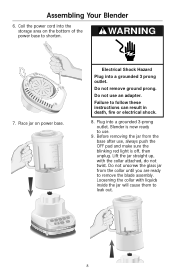
...grounded 3 prong outlet. Loosening the collar with the collar attached, do not twist. Do not remove ground prong.
Blender is off, then unplug. Lift the jar straight up, with liquids inside the jar will cause them to use an... adapter. Do not unscrew the glass jar from the base after use, always push the OFF pad and make sure the blinking red light is now ready to leak out. ...
Instructions and Recipes - Page 11
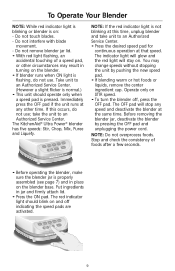
... Operate Your Blender
NOTE: While red indicator light is blinking or blender is properly assembled (see page 7) and in place on the blender base.
Put ingredients in jar and firmly attach lid.
• Press the ON pad. Stop and check the consistency of a speed pad, or other time. The KitchenAid® Ultra Power® blender has five...
Instructions and Recipes - Page 12
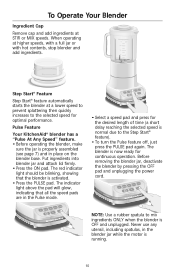
...® feature automatically starts the blender at STIR or MIX speeds. Pulse Feature
Your KitchenAid® blender has a "Pulse At Any Speed" feature. • Before operating the blender, make
sure the jar is now ready for continuous operation. The blender is properly assembled (see page 7) and in place on the blender base. Ultra Power
Stir
Chop Mix...
Instructions and Recipes - Page 13

... give better results. No liquid needs to 14 standard ice cubes at any speed. Disassemble blender container
parts and wash in automatic dishwasher. 2. NOTE: Always correctly assemble clean blender parts before storing on the bottom of the power base for processing, occasional stirring with warm, sudsy cloth; Puree
Pureed meat/Baby food meat . Ice...
Instructions and Recipes - Page 14
... pieces about 11⁄2 inches in diameter. Place in same ways you can of water in order to 3 cups at a time versus 1-cup portions.
• For many ingredient mixtures, start...at LIQUEFY, pulsing a few times, about 10 to combine the ingredients thoroughly.
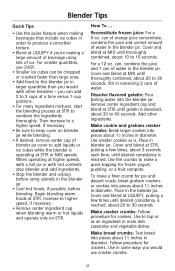
Use in blender jar. Blender Tips
Quick Tips
• Use the pulse feature when making a large amount of beverage using...
Instructions and Recipes - Page 15

...about 5 to 20 seconds longer.
For complete cleaning, wash all gaskets separately.
13
Puree vegetables: Place 2 cups canned or cooked vegetables in blender jar. Add 2 to 4 tablespoons ...blender jar: Fill blender jar one-third to 1-inch cubes. Rinse and dry. Blender Tips
How To ... scrape sides of blender jar. Grate cheese: Cut very cold cheese into saucepan and cook as a base...
Instructions and Recipes - Page 16

... 4 to 6 times, about 10 seconds each time, until slushy.
Scrape sides of blender jar, if necessary.
COCKTAILS
Cranberry Frosty
2 cups cranberry juice cocktail
1 cup orange juice...
3⁄4 cup vodka
2 tablespoons lime juice
2 cups small ice cubes
Place ingredients in blender jar. Per serving: About 159 cal, 0 g pro, 20 g car, 0 g fat, 0 mg chol, ...
Instructions and Recipes - Page 17

...tablespoons simple syrup or 11⁄2 tablespoons sugar
Place 11⁄2 cups champagne and strawberries in blender jar.
Yield: 10 (1⁄2 cup) servings.
Yield: 6 (3⁄4 cup) servings. ... to 2 tablespoons milk to thin to 30 seconds. Year-Round Nog
4 cups lowfat milk
1 container (4 oz.) refrigerated egg substitute or 2 pasteurized eggs, beaten
2 tablespoons rum or brandy, if ...
Instructions and Recipes - Page 18

... small non-stick skillet over medium-high heat.
Place remaining ingredients in blender jar. Add green onions, corn, red pepper, cilantro, and beans to 15 seconds; Cook and stir until ...until mixed, about 2 minutes.
Yield: 2 cups; 32 (1 tablespoon) servings. scrape sides of blender jar, if necessary. Cover and blend at STIR until smooth, about 10 to 15 seconds. Remove...
Instructions and Recipes - Page 19
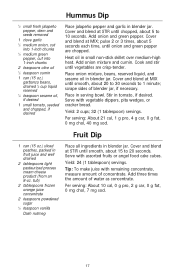
...desired
1 small tomato, seeded and chopped, if desired
Place jalapeño pepper and garlic in blender jar. Serve with vegetable dippers, pita wedges, or cracker bread.
Cover and blend at STIR ...seconds to 10 seconds. Add onion mixture and cumin. scrape sides of concentrate. Stir in blender jar.
Place onion mixture, beans, reserved liquid, and sesame oil in tomato, if desired...
Instructions and Recipes - Page 20
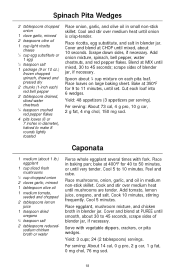
Scrape down sides, if necessary. scrape sides of blender jar, if necessary. Cut each ) red bell pepper
2 tablespoons drained, sliced water chestnuts
1⁄4 teaspoon crushed red pepper flakes
4 pita loaves (6 or 7 inches in diameter), halved to 45 seconds;
Place mushrooms, onion, garlic, and oil in blender jar. Serve with fork. Blend at PUREE until smooth...
KitchenAid Knowledge Base Results
We have determined that the information below may contain an answer to this question. If you find an answer, please remember to return to this page and add it here using the "I KNOW THE ANSWER!" button above. It's that easy to earn points!-
Handling immersion blender
... Saturday 10am-5pm, Saturday, Eastern Standard Time. For best blending results follow these recommendations: Hold the Immersion Blender at an angle Move the Immersion Blender up and down on the mixture when operating the Immersion Blender. Do not pound down within the container. Handling immersion blender What is the correct way to hold the Immersion... -
Coupler failure.
... any of the buttons in less time. If your blender's life. 1. They offer repair, and also sell parts and instructions. The black part on the base of the global blender is broken. Pulsing a few times before the blades have completely stopped spinning. This makes for a smoother result in use. To... -
Unable to upload photos to the display, French Door with Ice Bin in the Door
..., downloads can choose to continue the uploading process or stop uploading?' Photo names containing "." (dot) in the file name are pressed the "Do you attempt to... compatible USB drive identified", ensure that have completely transferred. If the USB memory device is inadvertently removed during uploading. Side by side refrigerator kitchen.aid.jpg). You can only be uploaded. ...
Similar Questions

Kitchen Aid Khb100wh1 Immersive Blender. Blade Part Available?
(Posted by nickganaway 3 years ago)

How To Change Rubber Clutch Coupling On A Kitchenaid Blender Model Ksb560mco
(Posted by jbros11djde 10 years ago)

Kitchen Aid Ksb560er1 120v 6amp 60hz On 220v?
Is it possible to switch the power supply of the 120V version blender to 220V to use it in europe? ...
Is it possible to switch the power supply of the 120V version blender to 220V to use it in europe? ...
(Posted by gerdseemanndr 11 years ago)

My Kitchenaid Ksb5 Blender Started Smoking And Lights Flashed.
I disassembled the housing and motor to check for any evidence of damage but don't see anything. At ...
I disassembled the housing and motor to check for any evidence of damage but don't see anything. At ...
(Posted by gomeril 12 years ago)

Kitchen Aid Ksb5-er4 Blender
I was given a Kitchen Aid Model KSB5-ER4 blender. I wanted to know what its original retail value wa...
I was given a Kitchen Aid Model KSB5-ER4 blender. I wanted to know what its original retail value wa...
(Posted by ecp45 13 years ago)