KitchenAid KRSF505ESS Support Question
KitchenAid KRSF505ESS Support Question
Find answers below for this question about KitchenAid KRSF505ESS.Need a KitchenAid KRSF505ESS manual? We have 4 online manuals for this item!
Question posted by Adelineaguilar62 on February 3rd, 2020
Fridge Is Not Level
The person who posted this question about this KitchenAid product did not include a detailed explanation. Please use the "Request More Information" button to the right if more details would help you to answer this question.
Current Answers
Answer #1: Posted by waelsaidani1 on February 3rd, 2020 10:30 PM
waelsaidani1

Member since:
May 12th, 2013 Points: 19,501,787

Member since:
May 12th, 2013 Points: 19,501,787
Check to make sure the floor under the refrigerator is level. If the floor is not level shims may need to be used to properly level the refrigerator.
If the refrigerator pulls out, rocks or is not stable CLICK HERE for troubleshooting
Related KitchenAid KRSF505ESS Manual Pages
Dimension Guide - Page 1
... radiator.
3³⁄₄" (9.5 cm)
Because Whirlpool Corporation policy includes a continuous commitment to improve our products, we reserve the right to swing open.
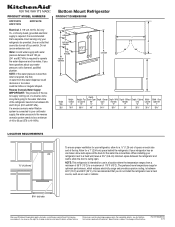
Bottom Mount Refrigerator
PRODUCT DIMENSIONS
I "
26.8
70C⁄v"
68C⁄v"
49"
54C⁄v"
36B⁄,"
34"
29M⁄,"
35B⁄," 39B⁄,"
LOCATION REQUIREMENTS
¹⁄₂" (1.25...
Warranty Information - Page 1
... and maintained according to instructions attached to or furnished with published user, operator or installation instructions.
2. Food or medicine loss due to chemicals.
9. KITCHENAID® REFRIGERATION LIMITED
WARRANTY
ATTACH YOUR RECEIPT HERE. In the event of Whirlpool Corporation or Whirlpool Canada LP (hereafter "KitchenAid") will pay for factory specified replacement parts...
Use & Care Guide - Page 2
... Each appliance that leaves our factory is inspected thoroughly to Water Line 11 -
Remove Left-Hand Refrigerator Door 7 - Final Steps 8 Remove and Replace Freezer Drawer Front 9 - Replace Drawer Front 9 - Remove and Replace Handle Medallions 13 Refrigerator Leveling, Door Closing and Alignment 13
FILTERS AND ACCESSORIES 15 Water Filtration System 15 - Installing the Produce...
Use & Care Guide - Page 3
...safety messages. Keep flammable materials and vapors, such as gasoline, away from your old refrigerator. Use two or more chemicals known to the State of California to potential hazards that... to reduce the chance of injury, and tell you and others are getting rid of your refrigerator, follow instructions.
Always read and obey all parts and panels before operating. All safety messages ...
Use & Care Guide - Page 4
...odor, particulates (class I . The measured fill feature allows you know that the refrigerator has been without power.
4
Since no air is eliminated. Freezer drawer
H. You...Ice maker
B. Energy and Normal Operating Sounds
Water Filter
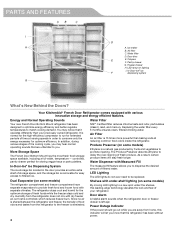
Your new French Door Bottom Mount refrigerator has been designed to optimize energy efficiency and better regulate temperatures to a new spot under...
Use & Care Guide - Page 5
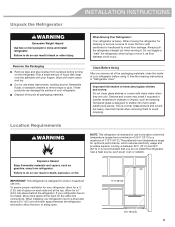
... explosion, or fire. It is recommended that you remove all packaging materials. IMPORTANT: This refrigerator is normal. If your refrigerator next to a fixed wall, leave a 3³⁄₄" (9.5 cm) minimum space ...Shelves and covers may break if exposed to a maximum of space on the refrigerator.
Glass shelves and covers are cold. Failure to shatter into many small, pebble-...
Use & Care Guide - Page 6

... the following instructions. Hinge Cover Screw C. Outer Ring
Top Left Hinge
A
B
C
A Internal hex-head Screws B. Outer Ring
Wiring Plug
A
A. Screws (Do Not Remove)
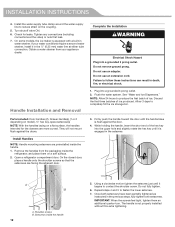
6 Unplug the refrigerator or disconnect power. TOOLS NEEDED hex-key wrench and a #2 Phillips screwdriver
WARNING
Electrical Shock Hazard Disconnect power before removing doors. If door removal is necessary...
Use & Care Guide - Page 8
...of the plug apart. With your left -hand door hinge).
2.
A
B
Replace Left-Hand Refrigerator Door
IMPORTANT: Do not intertwine the water tubing and wiring bundles when reconnecting them. 1. Style...you align the hinge when you are being removed.
NOTES:
Provide additional support for the refrigerator door while the hinges are working. Insert the tubing into place between the fitting and ...
Use & Care Guide - Page 9

...
WARNING
Electrical Shock Hazard Plug into the freezer. Reset the controls. Two people may be necessary to remove the freezer drawer front to move the refrigerator into your door opening, it may be required to remove and replace the freezer drawer front. Holding the drawer front by its full extension. Lift...
Use & Care Guide - Page 10

... the filter if necessary. The tank capacity could be turned off -taste or odor in your refrigerator has a water filter, it is important to the water inlet valve of copper, we recommend the...household water line) is blocked. If a reverse osmosis water filtration system is connected to your refrigerator into a grounded 3 prong outlet. If your ice or water.
NOTE: Before performing any ...
Use & Care Guide - Page 11
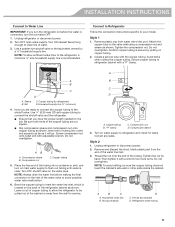
...to the valve inlet using a compression nut and sleeve as shown. NOTE: To allow the refrigerator to be sure the copper tubing does not touch the cabinet's side wall or other parts ... short, black plastic part from the end of copper tubing to allow sufficient water flow to the refrigerator, a minimum ¹⁄₂" size household supply line is connected, turn the ice maker OFF...
Use & Care Guide - Page 12
... both setscrews have been partially tightened as instructed in death, fire, or electrical shock. Open a refrigerator compartment door. A B
A. IMPORTANT: When the screws feel tight, tighten them on a soft surface... first three batches of ice. Obtain a water strainer from the packaging inside the
refrigerator, and place them an additional quarter-turn. Firmly push the handle toward the door...
Use & Care Guide - Page 13

... that the setscrews are snug against the drawer.
11. Shoulder screw B. Setscrews inside the handle
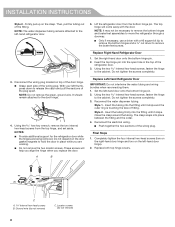
10. For some models, repeat steps 9 through 7 to keep the refrigerator level.
13 A
12. Using a left to right motion tighten the setscrew a quarter-turn at a time.
3. Do not fully tighten.
13.
Lower the brake feet, by turning...
Use & Care Guide - Page 14
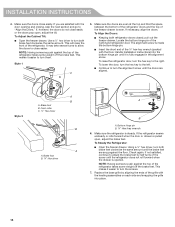
... the short end of the ¹⁄₈" hex-key wrench (packed with the leveling assemblies on each side and snapping the grille into the bottom hinge pin until the doors... Doors." Make sure the doors are aligned.
Using a ¹⁄₄" hex driver, turn both refrigerator doors closed, pull out the freezer drawer. NOTE: Having someone push against the top of the grille ...
Use & Care Guide - Page 27

... temperature, preset food icon will light up. Push the metal glide rails to remove. 3. REFRIGERATOR FEATURES
To remove the crisper(s) cover: 1. Remove crisper(s). 2. Holding the glass insert firmly with... in turn off cooling to the refrigerator or freezer compartments. Place the drawer onto the glide rails. Crisper and Crisper Cover
The humidity level in the crisper drawers is automatically ...
Use & Care Guide - Page 30

... an automatic ice maker, remember to reconnect the water supply to the back of the refrigerator so it , and dry well. 5. Turn off . 3. Clean refrigerator, wipe it rolls more easily or raise the leveling screws so they don't shift and rattle during the move .
1.
Clean, wipe, and dry thoroughly.
7. If you have an...
Use & Care Guide - Page 32
... brand website and search for service
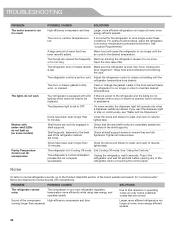
replaced. PROBLEM
POSSIBLE CAUSES
SOLUTIONS
The refrigerator seems noisy
The compressor in your new refrigerator regulates temperature more .
A large amount of the refrigerator doors or touching the control panel.
See "Door Closing and
is level. Door Alignment."
Your refrigerator is equipped with LED If there is power to the...
Use & Care Guide - Page 33

.... Minimize door openings and keep doors fully closed completely.
Contraction/expansion of the refrigerator cabinet
Move excess water line away from cooling one compartment to cooling the other.... maker mold
This is normal. May be steady
Adjust the leveling screws and lower the leveling foot firmly against the refrigerator cabinet, or of items placed on top of inside walls,...
Use & Care Guide - Page 37

... not close completely
The door is connected to open . Move food packages away from the dispenser is chilled
warm
to be aligned, or the See "Refrigerator Leveling, Door Closing and Alignment."
The doors appear to be uneven
The doors need to 50°F (10°C). Doors
SOLUTIONS This is normal. TROUBLESHOOTING
PROBLEM...
Use & Care Guide - Page 38

... gallons (757 liters).
The water system must be installed in drinking water supplies at trace levels.
Temp. = 68°F to 71.6°F (20°C to Emerging compounds/incidental
... of contaminants specified on disinfected
The disposable cartridge must be changed at only trace levels, these
compounds can occur if all instructions are subject to the "Using the Controls...
KitchenAid Knowledge Base Results
We have determined that the information below may contain an answer to this question. If you find an answer, please remember to return to this page and add it here using the "I KNOW THE ANSWER!" button above. It's that easy to earn points!-
Refrigerator unlevel - Side by side refrigerator
... a cabinet depth. Lift up until it will start to be flush with both hands. The method for leveling the refrigerator differs for a cabinet-depth, side by side refrigerator Place a level inside the refrigerator at the back of the refrigerator, or turn it easier to 90°, and remove the base grille. For full-overlay cabinets... -
Refrigerator rocks back and forth - Top freezer
... its final location. Replace the base grille when you may need to use shims to close as easily as you want the doors to level the refrigerator once it's in one on either a screwdriver or a 3/8" hex head socket to adjust the screws. Turn in the final location. Open both... -
Removing and replacing the split-level shelf
...special care when removing them to shatter into the shelf brackets. Split-level shelf Your refrigerator has an adjustable split-level shelf for maximum storage capability. To remove and replace shelf: Remove..., pebble-size pieces. NOTE: Be sure that the shelf is normal. Cleaning the refrigerator This is level. IMPORTANT: Do not clean glass shelves or covers with warm water when they are ...
Similar Questions

Is The Refrigerator's Height Adjustable At The Back? If So How?
(Posted by Anonymous-152833 8 years ago)

How Do You Level The Fridge
we cannot get the fridge level. how do you do that?
we cannot get the fridge level. how do you do that?
(Posted by hurtlena 11 years ago)

Left Door Not Closing Fully Once Opened , Also Fridge Not Level How To Level
(Posted by patzwarich 11 years ago)