Get support for KitchenAid KHMS2050SSS - 30

KitchenAid KHMS2050SSS Support Question

KitchenAid KHMS2050SSS Support Question

Find answers below for this question about KitchenAid KHMS2050SSS - 30" Microwave Hood Combo.
Need a KitchenAid KHMS2050SSS manual? We have 3 online manuals for this item!
Question posted by sandrochinelli on January 22nd, 2018

Microwave Seems To Be Acting Up

Hello I've been experiencing intermittence problems with my microwave. I hear beeps and I see the LCD display react like someone is using the microwave, but in reality it's doing this all on its own. I've been doing some online research and some say it's the main control board (piece WPW10391271), others say it's the keypad (piece WP8206635), and others say it's either control board (piece # WP8206488) or (piece # WP8206493 ) I personally don't think it's the keypad as the keys work, the LCD also is functional. I've looked at the WP8206493 and WPW10391271 to see if there were any burnt spot on the board and I didn't see any. Would you happen to have an idea of what it can be?Thanks

Current Answers

There are currently no answers that have been posted for this question.
Be the first to post an answer!

Remember that you can earn up to 1,100 points for every answer you submit. The better the quality of your answer, the better chance it has to be accepted.

Related KitchenAid KHMS2050SSS Manual Pages

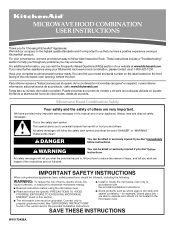
Use & Care Guide - Page 1

...obey all instructions before using your KitchenAid microwave hood combination, please contact us that can find your appliance. This symbol alerts you to help you through any problems you and others are... and tell you what can visit the Frequently Asked Questions (FAQs) section of the microwave oven opening, behind the door. for Choosing KitchenAid® Appliances. You can kill or ...
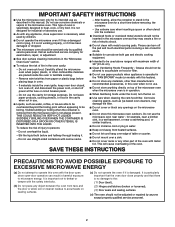
Use & Care Guide - Page 2

..., or near water - Corrosive cleaning agents, such as water, coffee, or tea are placed inside the oven ignite, keep oven door closed, turn the fan on. ■ Use care when cleaning the vent-hood filter. Do not use the microwave oven near a swimming pool, or similar locations. ■ Do not immerse cord or plug in water. ■...
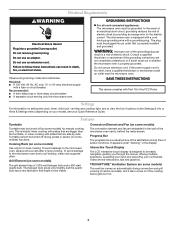
Use & Care Guide - Page 3

... than the turntable, or when cooking with a fuse or circuit breaker. Interactive Touch Display The LCD interactive touch display is designed to the microwave oven, always remove rack after 2-level cooking. Required: ■ A 120 Volt, 60 Hz, AC only, 15- Do not use an adapter. TRUCAPTURE® Ventilation System (on some models) The vent fan comes...
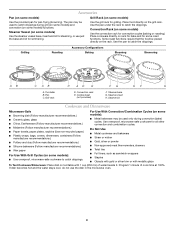
Use & Care Guide - Page 4

... rack. Place food directly on some models) Use the steamer vessel base, insert and lid for steaming, or use the dish in the microwave oven. 4 Use the pan to catch the drippings. Turntable B. Pan C. Convection rack E. If dish becomes hot and the water stays cool, do not use just the base and lid for some roast...
Use & Care Guide - Page 5

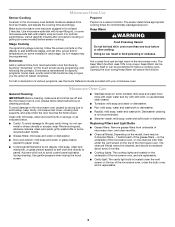
Keep Warm can be used by itself or can be prorammed to follow the screen prompts on the display to add additional stages, and set time, power and/or temperature (on the model, there may be kept warm in for commercially packaged popcorn. Microwave Oven Care General Cleaning IMPORTANT: Before cleaning, make sure all controls...
Use & Care Guide - Page 6

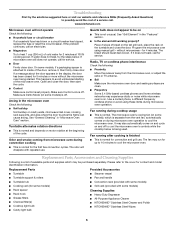
...■ Is the element still working properly? Program the microwave oven using these items during cooktop usage ■ This is normal for...problem continues, call . The bread should toast dark brown. Arcing in the display, the door has been closed for 2 minutes at the beginning of cold water for 5 minutes or more without microwaves - Quartz bulb does not appear to cool the microwave oven...
Use & Care Guide - Page 8

... ready. Repairs when your major appliance is used for the following components if defective in materials or workmanship: ■ Electric element ■ Solid state touch control system parts SECOND THROUGH TENTH YEAR LIMITED WARRANTY On microwave ovens only, in which it is reported to KitchenAid within 30 days from unauthorized modifications made to or...
Dimension Guide - Page 1

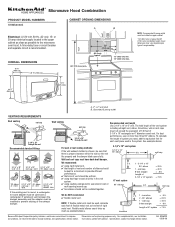
...using duct tape to seal all joints in the vent system. ✔ using caulking compound to seal exterior wall or roof opening around cap. ✔ two elbows should be kept to a minimum to the microwave oven hood... cm) 69" (175.3 cm) min. 30" (76.2 cm) 33" min. (83.2 cm) typical* 12" (30.5 cm) min. 13" (33.0 cm) max. For best performance, use no more than three 90° elbows. ...
Installation Guide - Page 1

... Plate to and including 30" (76.2 cm) wide. This symbol alerts you and others are not followed. See "Installation Requirements" section for use above electric or gas cooking products up to Wall 8 Prepare Upper Cabinet 8 Install the Microwave Oven 9 Complete Installation 10 VENTING DESIGN SPECIFICATIONS 11 ASSISTANCE 12 Replacement Parts 12 MICROWAVE HOOD COMBINATION SAFETY Your...
Installation Guide - Page 2

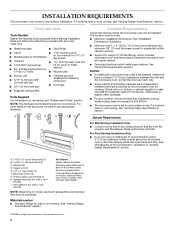
... freely and fully. Check with any obstructions so that combined cooking surface rating does not exceed 55,000 BTU/hr. ■ The microwave oven is set for recirculation mode. See Use and Care Guide.) NOTE: Depending on model, aluminum grease filter and charcoal filter may not be included. Power supply cord bushing (1) H. For...
Installation Guide - Page 3

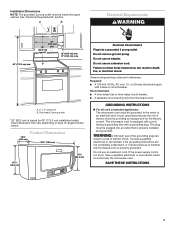
... or serviceman install an outlet near the microwave oven. Do not use an extension cord. Recommended: ■ A time-delay fuse or time-delay circuit breaker. ■ A separate circuit serving only this microwave oven. A. 2" x 4" wall stud B. GROUNDING INSTRUCTIONS ■ For all governing codes and ordinances. The microwave oven is equipped with a cord having a grounding...
Installation Guide - Page 4

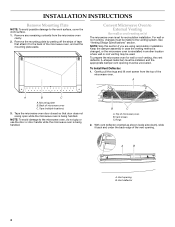
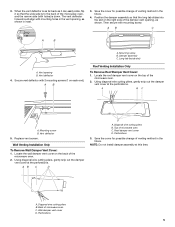
... being handled. Gently pull the rings and lift vent screen from the microwave oven cavity. 2. A A B C A. INSTALLATION INSTRUCTIONS Remove Mounting Plate NOTE: To avoid possible damage to the microwave oven, do not grip or use the door or door handle while the microwave oven is being handled. Remove the mounting plate by peeling off the strips of the...
Installation Guide - Page 5

... the damper vent opening , as shown in the vent opening , as shown. Using diagonal wire cutting pliers, gently snip out the damper vent cover at the perforations. Perforations 3. Diagonal wire cutting pliers B. Wall damper vent cover D. Damper assembly C. Top of microwave oven C. Wall Venting Installation Only To Remove Wall Damper Vent Cover: 1. When...
Installation Guide - Page 6

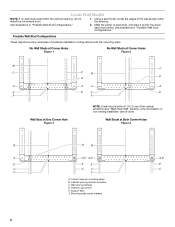
Using a stud finder, locate the edges of the wall stud(s) within the opening vertical centerline C. Wall stud centerlines D. Support tabs F. Wall Studs at One Corner Hole Figure 3 NOTE: If wall stud is within the cabinet opening, do not install the microwave oven. 1. Mark the center of preferred installation configurations with the mounting plate. See...
Installation Guide - Page 7

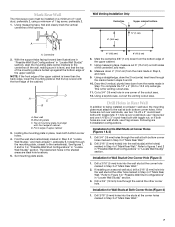
... Wall Stud(s)" section), align the mounting plate center markers to complete the 12" x 4" (30.5 x 10.2 cm) rectangle. A Wall Venting Installation Only Centerline Upper cabinet bottom 4" (10...6" (15.2 cm) 6. Rear wall B. Using measuring tape, find and clearly mark the vertical centerline of upper cabinet 3. Mark Rear Wall The microwave oven must attach to Figure 3 in "Possible Wall ...
Installation Guide - Page 8

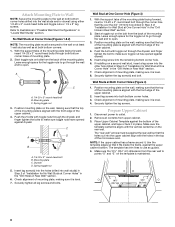
... nuts through both bottom corner holes drilled into the upper cabinet align with the front edge of the microwave oven. C D A B A. 1/4-20 x 3" round-head bolt B. Position mounting plate on the wall...alignment of mounting plate, making sure that the holes cut into the wall studs and/or drywall using either 1/4-20 x 3" round-head bolts and toggle nuts or 1/4 x 2" lag screws. Leave...
Installation Guide - Page 9

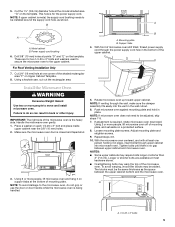
... hole at the bottom of the upper cabinet. 5. This hole is no gap between the upper cabinet bottom and the microwave oven. 3. Install the Microwave Oven WARNING Excessive Weight Hazard Use two or more people, lift microwave oven and hang it in place, insert bolts through upper cabinet into the vent in place. IMPORTANT: The right side...
Installation Guide - Page 10

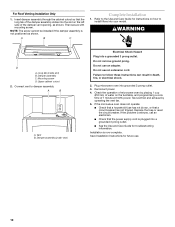
... Venting Installation Only 1. If the microwave oven does not operate: ■ Check that a household fuse has not blown, or that the power supply cord is plugged into your model. Save Installation Instructions for instructions on how to the Use and Care Guide for future use. 10 Vent B. If the problem continues, call an electrician. ■...
Installation Guide - Page 11

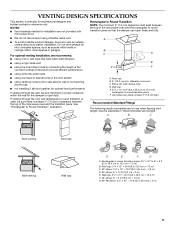
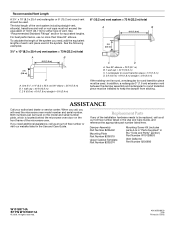
...The following length equivalents are not provided with microwave hood. ■ We do not recommend using recirculation installation. VENTING DESIGN SPECIFICATIONS This section is...at least 3" (7.6 cm) of clearance between the top of the microwave oven and the transition piece. For optimal venting installation, we recommend: ■ using caulking compound to 15.2 cm = 1.5 m) B. Wall cap E....
Installation Guide - Page 12

... the front frame of the installation hardware needs to round transition piece must not exceed the equivalent of each vent piece used . If you need additional assistance, call , you need the microwave oven model number and serial number. To calculate the length of the system you will need , add the equivalent lengths of...

KitchenAid Knowledge Base Results

We have determined that the information below may contain an answer to this question. If you find an answer, please remember to return to this page and add it here using the "I KNOW THE ANSWER!" button above. It's that easy to earn points!

  • Cleaning the warming drawer
    ...;my warming drawer? To clean warming drawer racks: Use a steel-wool pad and warm, soapy water. Control moisture level - Do not use on residue, use warm, soapy water or an all -purpose cleaner.... such as trim pieces, dispenser covers, or door gaskets. Repeat if necessary. To clean the warming drawer: For routine cleaning, use steel wool, abrasive cleansers or oven cleaner. Wash, ...
  • Using the Solid (Locked) Cycle - Fully integrated style
    ... opened when the ram is down position for at least 30 minutes at a time. To use the Solid (Locked) Cycle? If your kitchen. Fully integrated style Hidden Options - Lift the foot pedal Up to On. See Using the Solid (Locked) Cycle with fully visible controls Starting the compactor - Set the compactor Solid Cycle switch...
  • Can I use aluminum foil in my microwave and if so, are there tips for using it?
    ... gold or silver trim or a metallic glaze My microwave oven will not run FAQs Knowledgebase search tips Different types of light) can be used in ovens Product Literature (Use & Care, Parts Lists, etc) Always use the turntable. Always use oven mitts or pot holders when removing dishes from the microwave oven. Do not allow aluminum foil or metal to...

Similar Questions

Im Looking For The Main Relay Board
(Posted by MAJORHOMEAPPLIANCE 5 months ago)
Microwave Timer Starts But The Microwave Does Not.
When I enter the amount of time on the microwave and press Start, the timer begins but the microwave...
(Posted by Jimair1js 2 years ago)
Display Screen Keep Scrolling. Worth Fixing?
The display on the screen keep changing, making it hard to select the item I want. Otherwise microwa...
(Posted by Lightray 3 years ago)
Replace Handle On Kitchenaid Khms2050sss0 Microwave Hood Combo.
I need to install a replacement door handle on a Kitchenaid KHMS2050SSS0 microwave hood combo. All t...
(Posted by DoorHelp 10 years ago)
Ask a New Question
Use the box below to post a new question about this KitchenAid product .
Points & Prizes
  • You can earn points for nearly everything you do on HelpOwl.com
  • You can trade in those points for gift cards at leading retailers such as Amazon.com and Walmart
  • It's that simple!
See How it Works
Create a Free Account

KitchenAid Manuals

Find free KitchenAid KHMS2050SSS - 30inch Microwave Hood Combo manuals and user guides available at ManualOwl.com. Try out our unique manual viewer allowing you to interact with manuals from directly within your browser!

KitchenAid Reviews

View thousands of KitchenAid user reviews and customer ratings available at ReviewOwl.com.

Contact Information

Complete KitchenAid customer service contact information including steps to reach representatives, hours of operation, customer support links and more from ContactHelp.com.

Scoreboard Ratings

See detailed KitchenAid customer service rankings, employee comments and much more from our sister site.

KitchenAid Recalls

Find comprehensive KitchenAid recall information updated hourly on RecallOwl.com.