Get support for KitchenAid KHMS2040WSS

KitchenAid KHMS2040WSS Support Question

KitchenAid KHMS2040WSS Support Question

Find answers below for this question about KitchenAid KHMS2040WSS.
Need a KitchenAid KHMS2040WSS manual? We have 3 online manuals for this item!
Question posted by sredney1 on November 17th, 2011

Interior Of Microwave

There is a coated cardboard panel held in with 4 screws on the right hand interior of my microwave. Is there a reason for this or should it have been removed upon installation? Also the interior of the unit fogs up rather badly

Current Answers

There are currently no answers that have been posted for this question.
Be the first to post an answer!

Remember that you can earn up to 1,100 points for every answer you submit. The better the quality of your answer, the better chance it has to be accepted.

Related KitchenAid KHMS2040WSS Manual Pages

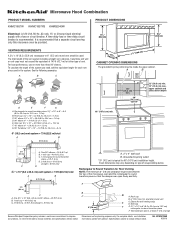
Dimension Guide - Page 1

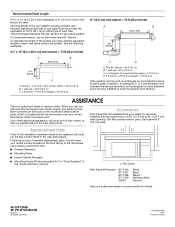
... cm = 1.5 m) B. Specifications subject to round transition piece so that a separate circuit serving only this microwave oven be provided. 17 " (43.8 cm) 16 " (41.3 cm) VENTING REQUIREMENTS A 3¹⁄₄... round vent C. For complete details, see Installation our products, we reserve the right to Round Transition for 66" (167.6 cm) installation height. W10247296B 9/30/10 A B ...
Installation Guide - Page 1

Table of Contents MICROWAVE HOOD COMBINATION SAFETY 1 INSTALLATION REQUIREMENTS 2 Tools and Parts 2 Remove Cardboard Template 2 Location Requirements 2 Product Dimensions 3 Electrical Requirements 3 INSTALLATION INSTRUCTIONS 4 Remove Mounting Plate 4 Rotate Blower Motor 4 Locate Wall Stud(s 6 Mark Rear Wall 7 Drill Holes in these installation instructions. We have provided many ...
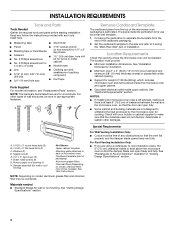
Installation Guide - Page 2

...Power supply cord bushing (1) H. Damper assembly (for wood studs. Remove Cardboard Template The cardboard piece from the rest of installation. Cut along the perforation to back of microwave oven) Cardboard template (part of the microwave oven packaging is for 1/4" x 2" lag screws ■ Scissors ■ 1½" (3.8 cm) diam. Set the cardboard template to the side and refer to Round...
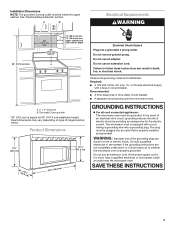
Installation Guide - Page 3

... Electrical Shock Hazard Plug into an outlet that is typical for the electric current. Do not remove ground prong. Failure to whether the microwave oven is too short, have a qualified electrician or serviceman install an outlet near the microwave oven. Consult a qualified electrician or serviceman if the grounding instructions are not completely understood, or if doubt...
Installation Guide - Page 4

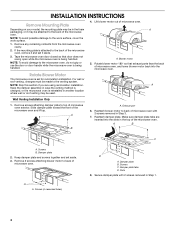
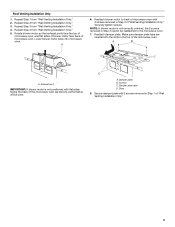
...or use the door or door handle while the microwave oven is set for recirculation installation. Secure damper plate with 2 screws removed in recessed holes) D A. Lift blower motor out of microwave oven exterior. Rotate Blower Motor The microwave oven is being handled. Remove screws attaching damper plate to the back of the microwave oven, remove it and set aside. 3. Slide damper plate...
Installation Guide - Page 5

... is not positioned with 2 screws removed in Step 3 of "Wall Venting Installation Only." 5 Repeat Step 1 from "Wall Venting Installation Only." 3. Rotate blower motor so that exhaust ports face the top of microwave oven, and flat sides of blower motor face back of the microwave oven (as shown), performance will be reattached to back of microwave oven with 2 screws removed in Step 1 of...
Installation Guide - Page 6

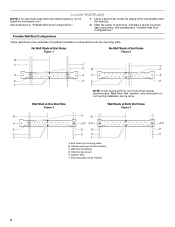
... show examples of each stud, and draw a plumb line down each stud center. Cabinet opening , do not install the microwave oven. 1. Holes for lag screws E. End holes (on mounting plate) B. Wall stud centerlines D. Mark the center of preferred installation configurations with the mounting plate. Support tabs F. Mounting plate center markers 6 Using a stud finder, locate the...
Installation Guide - Page 7

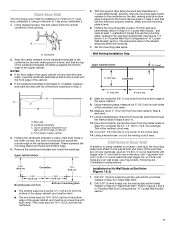
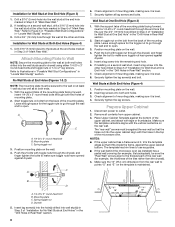
... a minimum of 1 lag screw, preferably 2. 1. Using a keyhole saw, cut out the venting cutout area. if 1 end hole is aligned to being installed on both holes in "Locate Wall Stud(s)" section. Following are ideal hole locations. 7. Holding the cardboard template in place, mark both sides of the upper cabinet. 9. Remove the cardboard template and check the...
Installation Guide - Page 8

... 3 of the microwave oven. Remove all lag screws and bolts. B D A. 1/4-20 x 3" round-head bolt B. Leave enough space for Wall Stud at the end hole marked in "Locate Wall Stud(s)" section. Securely tighten the lag screw(s) and bolt. Make sure the template centerline aligns with the holes in Step 3 of "Mark Rear Wall." Installation for the toggle...
Installation Guide - Page 9

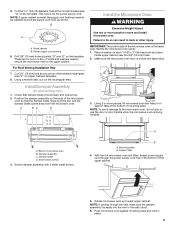
... or use the door or door handle while the microwave oven is at the circular shaded area "G" on the template. A. A B A. Mounting plate B. Rotate microwave oven up toward upper cabinet. Push microwave oven against mounting plate and hold in the wall cutout. 6. Failure to move and install microwave oven. Sheet metal screws 3. NOTE: If venting through the power supply cord hole...
Installation Guide - Page 10

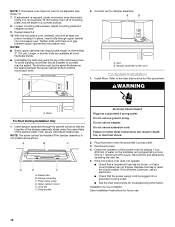
... or reset the circuit breaker. NOTE: If microwave oven does not need to be installed if the damper assembly is plugged into grounded 3 prong outlet. 3. Using 2 or more people, lift microwave oven off of the microwave oven. Loosen mounting plate screws. Repeat steps 3-6. 10. With the microwave oven centered, and with sheet metal screw. NOTES: ■ Some upper cabinets may require...
Installation Guide - Page 11

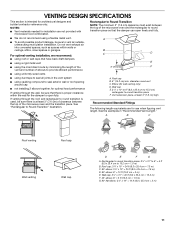
.../contractor reference only. Roof cap B. 6" (15.2 cm) min. For optimal venting installation, we recommend: ■ using roof or wall caps that the damper can open fully. A B C D E 3" (7.6 cm) F A. Vent extension piece, at least 3" (7.6 cm) of clearance between the top of the microwave oven and the transition piece. diameter round vent C. A B C Roof venting Roof cap...
Installation Guide - Page 12

... , you will need the microwave oven model number and serial number. The total length of vent. Accessories Filler Panel Kits are available from sticking. Each panel is a list of each vent piece used in the User Instructions. See "Recommended Standard Fittings" section for equivalent lengths. The filler panels come in China All rights reserved. 461965617428 9/10...
Use & Care Guide - Page 1

... have provided many important safety messages in this section and in accordance with the provided Installation Instructions. ■ Read all safety messages. This symbol alerts you to excessive microwave energy: ■ Install or locate the microwave oven only in the provided Installation Instructions. These words mean: DANGER You can kill or hurt you and others are...
Use & Care Guide - Page 2

...; Use the microwave oven only for a short time before removing the container. - It is removed from paper or plastic bags before placing bags in operation. ■ When flambeing foods under the hood, turn oven off, and disconnect the power cord, or shut off power at the fuse or circuit breaker panel. - Carefully attend the microwave oven when paper...
Use & Care Guide - Page 3

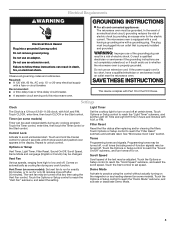
...models): Set vent fan to run for exactly 30 minutes, or to whether the microwave oven is too short, have a qualified electrician or serviceman install an outlet near the microwave oven. Timer (on some models). Do not use an adapter. Required: ■ A... the scroll speed. Observe all governing codes and ordinances. Do not remove ground prong. Do not use of electric shock.
Use & Care Guide - Page 4

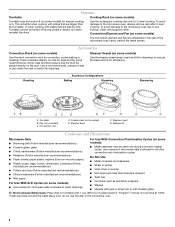
...be turned off (on some models) for simmering. Use a microwave-safe, ovenproof dish or pan under the rack to the microwave oven, always remove rack after 2-level cooking. Pan (not provided) C. Steamer ... require that are side by side. Steamer insert G. To avoid damage to the microwave oven due to catch drippings. Turntable B. Features Turntable Cooking Rack (on some models) Turntable...
Use & Care Guide - Page 5

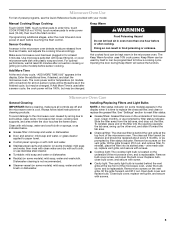
... models with plastic wrap and vent. Remove bulb cover screw, and open the bulb cover. Manual Cooking/Stage Cooking Touch COOK TIME, touch number pads to enter time, touch COOK POWER (if not 100%), touch number pads to the microwave oven caused by filter status indicator. Use microwave-safe dish with loose-fitting lid, or...
Use & Care Guide - Page 6

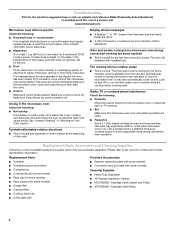
... indicator. Replacement Parts, Accessories and Cleaning Supplies Following is a list of the cycle. This occurs to possibly avoid the cost of the door, remove it, then firmly close door. www.kitchenaid.com Microwave oven will dissipate with some models) ■ Convection rack (provided with repeated use. If a message about the door appears in...
Use & Care Guide - Page 7

...microwave ovens only, in materials or workmanship. DISCLAIMER OF IMPLIED WARRANTIES; Consumable parts are excluded from unauthorized modifications made to the appliance. 8. The removal and reinstallation of your major appliance if it is installed...DAMAGES. THIS WARRANTY GIVES YOU SPECIFIC LEGAL RIGHTS, AND YOU MAY ALSO HAVE OTHER RIGHTS WHICH VARY FROM STATE TO STATE OR PROVINCE...

KitchenAid Knowledge Base Results

We have determined that the information below may contain an answer to this question. If you find an answer, please remember to return to this page and add it here using the "I KNOW THE ANSWER!" button above. It's that easy to earn points!

  • My microwave oven will not run
    ... a lock icon appears on some models) The Child Lock shuts down the control panel pads to unlock and remove the lock icon from display. KitchenAid products Product Literature (Use & Care, Parts Lists, etc) See "Microwave Oven control" section in my microwave and if so, are there tips for service. Is the magnetron working properly? Touch...
  • Preparing oven for self-clean
    ...seal. For additional information on the door frame. Care Guide search below to remove soil. Was this area. Keep the kitchen well-ventilated during the Self-...Installation Instructions and Warranty Information. Rate answer 2 of 3 Rate answer 3 of your appliance? Self-clean the oven before I do before it may burn or melt, which will not affect cooking performance. Hand...
  • Glass bowl and microwaves
    ... thread ring from the Glass Bowl. If you must remove the gray plastic thread ring on a stovetop, cooktop or in the microwave oven? Care Guides, Installation Instructions and Warranty Information. The 90th Anniversary Glass Bowl can be used in the microwave you require additional information, please call the KitchenAid Customer eXperience Center toll-free at...

Similar Questions

Ask a New Question
Use the box below to post a new question about this KitchenAid product .
Points & Prizes
  • You can earn points for nearly everything you do on HelpOwl.com
  • You can trade in those points for gift cards at leading retailers such as Amazon.com and Walmart
  • It's that simple!
See How it Works
Create a Free Account

KitchenAid Manuals

Find free KitchenAid KHMS2040WSS manuals and user guides available at ManualOwl.com. Try out our unique manual viewer allowing you to interact with manuals from directly within your browser!

KitchenAid Reviews

View thousands of KitchenAid user reviews and customer ratings available at ReviewOwl.com.

Contact Information

Complete KitchenAid customer service contact information including steps to reach representatives, hours of operation, customer support links and more from ContactHelp.com.

Scoreboard Ratings

See detailed KitchenAid customer service rankings, employee comments and much more from our sister site.

KitchenAid Recalls

Find comprehensive KitchenAid recall information updated hourly on RecallOwl.com.