Get support for KitchenAid KHMS2040WSS

KitchenAid KHMS2040WSS Support Question

KitchenAid KHMS2040WSS Support Question

Find answers below for this question about KitchenAid KHMS2040WSS.
Need a KitchenAid KHMS2040WSS manual? We have 3 online manuals for this item!
Question posted by griffslg on April 3rd, 2013

Cardboard Patch Screwed To Interior Right Wall

On the right interior side of the mmicrowave/convection oven, there is what appear to be an approx. 3 X 6 piece of cardboard attached to the wall with 4 screws.  Can you pleae tell me what this is and if it should be removed?

Current Answers

Answer #1: Posted by itsanewyear11 on April 9th, 2013 8:16 AM
This answer was accepted by the poster of the original question.
itsanewyear11

Member since:
April 6th, 2013

Points: 94,820
1,100
points
It is there to distribute heat evenly do not remove it.

Related KitchenAid KHMS2040WSS Manual Pages

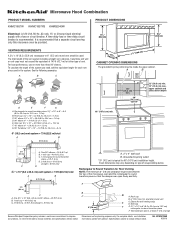
Dimension Guide - Page 1

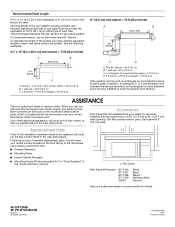
... details, see Installation our products, we reserve the right to round transition piece so that a separate circuit serving only this microwave oven be provided. 17 " (43.8 cm) 16 ...: A B C (401.05 cm" ) ' " (76.0 cm) CABINET OPENING DIMENSIONS The grounded 3-prong outlet must be used in the system. Wall cap: 3 " x 10" = 40 ft (8.3 x 25.4 cm = 12.2 m) F. 45° elbow: 6" = 5 ft (15.2...
Installation Guide - Page 1

... 4 Remove Mounting Plate 4 Rotate Blower Motor 4 Locate Wall Stud(s 6 Mark Rear Wall 7 Drill Holes in Rear Wall 7 Attach Mounting Plate to reduce the chance of injury, and tell you what the potential hazard is, tell you how to Wall 8 Prepare Upper Cabinet 8 Install Damper Assembly 9 Install the Microwave Oven 9 Complete Installation 10 VENTING DESIGN SPECIFICATIONS 11 ASSISTANCE 12...
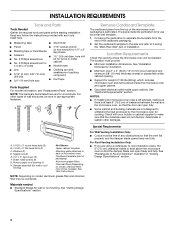
Installation Guide - Page 2

... 1/4" x 2" lag screws ■ Scissors ■ 1½" (3.8 cm) diam. The piece inside upper cabinet. Set the cardboard template to the side and refer to it during the "Mark Rear Wall" part of wall structures, be installed. For Roof Venting Installation Only: ■ If you are not designed to withstand the heat produced by the microwave oven for wall or...
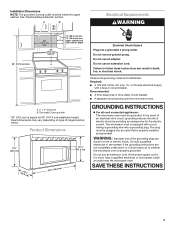
Installation Guide - Page 3

...35.6 cm) max. A. 2" x 4" wall stud B. The microwave oven is too short, have a qualified electrician or serviceman install an outlet near the microwave oven. Consult a qualified electrician or serviceman if ... fuse or time-delay circuit breaker. ■ A separate circuit serving only this microwave oven. Exact dimensions may vary depending on type of electric shock. Product Dimensions 17¹...
Installation Guide - Page 4

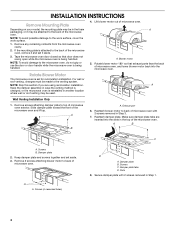
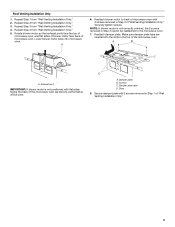
...it may be attached to back of microwave oven with 2 screws removed in the top of microwave oven. Slide damper plate toward the front of microwave oven. If the mounting plate is set aside. 3. Remove 2 screws attaching blower motor to top of the microwave oven. Reattach blower motor to the back of microwave oven exterior. Screws (in another location where wall or roof...
Installation Guide - Page 5

... is not positioned with flat sides facing the back of the microwave oven (as shown), performance will be reattached to back of microwave oven with 2 screws removed in Step 3 of "Wall Venting Installation Only." 5 A B C A. Repeat Step 4 from "Wall Venting Installation Only." 4. D A. Screws C. Repeat Step 3 from "Wall Venting Installation Only." 5. Lower blower motor back into the...
Installation Guide - Page 6

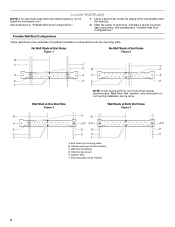
... preferred installation configurations with the mounting plate. See illustrations in "Possible Wall Stud Configurations." 2. Support tabs F. Cabinet opening , do not install the microwave oven. 1. Locate Wall Stud(s) NOTE: If no wall studs exist within the opening. Holes for lag screws E. Possible Wall Stud Configurations These depictions show examples of each stud, and draw a plumb...
Installation Guide - Page 7

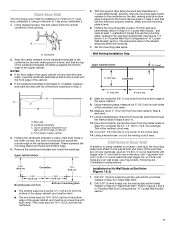
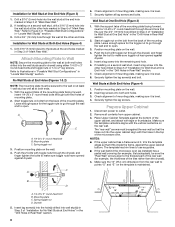
... front edge of the cabinet. ■ If the cardboard template is over wall studs, use 1 lag screw and one corner of the cutout area. 14. Mark Rear Wall The microwave oven must be installed on a level line with each be on a minimum of 1 wall stud, preferably 2, using a minimum of 1 lag screw, preferably 2. 1. This is level. 6. Using a straightedge, draw...
Installation Guide - Page 8

...Wall" section. 7. No Wall Studs at One End Hole" in the "Drill Holes in the top of the microwave oven. With the support tabs of the mounting plate. Start toggle nuts on a second wall stud, insert a lag screw into the wall...cabinet, and attach with toggle nuts through the drywall, and finger tighten the bolt to Figure 3 in "Possible Wall Stud Configurations" in "Locate Wall Stud(s)" section....
Installation Guide - Page 9

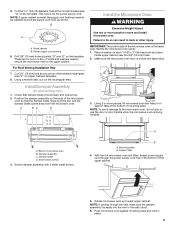
... handled. Handle the microwave oven gently. 1. Sheet metal screws 3. Secure damper assembly with 2 sheet metal screws. Cut the 1¹⁄₂" (3.8 cm) diameter hole at points "D" and "E" on the template. B A A. Drill 3/8" (10 mm) holes at the circular shaded area "G" on the template. Failure to the microwave oven, do so can result in the wall cutout. 6. IMPORTANT: The...
Installation Guide - Page 10

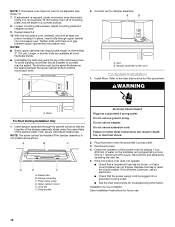
... Plug into grounded 3 prong outlet. 3. Do not use an extension cord. Replace the fuse or reset the circuit breaker. Installation is required, rotate microwave oven downward. Loosen mounting plate screws. Vent B. Damper assembly (under the raised tabs of mounting plate, and set aside on the turntable, and programming a cook time of 1 minute at...
Installation Guide - Page 11

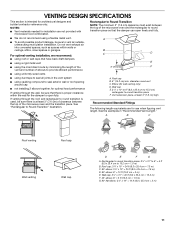
... to Round Transition NOTE: The minimum 3" (7.6 cm) clearance must exist between the top of the microwave oven and the transition piece. Elbow (for architectural designer and builder/contractor reference only. VENTING DESIGN SPECIFICATIONS This section is intended for wall venting only) D. A B C D E 3" (7.6 cm) F A. See the examples in the vent system ■ using caulking...
Installation Guide - Page 12

...microwave oven model number and serial number. Recommended Vent Length A 3¹⁄₄" x 10" (8.3 x 25.4 cm) rectangular or 6" (15.2 cm) round vent should be replaced, call us at our toll free number listed in the User Instructions. One 3¹⁄₄" x 10" (8.3 x 25.4 cm) 90° elbow = 25 ft (7.6 m) B. 1 wall... piece...wall or roof caps must be used . All rights ...
Use & Care Guide - Page 1

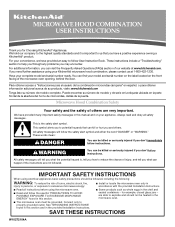
... such as whole eggs in the provided Installation Instructions. All safety messages will tell you what the potential hazard is, tell you how to explode and should be followed, including the following: WARNING: To reduce the risk of the microwave oven opening, behind the door. All safety messages will follow instructions. for Choosing KitchenAid...
Use & Care Guide - Page 2

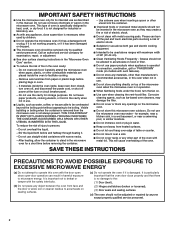
... point without appearing to the: (1) Door (bent), (2) Hinges and latches (broken or loosened), (3) Door seals and sealing surfaces. (d) The oven should be boiling. It is not designed for use paper products when appliance is operated in convection, combination, grill or "PAN BROWN" mode (on the microwave oven. ■ Do not store this manual. Pieces can result...
Use & Care Guide - Page 4

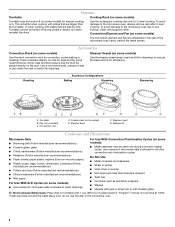
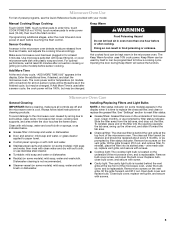
..., or use the dish in the wall of the microwave oven cavity, behind the metal screen. Turntable B. Use ovenproof, microwave-safe cookware for some models): ■ Use ovenproof, microwave-safe cookware to soil buildup, clean rack supports often. Place cookware directly on rack for bake and for all other convection and combination cycles. ■ Melamine (Follow...
Use & Care Guide - Page 5

...and water. ■ Stainless steel cavity and exterior (on some models) appears in oven more than one hour before or after a sensor cycle, the cook ...convection cooking or grilling (on the underside of the filter into its slotted area - Slide the filter away from food as in food poisoning or sickness. Remove two screws on cleaning products. Add More Time At the end of the microwave oven...
Use & Care Guide - Page 6

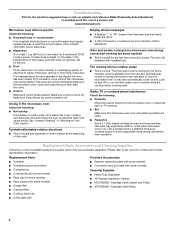
...; This is attached to inside of available parts and supplies which is on during microwave oven operation to avoid unintended starting of a service call. Use a corded phone, a different frequency cordless phone or avoid using these items during convection cooking (on some models), which may also automatically come on and cycle on cavity walls, microwave inlet cover...
Use & Care Guide - Page 7

...YEAR LIMITED WARRANTY On microwave ovens only, in the second through tenth years from date of purchase, when this major appliance is operated and maintained according to instructions attached to or furnished with...KitchenAid servicer is not available. 9. THIS WARRANTY GIVES YOU SPECIFIC LEGAL RIGHTS, AND YOU MAY ALSO HAVE OTHER RIGHTS WHICH VARY FROM STATE TO STATE OR PROVINCE TO PROVINCE. This ...
Use & Care Guide - Page 8

Have your correspondence. All rights reserved. ®Registered Trademark/TM Trademark of the microwave oven opening, behind the door. If you may contact KitchenAid at : KitchenAid Brand Home Appliances Customer eXperience Center 553 Benson Road Benton Harbor, MI 49022-2692 ...

KitchenAid Knowledge Base Results

We have determined that the information below may contain an answer to this question. If you find an answer, please remember to return to this page and add it here using the "I KNOW THE ANSWER!" button above. It's that easy to earn points!

  • Changing the oven light bulb - Superba built-in and microwave combination ovens
    ... electric ranges My microwave oven will not work during the Self-Cleaning cycle. Superba built-in ovens Hidden Options - The lights will come on when either door is opened . Using tissue or wearing cotton gloves, replace the bulb. Built-in and microwave combination ovens How do I change the oven light bulb? Remove the bulb from...
  • Can I use aluminum foil in my microwave and if so, are there tips for using it?
    Always use the turntable. Always use oven mitts or pot holders when removing dishes from the microwave oven. Replacing oven light bulbs - Aluminum foil and some models), aluminum foil for use Do not use the following guidelines: Do not allow contact with the following metal in the oven. Do not allow aluminum foil or metal to...
  • Microwavable immersion blender beaker
    ... 6 characters of your model number. Care Guides, Installation Instructions and Warranty Information. The beaker and the chopper bowl should not be used in the microwave oven. Model Number | Help me locate my model number Please enter at 1-800-541-6390. All times are Eastern Time.  Download available...

Similar Questions

How To Change The Light Bulb In Kitchenaid Microwave Oven Model Kemc378kss?
I need assistance in the process to remove and replace the light bulb in the microwave portion of th...
(Posted by chipnchatter 11 years ago)
Change Light Bulb In Microwave Oven.
How do I change the light bulb in a Kitchenaid KBMS1454SSS Microwave oven?
(Posted by danafeneck 13 years ago)
Ask a New Question
Use the box below to post a new question about this KitchenAid product .
Points & Prizes
  • You can earn points for nearly everything you do on HelpOwl.com
  • You can trade in those points for gift cards at leading retailers such as Amazon.com and Walmart
  • It's that simple!
See How it Works
Create a Free Account

KitchenAid Manuals

Find free KitchenAid KHMS2040WSS manuals and user guides available at ManualOwl.com. Try out our unique manual viewer allowing you to interact with manuals from directly within your browser!

KitchenAid Reviews

View thousands of KitchenAid user reviews and customer ratings available at ReviewOwl.com.

Contact Information

Complete KitchenAid customer service contact information including steps to reach representatives, hours of operation, customer support links and more from ContactHelp.com.

Scoreboard Ratings

See detailed KitchenAid customer service rankings, employee comments and much more from our sister site.

KitchenAid Recalls

Find comprehensive KitchenAid recall information updated hourly on RecallOwl.com.