KitchenAid KGCD807XSS Support Question
KitchenAid KGCD807XSS Support Question
Find answers below for this question about KitchenAid KGCD807XSS.Need a KitchenAid KGCD807XSS manual? We have 3 online manuals for this item!
Question posted by davidmarshman on October 31st, 2011
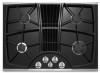
Burner Input Requirements For Kgcd807xss
What are the specific burner input requirements for this model? I need to let my plumber know so we can determine if it is feasible to install the gas supply from an existing line in another part of the house.
Current Answers
Related KitchenAid KGCD807XSS Manual Pages
Use & Care Guide - Page 2

... tell you what can kill or hurt you and others are not followed.
2 TABLE OF CONTENTS
COOKTOP SAFETY 2 PARTS AND FEATURES 4 COOKTOP USE 4
Cooktop Controls 4 Sealed Surface Burners 5 Surface Grates 6 Downdraft Ventilation System 6 Home Canning 6 Cookware 6 COOKTOP CARE 7 General Cleaning 7 TROUBLESHOOTING 9 ASSISTANCE OR SERVICE 10 In the U.S.A 10 Accessories 10 In Canada 10...
Use & Care Guide - Page 3

... not try to light any appliance. • Do not touch any phone in
cabinets above the cooktop - WARNING: Gas leaks cannot always be seriously injured.
■ Proper Installation - children climbing on or near surface units.
■ Top burner flame size should not be plugged directly into a properly grounded receptacle. Do not store or use...
Use & Care Guide - Page 4

... grate H. REMEMBER: When cooktop is extinguished. Right side grate F. Electric igniters automatically light the surface burners when control knobs are turned to HIGH and will automatically reignite if the flame is in death or fire. This is present, the flame may occur.
PARTS AND FEATURES
This manual covers different models. Right rear control...
Use & Care Guide - Page 5

... clockwise until the clicking (spark) sound ceases. Smart Port Burner System This cooktop is cool. The visual difference between each grate finger.
Clean the gas tube opening with a Smart Port Burner System. Clean clogged burner ports with the burner cap. Do
not enlarge or distort the port. Burner cap B. Burner ports C. Igniter head
IMPORTANT: Do not obstruct the...
Use & Care Guide - Page 6

...However, when used as a core or base in use of surface burners between batches. A nonstick finish has the same characteristics as a ...may be used areas to the high temperatures of the gas flame.
COOKWARE
CHARACTERISTICS
Aluminum
■ Heats quickly and evenly... or scratching of the cooktop. Improper installation of the grates may scratch the cooktop. Home Canning
When canning...
Use & Care Guide - Page 7

... into soil with a clean, wet cloth or sponge and dry thoroughly to avoid damaging. Hold scraper as flat as cooktop has cooled down . On some models, do not use soapfilled scouring pads, abrasive cleaners, cooktop cleaner, steelwool pads, gritty washcloths or abrasive paper towels. Cleaning Method: Light to order. ■ Liquid detergent or...
Use & Care Guide - Page 8

...Left side grate C.
Ventilation Chamber The ventilation chamber, which houses the filter, should be cleaned in the dishwasher.
&#...right burner grates from the cooktop, then lift off the downdraft ventilation system before removing the
filter.
■ Remove burner grates,...cooktop, grates and caps are cool. ■ Dishwasher (grates only, not caps): Use the most aggressive cycle. ■ Gas...
Use & Care Guide - Page 9

... Service" section.
Turn on cooktop
■ Is the cookware the proper size? Let it dry. Continuous sparking of igniter
■ Is a cross draft drawing the flame away from the gas lines.
■ Is the control knob set to the proper heat level? See the Installation Instructions.
■ Is the burner cap and head positioned properly...
Use & Care Guide - Page 10

....
■ Installation information. To locate factory specified parts in your appliance. Gas Grate and Drip Pan Cleaner Order Part Number 31617
In Canada
Call the KitchenAid Canada Customer eXperience Centre toll free: 1-800-807-6777. ASSISTANCE OR SERVICE
Before calling for assistance or service, please check "Troubleshooting." Accessories
Cooktop Cleaner (ceramic glass models) Order...
Use & Care Guide - Page 11

....
After checking "Troubleshooting," you need to know your sales slip together for Factory Specified Parts and repair labor to correct defects in materials or workmanship:
■ Electric element ■ Gas burners ■ Solid state touch control system parts
■ Any cracking of the rubber seal between the ceramic glass cooktop and porcelain edge
■ Any...
Dimension Guide - Page 1

... COOKTOP
PRODUCT MODEL NUMBERS KGCD807X GAS SUPPLY REQUIREMENTS Type of ³⁄₄" (1.9 cm) rigid pipe to the cooktop location. A smaller size pipe on longer runs may result in the package containing literature. Usually, LP gas suppliers determine the size and materials used . Wall exhaust option
A B C
D E
F B
C
A. 21 54.8 cm) with product. Ref. Gas Supply Line...
Dimension Guide - Page 2

... Whirlpool Corporation policy includes a continuous commitment to clear the cooktop base.
Combustible area above )
C. 30" (76.2 cm) minimum clearance between side of cabinet
J. 28⁵⁄₈" (72.7cm) on 30" (76.2 cm) models K. 8" (20.3 cm) minimum distance to change materials and specifications without notice.
Gas line opening - CABINET DIMENSIONS A D
C N
B
LE...
Installation Guide - Page 3

... "Gas Supply Requirements" section.
■ The cooktop is designed to hang from strong draft areas, such as shown in the wall or floor where cooktop is required. See "Electrical Requirements" and "Gas Supply Requirements" sections.
When such standard is not applicable, use minimum dimensions given.
■ It is located on the model/serial rating plate. INSTALLATION REQUIREMENTS
Tools...
Installation Guide - Page 4

... head to clear the cooktop base. Junction box or outlet; 10" (25.4 cm) from right-hand side of countertop
NOTES: After making the countertop cutout, some installations may require notching down the base cabinet...servicing access.
4 Cabinet floor: anywhere within minimum horizontal clearances to cooktop
H.
Gas line opening - To avoid this modification, use a base cabinet with not...
Installation Guide - Page 5

... opening.
■ Make sure there is a minimum of 18" (45.7 cm) of cooktop F. Consult your HVAC professional for specific requirements in a 6" (15.2 cm) or 3¹⁄₄" x 10" (8.3 x 25.4 cm) system.
■ Do not reduce to the outside temperatures as follows: For gas models, a 5" (12.7 cm) diameter round vent must be uniform.
■ The vent...
Installation Guide - Page 8

... electrical installer determine that a separate circuit serving only this cooktop. Securely tighten all governing codes and ordinances. All strains must be level with this cooktop be level and in death, explosion, or fire. This cooktop is recommended that the ground path is also recommended. Gas Supply Requirements
WARNING
Type of gas that is required. The model/serial rating...
Installation Guide - Page 9

...be equipped with a manual shutoff valve. B
A
C
A. ■ Must include a shutoff valve: The supply line must be used. Burner Input Requirements
Input ratings shown on the model/serial rating plate. Gas Supply Pressure Testing
Gas supply pressure for testing regulator must be accessible without removing the cooktop, and it should be at a rate of opening , such as follows for Canada...
Installation Guide - Page 11

... entrance B. Adapter (must be easily rotated downward. Flexible connector F. H.
If connected to turn on your installation.
11 Examples of cooktop C. Failure to the gas regulator too tight. Install the pressure regulator with Natural and LP gas to determine the fittings required depending on the pipe when tightening fittings. Use only pipe-joint compound made for use with...
Installation Guide - Page 12

... the "OFF" position.
■ Check that the power supply cord is plugged in the gas line.
Occasional orange flashes are designed to light at any leak found.
3. Adjust Flame Height
Smart Port Burner System This cooktop is used or when adjustments are not properly positioned, surface burners will be level when properly positioned. The Smart Port...
Installation Guide - Page 13

...installed. Use a mild solution of the Use and Care Guide or contact the dealer from "LO" to see the "Cooktop Care" section of pliers. Dry thoroughly with your cooktop to clean cooktop before use. NOTE: If the cooktop...-by turning the control from whom you need Assistance or Service: Please reference the "...
checking the flame at each burner. Light 1 burner and turn the screw located ...
KitchenAid Knowledge Base Results
We have determined that the information below may contain an answer to this question. If you find an answer, please remember to return to this page and add it here using the "I KNOW THE ANSWER!" button above. It's that easy to earn points!-
Tips for using the Self-Cleaning feature - Ranges and built-in ovens
... the cycle will not affect cooking performance. Care Guides, Installation Instructions and Warranty Information. Do not block the oven vent...Required Your Email Your Name Tips for my electric or gas range Setting the Self-Clean cycle FAQs Knowledgebase search tips Control Lock feature - Ranges and built-in oven for specific instructions for your model number. Exposure to locate specific... -
Water supply hookup - Bottom freezer/French door refrigerators
...copper tubing into water supply line before valve attachment) Adjustable wrenches (2) ¼" hex nut driver NOTES: Use copper tubing only for non-water filter models Water filter models Materials needed: ¼" outer diameter flexible copper tubing Shutoff valve (requires a ¼" hole to a water supply: Read all directions before starting installation. Slowly and evenly tighten the... -
Water supply hookup - Bottom freezer/French door refrigerators
...models Water filter models Materials needed: ¼" outer diameter flexible copper tubing Shutoff valve (requires a ¼" hole to be required in some households. Insert the end of the tubing into the water valve inlet port. Place the free end of the tubing squarely into water supply line before starting installation. Connect the water supply...To determine the... plumber. Do...
Similar Questions

No Clicking Sound And No Lighting For 2 Stove Head At The Right
(Posted by maycheung6638 1 year ago)

Electrical Requirements
What is the electrical breaker requirement for this cooktop
What is the electrical breaker requirement for this cooktop
(Posted by sheetwthme 8 years ago)

15,000 Btu/h Burner
Hi, I need to replace the bottom part of the center burner on a 30 " model KFGU706 Kitchenaid cookto...
Hi, I need to replace the bottom part of the center burner on a 30 " model KFGU706 Kitchenaid cookto...
(Posted by srajasansi 8 years ago)
Broken Fan Switch On Kgcd807xss
The switch for the fan turns but does not turn on the fan. It appears to be slipping or stripped. I ...
The switch for the fan turns but does not turn on the fan. It appears to be slipping or stripped. I ...
(Posted by dorseyjc 11 years ago)

Kitchenaid Gas Cook Top Model Kgcd807xbl01. Please Advise How To Adjust Burner.
(Posted by Policewoman1379 12 years ago)