KitchenAid KFCS22EVMS Support Question
KitchenAid KFCS22EVMS Support Question
Find answers below for this question about KitchenAid KFCS22EVMS - ARCHITECT Series II 72.Need a KitchenAid KFCS22EVMS manual? We have 3 online manuals for this item!
Question posted by opesajid on March 27th, 2014
Kitchenaid Kfcs22evms 5 Refrigerator How To Remove The Drip Pan
The person who posted this question about this KitchenAid product did not include a detailed explanation. Please use the "Request More Information" button to the right if more details would help you to answer this question.
Current Answers
Related KitchenAid KFCS22EVMS Manual Pages
Energy Guide - Page 1
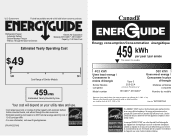
...determine how this label before first retail purchase is an energy-efficient appliance.
Canada
Refrigerator-Freezer ·Automatic Defrost ·Bottom Mounted Freezer ·Without Through-the-Door... on models of this is an offense (S.C. 1992, c. 36). Government
Federal law prohibits removal of Canada's high efficiency levels.
La marque ENERGY STAR® sur cette étiquette ...
Use & Care Guide - Page 1
... 29 GARANTÍA 30
FEUILLES DE DONNÉES SUR LE PRODUIT 44
GARANTIE 45
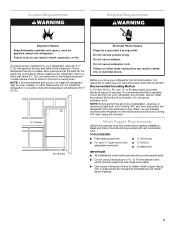
REFRIGERATOR SAFETY
Your safety and the safety of the refrigerator compartment. All safety messages will need assistance, call us at www.kitchenaid.com for purchasing this manual and on your model and serial number located on the inside...
Use & Care Guide - Page 2
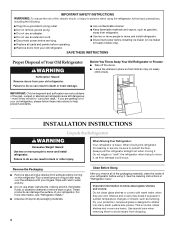
...; Do not use sharp instruments, rubbing alcohol, flammable fluids, or abrasive cleaners to remove tape or glue.
Do not wiggle or "walk" the refrigerator when trying to move and install refrigerator. If you remove all parts and panels before operating. ■ Remove doors from your protection, tempered glass is designed to shatter into many small...
Use & Care Guide - Page 3
.... Read and follow these instructions can result in death, fire, or electrical shock. Before you are finished, reconnect the refrigerator to follow the instructions provided with any type of installation, cleaning, or removing a light bulb, turn Cooling ON. See "Using the Controls." TOOLS NEEDED:
■ Flat-blade screwdriver
Nut driver
and ¹...
Use & Care Guide - Page 4
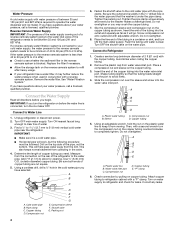
...water pressure to the reverse osmosis system needs to be a minimum of 40 to 60 psi (276 to refrigerator and check for cleaning.
A
B
C
A. Compression nut
D E F G
E. Packing nut
4
6....Compression nut
D. Correct any leaks. Remove the water filter.
Turn ON nearest faucet long
enough to completely tighten. Add 7 ft (2.1 m) to Refrigerator
1. Insert the end of the tubing...
Use & Care Guide - Page 5
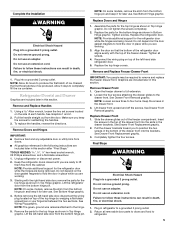
... keep it for the bottom hinge as shown in Top Hinge graphic.
Do not tighten the screws completely.
2. Replace the refrigerator door. Tighten all removable door parts to doors and food to
refrigerator.
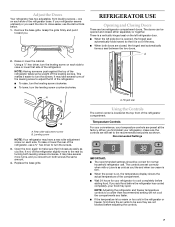
5 Remove and Replace Freezer Drawer Front
IMPORTANT: Two people may be required to completely fill the ice container. See Drawer Front...
Use & Care Guide - Page 6
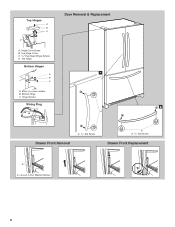
Loosen 4 Door Bracket Screws
6 Top Hinge Cover C. 5/16" Hex-Head Hinge Screws D. Hinge Screws
Wiring Plug
2
A
Drawer Front Removal
A. 3/32" Set Screw
A
A. 3/32" Set Screw
Drawer Front Replacement
A
A. Top Hinges
A B C
D
Door Removal & Replacement
A. Top Hinge
Bottom Hinges
1
A B C
A. Shim (on some models) B. Hinge Cover Screw B. Bottom Hinge C.
Use & Care Guide - Page 7
... a seal between the two doors. If your temperature controls are two refrigerator compartment doors. If not, tilt the refrigerator slightly more turns, and you want the door to a colder than ... add food before adding food. When you . Adjust the Doors
Your refrigerator has two adjustable, front leveling screws - Remove the base grille.
There is a vertically-hinged seal on each side....
Use & Care Guide - Page 8
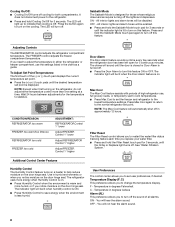
... preferences, if desired. User Preferences
The control center allows you notice moisture on .
The
indicator light will automatically shut off .
Adjusting Controls
The REFRIGERATOR control adjusts the refrigerator compartment temperature.
NOTE: The Max Cool feature will be enabled.
■ Press and hold the Filter Reset touch pad for the temperature to the...
Use & Care Guide - Page 9
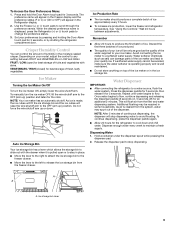
...ice approximately every 3 hours.
■ To increase ice production, lower the freezer and refrigerator temperature.
Release the dispenser pad to stop dispensing water to flow, continue depressing and ...(+) or (-) touch pads to cool down . VEGETABLES / HIGH (closed) for the refrigerator to scroll through the preference names. Hold a container under the dispenser spout while pressing the...
Use & Care Guide - Page 10
... or harsh cleaners such as the trim pieces, dispenser covers or door gaskets. There is almost time to remove minor scuffs or marks, it is located in warm water. Plug in warm water.
3.
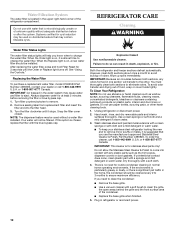
Unplug refrigerator or disconnect power.
2. See "Using the Controls." Do not use with any odors formed in normal home...
Use & Care Guide - Page 11
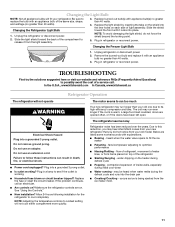
.... If the problem continues, call . water dripping on top of the compartment to replace the bulb with appliance bulb(s) no greater than 40 watts.
4. Changing the Refrigerator Light Bulb
3. Slide the light shield toward the front until it locks into the drain pan
■ Creaking/Cracking - Remove the burned-out bulb and replace it...
Use & Care Guide - Page 12
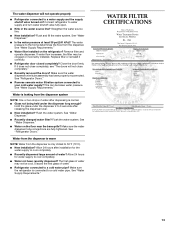
...system before using a new water filter. Clean gaskets and contact surfaces with soft cloth.
Wait 72 hours for ice maker to store food.
■ Are there minerals (such as sulfur) ... 24 hours. Allow 24 hours following installation for ice production to remove the minerals.
■ Water filter installed on the refrigerator?
Use airtight, moisture proof packaging to make new ice.
■...
Use & Care Guide - Page 13
... Dispenser."
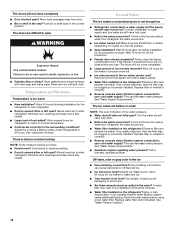
■ Is the water pressure at least 35 psi (241 kPa)? The water pressure to a cold water pipe. If it correctly.
■ Refrigerator door closed completely?
Remove filter and operate dispenser. Close the door firmly. See "Water Supply Requirements." Water is only chilled to a water supply and the supply shutoff valve...
Use & Care Guide - Page 14
....2
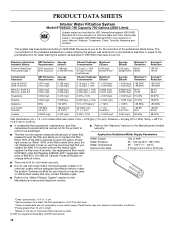
0.000 mg/L 96.50%
Average% Reduction
>99.35% >99.33%
95.70 86.22
92.97%
76.99%
>99.99%
>99.99 97.09
98.72%
Test Parameters: pH = 7.5 ± 0.5 unless otherwise noted. order Part Number 4396395. 2007 suggested retail price of Chlorine Taste and Odor, Particulate Class I *
Contaminant Reduction
Lead...
Use & Care Guide - Page 15
... call 1-800-422-1230.
Service must be provided by a KitchenAid designated service company.
Pickup and delivery. The removal and reinstallation of your major appliance, to instruct you can find... Instructions and model number information for product service in remote locations.
10. KITCHENAID® REFRIGERATOR WARRANTY
ONE YEAR LIMITED WARRANTY For one year from the date of purchase,...
Dimension Guide - Page 1
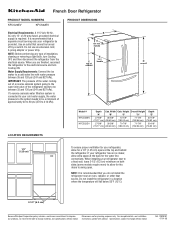
... to 60 psi (276 to 414 kPa). When you do not install the refrigerator near an oven, radiator, or other heat source. If a reverse osmosis water filtration system is recommended that cannot be a minimum of installation, cleaning or removing a light bulb, turn Cooling ON. handle
D overall
LOCATION REQUIREMENTS
Model # KFCO22EV KFCS22EV
Depth...
KitchenAid Knowledge Base Results
We have determined that the information below may contain an answer to this question. If you find an answer, please remember to return to this page and add it here using the "I KNOW THE ANSWER!" button above. It's that easy to earn points!-
Changing the oven light bulb - Superba built-in and microwave combination ovens
..., both upper and lower lights will come on when either door is opened . Remove the glass light cover by snapping it back into the wall. Built-in oven ... the oven door is off . Architect Series II - Disconnect power. Built-in ovens Hidden Options - The oven lights are 12-volt, 5-watt maximum halogen bulbs. Changing the oven light bulb - Remove the bulb from the oven. Superba... -
Temperature probe - Architect Series II - gas and electric ranges
... of poultry, away from the probe jack. To use the temperature probe? To change probe temperature, oven setting: Press Off; Architect Series II My gas oven won't operate Temperature adjustment Architect Series II - Always unplug and remove the temperature probe from the oven. Press number pads to enter a probe temperature. Press Start. Press the number pads to... -
Cleaning the Downdraft Vent System - Architect 2 electric cooktop with downdraft
... ™ All Rights Reserved. Cleaning the downdraft vent cover, image A: Remove the vent cover from foods prepared on the cooktop. Clean the vent cover using the venting system. Do not clean the filter in the dishwasher. Architect Series II - Product Help Share Delicious Digg Facebook Reddit StumbleUpon Twitter Print Email this...
Similar Questions

Need To Replace Control Board On Kitchen Aid Architect Series Ii Drawer Fridge
looking for an avtive part number
looking for an avtive part number
(Posted by Newcowoodworks 8 years ago)

Kfcs22evms Where Is The Drip Pan
(Posted by googzaid 9 years ago)

How To Remove Defrost Drain From Kitchenaid Refrigerator Kfcs22evms
(Posted by wpasgh 10 years ago)


Kfcs22evms Refrigerator's Interior Water Dispenser Is Getting Slower And Slower.
My KFCS22EVMS refrigerator's interior water dispensor seems to be getting slower and slower in dispe...
My KFCS22EVMS refrigerator's interior water dispensor seems to be getting slower and slower in dispe...
(Posted by jdpeterea 13 years ago)