
KitchenAid KESS907SSS Support Question
KitchenAid KESS907SSS Support Question
Find answers below for this question about KitchenAid KESS907SSS - 30" Electric Range.Need a KitchenAid KESS907SSS manual? We have 3 online manuals for this item!
Question posted by ldudevoir on October 2nd, 2013
Self Clenaing Cycle Burned Up My Oven?
light use of this 5 year old oven and now this? I can't believe it. I bought kicthen Aid because in the past they had always been a great appliance. The microwave fan just went out as well... just shy of that appoliance turning 5. I will never buy Kitchen Aid again
Current Answers
Related KitchenAid KESS907SSS Manual Pages
Dimension Guide - Page 1

...range will not be level for use with not less than ¹⁄₄" (0.64 cm) flame retardant millboard covered with a nominal 1³⁄₈" (34.93 mm) diameter connection opening. 30" (76.2 cm) Freestanding and Slide-In Electric Range... If installing a range hood or microwave hood combination above the range, follow the range hood or microwave hood combination installation ...
Installation Guide - Page 3

...must end in the kitchen.
■ To eliminate the risk of burns or fire by installing a range hood or microwave range hood combination that projects horizontally a minimum of 5" (12.7 cm)...mm) carbide-tipped masonry drill bit (for use with the range, see "Install Anti-Tip Bracket" section.
■ Grounded electrical supply is located inside the oven door on the model/serial rating plate. ...
Installation Guide - Page 4

...front of range**
F. 23" (58.4 cm) countertop notch to the floor during transit. See "Electrical Connection" section. Model/serial number plate (located on the right-hand side oven door trim)
D. 30" (76... countertop; The appliance wiring will need to underside of this range must be raised approximately 1" (2.5 cm) by adjusting the leveling legs.
**When installed in *
E. 30" (76.2 ...
Installation Guide - Page 5

...covered with ranges.
5
Use a 3-wire UL listed, 40- opening depth
E. 30" (76.2 cm) min. Junction box - 8" (20.3 cm) to the cabinet. Electrical Requirements - Do not use with not...max. IMPORTANT: If installing a range hood or microwave hood combination above code standards can be using and follow the range hood or microwave hood combination installation instructions for 25"...
Installation Guide - Page 7

... the floor behind the range to the floor. Using 2 or more people to underside of the range cooktop. Measure from floor to move and install range. Range must be the difference between the 2 measurements you have just taken.
7
Remove oven racks and parts package from the range. Range side frame C.
Keep cardboard bottom under range. To place range on its back...
Installation Guide - Page 15

... supply cord-connected ranges: 1. If removing the range is necessary for the anti-tip bracket securely attached to floor. ■ Slide range back so rear range foot is under anti-tip
bracket.
6. Using two or more people, slide range onto cardboard or
hardboard to do so can result in range. 5. For direct-wired ranges:
WARNING
Electrical Shock Hazard Disconnect...
Use & Care Guide - Page 1

ELECTRIC RANGE
ARCHITECT® SERIES II
Use & Care Guide
For questions about features, operation/performance, parts, accessories or service, call: 1-800-422-1230 or visit our website at www.kitchenaid.com
In ...
Use & Care Guide - Page 2
... System 12 Cooktop Controls - Option 7 18
OVEN USE 19 Aluminum Foil 19 Bakeware 19 Meat Thermometer 19 Temperature Probe 19 Oven Vent 20 Positioning Racks and Bakeware 20 Bake 20... 25
RANGE CARE 26 Self-Cleaning Cycle 26 General Cleaning 27 Oven Light(s 28 Oven Door 28 Storage Drawer 29 Warming Drawer 29
TROUBLESHOOTING 29
ASSISTANCE OR SERVICE 30 In the U.S.A 30 Accessories...
Use & Care Guide - Page 4

... of utensil to burner will expose a portion of the heating element to cause burns. Always place oven racks in the manual. For self-cleaning ranges -
■ Do Not Clean Door Gasket - Loose-fitting or hanging garments should not be worn while using the range, follow basic precautions, including the following:
■ WARNING: TO REDUCE THE RISK...
Use & Care Guide - Page 10

... A
REMEMBER: When range is in death or fire.
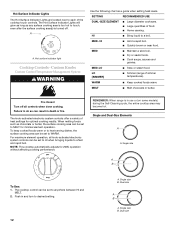
Single, Dual and Triple-Size Elements
A
A. Single size
A B
To Use: 1.
Failure to ...This allows time for 208V operation without affecting cooking performance. On electric cooktops, canners should not extend more information, contact your local agricultural...Self-Cleaning cycle, the entire cooktop area may become hot.
Use & Care Guide - Page 12
..., the surface cooking area can result in death or fire. i
REMEMBER: When range is turned off all knob-activated electronic system controls can be set to WARM. The...cooking results. Push in use or (on some models) during the Self-Cleaning cycle, the entire cooktop area may become hot.
Dual size
A B
A. Hot Surface Indicator Lights The Hot Surface Indicator Lights are located next to ...
Use & Care Guide - Page 14

... ■ Simmer. REMEMBER: When range is in the same way as a guide when setting heat levels. To Use DUAL: 1.
Power on some models) during the Self-Cleaning cycle, the entire cooktop area may become... meat.
■ Cook pudding, sauce, icing or gravy.
Turn knob to a boil. The light will glow as long as any surface cooking area is turned off all controls when done cooking. Single...
Use & Care Guide - Page 19

... permanent damage to the oven bottom finish, do not line the oven bottom with any type of foil, liners or cookware.
■ For best cooking results, do not cover entire rack with this appliance.
■ Insert the thermometer into the meat ½" (1.3 cm) more and read again.
WARNING
Burn Hazard Use an oven mitt to another...
Use & Care Guide - Page 22
... used to maintain oven temperature, while the fan constantly circulates the hot air. Press START. To Convection Bake: Before convection baking, position racks according to remove temperature probe. They will prompt a food check at least 1" (2.5 cm) of space between 170°F and 500°F (77°C and 260°C).
22 The convection bake range...
Use & Care Guide - Page 26
... Self-Cleaning cycle uses very high temperatures, burning soil to determine the desired cleaning level. Use a damp cloth to clean this area.
■ Wipe out any pad or open the oven door to heavy soil. Exposure to slide. Heavy soil results in the display. This will not work during the Self-Cleaning cycle.
The clean time can result. RANGE...
Use & Care Guide - Page 27
See "Clock/Timer Display" section. "DELAY" will appear on the oven display. When the cycle is complete and the oven cools, "SELF CLEAN COMPLETE" will also appear on surface and scrape. These spills may remove numbers. Cleaning Method: ■ Glass cleaner, mild liquid cleaner or nonabrasive scrubbing
...
Use & Care Guide - Page 28
... the light on some models, when the oven door is off . Plug in the Off position.
OVEN AND ROASTING RACKS
Cleaning Method: ■ Self-Cleaning cycle:
See "Self-Cleaning Cycle" first. Remove racks or they will come on each side.
3.
The oven door is a standard 15-watt appliance bulb. Close the oven door as far as it is opened. Unplug range...
Use & Care Guide - Page 30

...; On some models, does the cooling fan run when the oven is normal for the fan to build every new KITCHENAID® appliance. If a letter followed by a number? Self-Cleaning cycle will fit right and work right because they are made with : ■ Features and specifications on your appliance. Level the range. ASSISTANCE OR SERVICE
Before calling for...
Use & Care Guide - Page 31
...our website at 1-800-442-9991 and follow the menu prompts. Proof of appliances.
■ Use and maintenance procedures.
■ Accessory and repair parts sales.
■ ...KitchenAid designated service company.
KITCHENAID® ELECTRIC RANGE WARRANTY
LIMITED WARRANTY
For one year from the date of purchase, when this major appliance is operated and maintained according to ...
Use & Care Guide - Page 32
...electrical or plumbing codes, or use of your major appliance for repairs. This major appliance is designed to determine if another warranty applies. Repairs to KitchenAid within 30... TO ONE YEAR OR THE ...appliance if it . Major appliances with published installation instructions.
10. Repairs when your major appliance, to replace or repair house fuses, or to repair or replace appliance light...
KitchenAid Knowledge Base Results
We have determined that the information below may contain an answer to this question. If you find an answer, please remember to return to this page and add it here using the "I KNOW THE ANSWER!" button above. It's that easy to earn points!-
Setting the Self-Clean cycle
... product. See "Clock/Timer Display" section in the display. Do not block the oven vent(s) during the Self-Cleaning cycle. The door gasket is set between 3 hours 30 minutes and 4 hours 30 minutes for a good seal. The Self-Cleaning cycle uses very high temperatures to burn soil to clear the oven display. Do not wipe any pad or open the... -
Tips for using the Self-Cleaning feature - Ranges and built-in ovens
... off during the Self-Cleaning cycle. Remove any loose soil out of the oven to move birds to 5 years Greater than one year 1 to another closed completely or it has completely cooled could be set or turned on steel in the oven may result in ovens Using the Control Lock feature << If they may burn or melt... -
Temperature probe - Architect Series II - gas and electric ranges
...Press Off or open the oven door to enter a temperature other than the one displayed. then repeat the above steps. gas and electric ranges How do I use : Before using, insert the probe into ... the probe is reached, the oven will shut off automatically and "Cooking Complete" or "End" will show the temperature increasing in determining the doneness of -cycle tones will appear as possible....
Similar Questions

How Do I Replace A Front Right Burner Element When The Knobs Are In Front?
Right front burner element "burned out". How do I open flat-glass cooktop to expose the burner eleme...
Right front burner element "burned out". How do I open flat-glass cooktop to expose the burner eleme...
(Posted by Yazmin50 7 years ago)

Self Clean Cycle Ran; Now Oven Doesn't Work
This is the second time this has happened . First time it was under warranty; no such luck this time...
This is the second time this has happened . First time it was under warranty; no such luck this time...
(Posted by Feileacan42 7 years ago)

Dual Burner Switch Replacement For The Model #kess907 Electric Range
How do i replace the left side dual burner switch and what is the part number ?
How do i replace the left side dual burner switch and what is the part number ?
(Posted by woodsv 9 years ago)
Run Self Cleaning Cycle Now Door Is Locked And Display Pamel Is Not Working
(Posted by johnvrska 12 years ago)

First: What Price Do You Charge For Your Answers? Second:
KitchenAid electric range, Mod. YKESH307HS0 presents F5:E3 in place of time in the clock display. W...
KitchenAid electric range, Mod. YKESH307HS0 presents F5:E3 in place of time in the clock display. W...
(Posted by ve3auw 14 years ago)