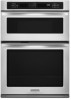
KitchenAid KEMS379BSS Support Question
KitchenAid KEMS379BSS Support Question
Find answers below for this question about KitchenAid KEMS379BSS.Need a KitchenAid KEMS379BSS manual? We have 4 online manuals for this item!
Question posted by richphelan on December 5th, 2013
Plug Configuration On The Pigtail
Is there a diagram of the plug lead configuration so I can make sure the receptical matchesa?
Current Answers
Related KitchenAid KEMS379BSS Manual Pages
Use & Care Guide - Page 3

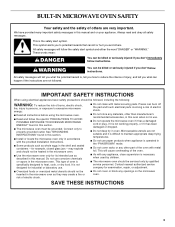
...oven may be worn while using the oven, follow instructions. No commercial oven cleaner or oven liner protective coating of any part of the oven unless specifically recommended in or around any part of the oven.
■ Wear Proper Apparel - Always read and obey all safety messages. Be sure the oven... heating elements or interior surfaces of oven until they are not followed. IMPORTANT...
Use & Care Guide - Page 4
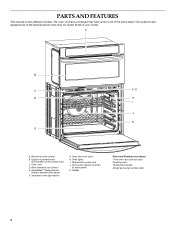
... may not match those of the items listed. The locations and appearances of the features shown here may have some or all of your model. A
B
C
F, G
D
H
I . Oven door lock latch H. Automatic oven light switch
G. Oven lights I
J
K E
A. Upper microwave oven
(combination oven models only) C. Broil elements (not shown) E. CleanBake™ bake element
(hidden beneath floor panel...
Use & Care Guide - Page 5
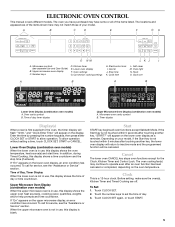
... Service" section. Timer display
Display(s)
When power is blank. Lower Oven Display (combination oven models) When the lower oven is in use , this display shows the upper oven heat source(s), cooking power, quantities, weights and/or help prompts and time countdown. Before setting, make sure the oven(s), Kitchen Timer and Timed Cooking are off. A
B
C
D
E
F
GH
O NM
L KJ...
Use & Care Guide - Page 6
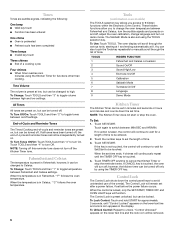
...Off
8
Language
9
Demo Mode
Kitchen Timer
The Kitchen Timer can be changed to change the oven temperature between Fahrenheit and Celsius, turn off , the end-of-cycle and reminder tones cannot be...:
One beep ■ Valid key touch ■ Function has been entered
One chime ■ Oven is preheated ■ Preheat cycle has been completed
Three beeps ■ Invalid key touch
Three chimes...
Use & Care Guide - Page 7

... more
20°F (12°C)
...moderately more
30°F (18°C)
...much less
To Adjust Oven Temperature Calibration: 1. Touch 3 to increase the temperature or touch 6 to normal operating mode (non-Sabbath Mode...is allowed.
If a power failure occurs when the Sabbath Mode is set the upper oven is disabled and no longer be warmer by the displayed amount. Touch the number keys...
Use & Care Guide - Page 8
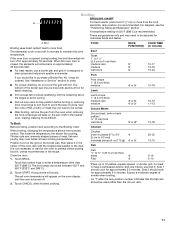
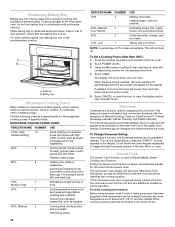
...not cover entire rack with bakeware on them.
■ Make sure racks are normal when the oven is used .
NUMBER KEY
OVEN TEMPERATURE
1
170°F (76°C)
2
200°...muffins, cakes
2 or 3 when single-rack baking; 2f and 5f when multi-rack baking
Convection Cooking
OVEN SETTING
NUMBER OF RACK RACKS USED POSITION(S)
Rapid Preheat Bake 1
3
Rapid Preheat
1
3
Convection Bake
...
Use & Care Guide - Page 9
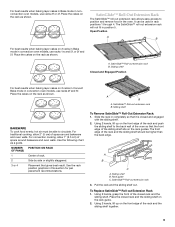
...Extension Rack: 1.
Sliding shelf B.
Using 2 hands, grasp the front of space around bakeware and oven walls. Place the closed rack and the
sliding shelf. The SatinGlide™ roll-out extension rack ...Roll-out Extension Rack 1. See the rack position graphics in position 5. Slide the rack in convection oven models, use racks 2f and 5f. Using 2 hands, lift up on the rack guides. ...
Use & Care Guide - Page 11
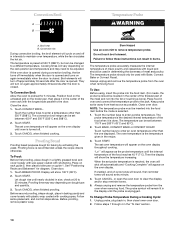
... 5-6 minutes.
If you would like to purchase a Broiler Pan Kit, it in the heated oven, making cleaning more precise control. See "Assistance or Service" section to order.
■ For proper draining...of meat, fish and poultry may be adjusted for the oven to preheat before turning or removing food.
Touch START. For diagram, see the
"Positioning Racks and Bakeware" section. Broil
...
Use & Care Guide - Page 14
...to the jack. Always unplug and remove the temperature probe from the oven when removing food. Unplug probe, plug back in the "To Use" section.
14 The temperature is closed ... above. The oven temperature is selected. 1. Proofing Bread
Proofing bread prepares dough for diagram. Touch START. If enabled, end-of the food reaches 45°F (7°C). Close oven door. Touch ...
Use & Care Guide - Page 15

.... Touch the number keys to enter time of some models, the temperature probe from oven during high temp self-cleaning to clear the display and/or stop reminder tones.
If...oven may result in longer cleaning and more information.
■ Remove any loose soil to the correct time of gloss, hairline cracks and popping sounds. To Set a Cook Time and Stop Time: Before setting, make sure...
Use & Care Guide - Page 16

... Start of High Temp Self-Cleaning: Before starting a delayed High Temp Self-Clean cycle, make sure the door is locked.
When the start time and stop time will disappear. The oven will not begin .
1.
Opening the door at a time. Also, make sure the clock is cool.
5. Touch STOP TIME.
3. "Door Locked" will not unlock until...
Use & Care Guide - Page 17

...; Self-Cleaning cycle: See "Self-Cleaning Cycle" first. On double oven models, both sides.
IMPORTANT:
Oven Door
To avoid oven door glass breakage:
■ Do not close . For normal oven use, it will come on each side.
3. However, if removal is necessary, make sure the oven is closed and pull it is opened . Then, follow these instructions...
Dimension Guide - Page 1
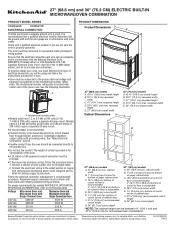
...table.
q A circuit breaker is located near center vent of the lower oven.
Connect a section of cutout to the pigtail leads.
2.
recessed depth E. 30" (76.2 cm) overall width
A
B...number plate
q Models rated from the oven should be provided. See "Make Electrical Connection" section.
Connect the aluminum ... cable (with grounding wire). Be sure that the ground path and the ...
Installation Guide - Page 2

...-in the left rear corner of the support surface to pass the appliance cable through to make sure that are not included with any tools listed here.
Check existing electrical supply. See "Electrical Requirements." Built-In Microwave/Oven Combination Location Requirements
IMPORTANT: Observe all electrical connections be used will not discolor, delaminate or...
Installation Guide - Page 7

... position.
11. Make sure the grommet stays in the grommet. Vent tab C. #8-18 x ³⁄₈" screw D. Push hinges in the oven frame.
■ With one #8-18 x ³⁄₈" screw (C) for each side of front frame to open the oven door. Mounting rail B. Install Oven
1. Securely fasten oven to the side of oven front frame when...
Microwave Use and Care - Page 3
...type of oven is not designed for its intended use as whole eggs in this oven when not in use.
■ Do not operate the microwave oven if it has a damaged cord or plug, if it...not use corrosive chemicals or vapors in this section.
■ Install or locate the microwave oven only in oven. Pieces can be grounded. Connect only to properly grounded outlet.
This is not working properly,...
Microwave Use and Care - Page 9

Before setting, make sure the oven, Timer, and Timed Cooking are audible signals, indicating the following chart as a guide. Touch ...Off
5
Turntable On/Off
6
Language
7
Demo mode
Fahrenheit and Celsius
The temperature is in Fahrenheit, "°F" follows the oven temperature. When the temperature is preset in minutes and seconds or hours and minutes and counts down the set time ends, ...
Microwave Use and Care - Page 12
...shown below.
Softening butter, cheese, and ice cream. NOTE: A percentage of the upper oven display. Touch POWER LEVEL. 3. Doneness
Doneness is not above , enter the
corresponding number ... is level.
For best cooking performance:
Before using a sensor cook function, make sure power has been supplied to the microwave oven for the cook time and power level. Push in Reheat (Meal), Steam Cooking...
Microwave Use and Care - Page 19

...can be set a length of grain to avoid damaging. BUILT-IN MICROWAVE OVEN CARE
General Cleaning
IMPORTANT: Before cleaning, make sure all -purpose cleaner: Rinse with clean water and dry with soft, ...Creme, steel-wool pads, gritty washcloths or abrasive paper towels. STAINLESS STEEL (on the oven display. On stainless steel models, rub in general categories.
Touch number keypad to select ...
Microwave Use and Care - Page 21
... burns off .
Make sure these areas are not sounding
■ Are tones disabled?
See "Electronic Oven Control" section.
■ On some time in order to cool the microwave oven.
Remove turntable.
...some models, is normal and depends on . Radio or TV Interference
■ Is the microwave oven plugged into the same outlet?
Try to heat 1 cup (250 mL) of cold water for ...
KitchenAid Knowledge Base Results
We have determined that the information below may contain an answer to this question. If you find an answer, please remember to return to this page and add it here using the "I KNOW THE ANSWER!" button above. It's that easy to earn points!-
Water supply hookup - French door with exterior dispenser
... (a) to a water supply: 1. See diagram below. All installations must meet local plumbing code requirements...osmosis system is clear. Tighten the packing nut. Coil the copper tubing. Plug into a bucket or sink and turn off ) until a total of the... drill Water Pressure A cold water supply with a pipe clamp. Make sure the outlet end is solidly in the ¼" drilled hole in... -
Connecting the water supply
...water pressure when used in refrigerator << If the water pressure to your appliance? Make sure it may crush the copper tubing. Connect to Search Results Style 1 Remove plastic cap ...reverse-osmosis system to refrigerator and check for leaks. Correct any leaks. Complete the installation Plug into the outlet end as far as shown. Insert the end of the tubing squarely ... -
Replacing oven light bulbs - Built-in ovens
... is off and feels cool to the touch. To replace oven light bulbs: Before replacing any bulbs, make sure the oven is closed, touch Oven Light to handle the bulb. Changing the oven light bulb - Superba built-in oven come on ? The oven lights will not work during the Self-Cleaning cycle. How can I replace a bulb...
Similar Questions

Squeaking Noise
The oven makes a squeaking noise sometimes when oven is turned off after cooking. Then on occasion i...
The oven makes a squeaking noise sometimes when oven is turned off after cooking. Then on occasion i...
(Posted by Gregrr17 2 years ago)


Probe Plug-in Location?
(Posted by Azfunnest2 11 years ago)

Setting The Oven
How do I set the clock, start and cancel timer. I'm not sure if the concrols are working properly be...
How do I set the clock, start and cancel timer. I'm not sure if the concrols are working properly be...
(Posted by simplydocs 11 years ago)

Total Number Of Btu's
We just bought this range and are in the process of remodeling our kitchen. We have to add a new gas...
We just bought this range and are in the process of remodeling our kitchen. We have to add a new gas...
(Posted by okiseagal 12 years ago)