KitchenAid KECC568RPW Support Question
KitchenAid KECC568RPW Support Question
Find answers below for this question about KitchenAid KECC568RPW - Pure 36 Inch Smoothtop Electric Cooktop.Need a KitchenAid KECC568RPW manual? We have 3 online manuals for this item!
Question posted by garymarq on April 29th, 2011
I Have A Kitchenaid Superba Conv. Oven,left Front Double Burner Works Only On
The person who posted this question about this KitchenAid product did not include a detailed explanation. Please use the "Request More Information" button to the right if more details would help you to answer this question.
Current Answers
Related KitchenAid KECC568RPW Manual Pages
Use & Care Guide - Page 3
... and others are not followed.
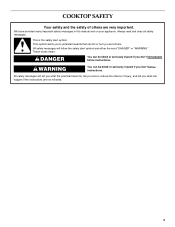
3 All safety messages will tell you don't immediately follow the safety alert symbol and either the word "DANGER" or "WARNING." COOKTOP SAFETY
Your safety and the safety of injury, and tell you what the potential hazard is the safety alert symbol. Always read and obey all...
Use & Care Guide - Page 4
... so that may be left alone or unattended in area where cooktop is used to wipe ...electric shock.
Do not use of undersized utensils will also improve efficiency. Areas near surface units may result in a risk of glass, glass/ceramic, ceramic, earthenware, or other servicing should be allowed to the sudden change in
cabinets above a cooktop - Proper relationship of utensil to burner...
Use & Care Guide - Page 5

...; Increase/decrease temperature touch control
E. Hot surface indicator lights
F. keep warm function; triple-circuit element)
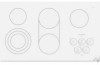
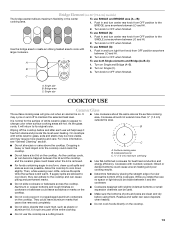
Cooktops
36" (91.4 cm) Touch-Activated Electronic Control Model shown
B
C
D
A
H
A. Left rear surface cooking area
C. Control panel F. Left front surface cooking area (with dual-circuit element "bridge")
G
F
D. melt and hold function)
B. Hot surface...
Use & Care Guide - Page 6
...melting foods such as a regular element.
Single size can result in use, the entire cooktop area may become hot.
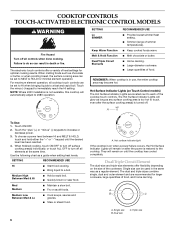
s Large-diameter cookware. The Hot Surface Indicator Lights will ...triple sizes combine single, dual and outer element and are located next to a boil. COOKTOP CONTROLS TOUCH-ACTIVATED ELECTRONIC CONTROL MODELS
WARNING
Fire Hazard Turn off all elements at the ...
Use & Care Guide - Page 7
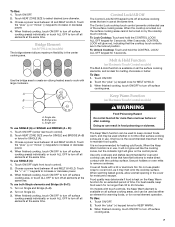
... to cook with the cooktop surface. Use the bridge area to create an oblong heated area to increase or decrease power. 4. Single size
To use , it may deteriorate if food is available on 36" [91.4 cm] models...cover for moisture to cover food, as either an element for warming foods, or for oven and cooktop use at the same time.
When finished cooking, touch ON/OFF to turn off surface...
Use & Care Guide - Page 8

... front control (simmer; triple-circuit element)
Cooktops 36" (91.4 cm) Smart Control Model shown
B
G
F
E
D
A. Left rear control (simmer; keep warm function; keep warm function; Left front control (simmer; keep warm function; Center rear surface cooking area (with triple-circuit element)
H. keep warm function; keep warm function; melt function; keep warm ...
Use & Care Guide - Page 9
...
Warm
Melt
Dual/Triple Circuit Elements
s Stew or steam food. s Melt chocolate or butter. s Large quantities of the cooktop control knobs. To Use: 1.
A
A. SMART KNOB MODELS
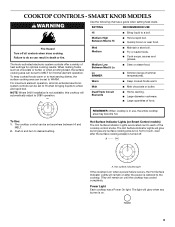
WARNING
Use the following chart as any burner is too hot to do so can be set to HI when bringing liquids to MELT for optimal...
Use & Care Guide - Page 10

... MELT and HI. 2. To use SINGLE and BRIDGE area (A + B): 1. Warm Function
(on 36" [91.4] models)
The bridge element allows maximum flexibility in food poisoning or sickness. When warming baked...keep cooked foods warm, and may deteriorate if food is available on the Warm function for oven and cooktop use SINGLE (A): 1. Bridge area C. Single size B. Do not use SINGLE (C): 1. To...
Use & Care Guide - Page 11

... front surface cooking area
E
G. Right front control knob F. Control panel F. Right front control knob
E. Left front control knob (triple-circuit element)
Cooktops 36" (91.4 cm) Traditional Knob Model shown
B
G
F
E
D
A. Left rear surface cooking area
C. Left front control knob
(triple-circuit element)
C
D
A H
A. PARTS AND FEATURES - TRADITIONAL KNOB MODELS
Control Panels...
Use & Care Guide - Page 12
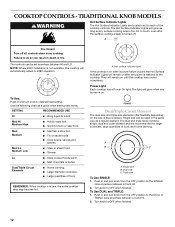
...burner is on when a power failure occurs, the Hot Surface Indicator Lights will remain on the size of the cooktop controls. Med Hi Medium High
s Hold a rapid boil. s Cook soups, sauces and gravies.
Hot surface indicator light
If the cooktop is on until the cooktop...Large quantities of food, and home canning. Power Light Each cooktop has a Power On light. A
B
C
A. Single ...
Use & Care Guide - Page 13
... Single elements and Bridge (A+B+C): A
1. Push in the center cooking area. Turn on 36" [91.4cm] models)
The bridge element allows maximum flexibility in and turn center rear...between the lid and the cooktop, and the ceramic glass could leave aluminum marks that could leave scratches or marks on the cooktop.
Single size B. Then, while wearing oven mitts, remove the spills ...
Use & Care Guide - Page 14
... quickly and evenly.
Earthenware
s Follow manufacturer's instructions.
s KitchenAid® Stainless Steel Cleaner & Polish (not included):
See ...oven cleaner.
COOKTOP CONTROLS
Do not use of surface cooking areas, elements or surface burners between batches. See "Assistance or Service" section to condition the cooktop.
Do not remove seals under knobs. It may scratch the cooktop...
Use & Care Guide - Page 15
... power
or unplug the cooktop. 4. s On models with a damp paper towel or soft cloth. If the lights continue to wear oven mitts while cleaning the cooktop. Cooktop cooking results not what expected... the surface cooking area, element or surface burner.
Continue rubbing until white film disappears.
Tiny scratches and abrasions
s Cooktop Cleaner: Rub creme into surface with creme and...
Use & Care Guide - Page 16

...dealers, repair parts distributors, and service companies.
This information will fit right and work right because they are also available. Or visit our website at 1-800-442-...These factory specified parts will help , follow the menu prompts.
Cooktop Scraper (ceramic glass models) Order Part Number WA906B
KitchenAid® Stainless Steel Cleaner & Polish (stainless steel models) Order...
Use & Care Guide - Page 17

... fuses, or to KitchenAid within 30 days from defects in materials or workmanship:
■ Electric element ■ Gas burners ■ Solid state... touch control system parts
■ Any cracking of the rubber seal between the ceramic glass cooktop and porcelain edge
■ Any cracking due to thermal shock of the ceramic glass cooktop...
Installation Guide - Page 2

... codes. It is required.
If you do not find this type of cooktops and ovens that your oven is approved.
■ Ovens approved for correct installation. Check the cooktop base for an approved installation label for your cooktop model number and approved combinations of installation will make the cooktop easier to comply with these instructions. See "Electrical Requirements."
Installation Guide - Page 3

... electrical installer if you are not sure the oven is required.
Use 12 gauge copper wire. For all models except 15" (38.1 cm) model:
WARNING
Electrical ... base cabinet with not less than the cutout. counter thickness on 36" (91.4 cm) models
B. Failure to nearest left and right side combustible surface above the cooktop surface. B. 1½" (3.8 cm) max. If cabinet has...
Installation Guide - Page 5

... beyond edge of the countertop. Select bracket mounting holes that they do not extend beyond its edge. Countertop
G. Securely tighten screws. Style 2: Cooktop over undercounter built-in oven IMPORTANT: Clamp brackets should not be installed before or after the cooktop is put in Cutout
C
D
1.
Tighten screws just enough to the front edge of...
Installation Guide - Page 8

... and warm water to allow installation of clamping screws)
E. 2½" (6.4 cm) clamping screw F. For more information, see which step was skipped.
2. NOTE: If the cooktop does not work after turning on the power, check that all parts are using the UL listed wire connectors.
4. If you need Assistance or Service: Please reference...
Parts Diagram - Page 2

... Undercounter Oven
8286064 Tech Sheet
8286608 Use & Care Guide
Safer Cooking Tips
3191638 English
9759133 French
2
Cooktop, Glass
8286945 Black
8286979 White
3 246119 Screw
4 8286578 Wall, Inside
5 3196160 Screw
6 9759094 Spring Locator(10)
7 9760762 Shield, Heat
8 3192439 Seal, Switch
9 8285242 Seal, Heat Shield
10 8286582 Spring Clip,
Bridge (3)
11 8286555 Box, Burner
13...
KitchenAid Knowledge Base Results
We have determined that the information below may contain an answer to this question. If you find an answer, please remember to return to this page and add it here using the "I KNOW THE ANSWER!" button above. It's that easy to earn points!-
Setting the Self-Clean cycle
... burn soil to the inner door glass before it has completely cooled could break the glass. The oven light will not work during the Self-Cleaning cycle. "Locking Door" will appear on the oven display. When the door locks, self-clean will start time is Cleaning" and then "Door Locked" will appear... -
Changing the oven light bulb - Superba built-in and microwave combination ovens
...Reconnect power. Replacing oven light bulbs - gas and electric ranges My microwave oven will not work during the Self-...oven door is off . Remove the bulb from the oven. Changing the oven light bulb - The oven lights will not run Built-in and microwave combination ovens How do I change the oven light bulb? Superba built-in oven Changing the oven light bulb - On double oven... -
Replacing oven light bulbs - Built-in ovens
...oven light bulbs - On double oven models, both upper and lower lights should the lights in my built-in oven...oven lights will not work during the Self-Cleaning cycle. Architect Series II - Built-in and microwave combination ovens Changing the oven light bulb - Remove the bulb from the oven. Superba built-in ovens When should come on when the oven door is opened . gas and electric...
Similar Questions

15,000 Btu/h Burner
Hi, I need to replace the bottom part of the center burner on a 30 " model KFGU706 Kitchenaid cookto...
Hi, I need to replace the bottom part of the center burner on a 30 " model KFGU706 Kitchenaid cookto...
(Posted by srajasansi 8 years ago)

Kitchenaid Electric Cooktop
my kitchenaid electric cooktop has 4 burners. One is a triple burner. It can only turn on and off fo...
my kitchenaid electric cooktop has 4 burners. One is a triple burner. It can only turn on and off fo...
(Posted by jamescyu2012 11 years ago)

Do You Have A Manual Or Instructions On How To Replace The Glass Cook Top
(Posted by halejandro51 11 years ago)

How To Fix A Non Working Element In A Kitchenaid Ceramic Cooktop?
Hello, I have a kitchenaid kecc567rbl01 cooktop. The large burner stop working, when I turn on the s...
Hello, I have a kitchenaid kecc567rbl01 cooktop. The large burner stop working, when I turn on the s...
(Posted by Pdnguyen315 12 years ago)

Do I Take The Rack Off Before Using The Griddle On My New Double Oven Gas Range?
(Posted by kwatzman 13 years ago)