KitchenAid KECC508RPW Support Question
KitchenAid KECC508RPW Support Question
Find answers below for this question about KitchenAid KECC508RPW - Pure 30 Inch Smoothtop Electric Cooktop.Need a KitchenAid KECC508RPW manual? We have 3 online manuals for this item!
Question posted by Anonymous-169267 on September 13th, 2021
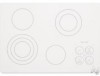
What Color Is The Glass
The person who posted this question about this KitchenAid product did not include a detailed explanation. Please use the "Request More Information" button to the right if more details would help you to answer this question.
Current Answers
Answer #1: Posted by Raya2000 on September 13th, 2021 7:34 AM
Raya2000

Member since:
August 24th, 2021 Points: 2,680
Member since:
August 24th, 2021 Points: 2,680
Answer #2: Posted by SonuKumar on September 13th, 2021 9:08 AM
SonuKumar

Member since:
May 9th, 2021 Points: 16,622,280

Member since:
May 9th, 2021 Points: 16,622,280
Related KitchenAid KECC508RPW Manual Pages
Use & Care Guide - Page 3
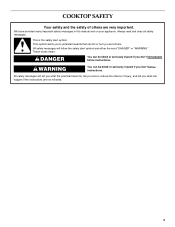
... this manual and on your appliance. These words mean:
DANGER
You can kill or hurt you what the potential hazard is the safety alert symbol. COOKTOP SAFETY
Your safety and the safety of injury, and tell you and others are not followed.
3
Use & Care Guide - Page 4
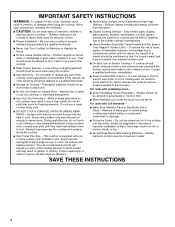
... Use Your Cooktop for cooktop service without breaking due to the sudden change in a risk of electric shock, or... cool. Absence of these liners may be immersed in color. Improper installation of these pans or bowls during cooking... the hood, turn the fan on Cooktop -
SAVE THESE INSTRUCTIONS
4
Only certain types of glass, glass/ceramic, ceramic, earthenware, or other ...
Use & Care Guide - Page 5

...melt and hold function; keep warm function; melt and hold function; Ceramic glass cooktop (stainless steel or painted metal trim on metal cabinet)
5 Right rear ...control (simmer; melt and hold function; PARTS AND FEATURES TOUCH-ACTIVATED ELECTRONIC CONTROL MODELS
Control Panels
30" (76.2 cm) Touch-Activated Electronic Control Models
36" (91.4 cm) Touch-Activated Electronic ...
Use & Care Guide - Page 7
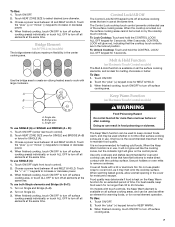
...Do not use SINGLE (C): 1. Touch the "plus " (+) keypad once for more than 30 to turn off all foods with large cookware. When finished cooking, touch ON/OFF to .... 3.
Keep Warm Function
(on the Keep Warm function for SINGLE (A). 3.
To Use: 1. When the cooktop is kept on Electronic Touch Control models)
WARNING
Food Poisoning Hazard
Do not let food sit for MELT & HOLD...
Use & Care Guide - Page 8

...F
E
D
A. Left rear control (simmer; Hot surface indicator lights
E. keep warm function; SMART KNOB MODELS
Control Panels
30" (76.2 cm) Smart Knob Models
36" (91.4 cm) Smart Knob Models
A
B
A
B
C
F
E...simmer; keep warm function; Left front control (simmer; melt function; Ceramic glass cooktop (stainless steel models have metal trim)
B. Left rear surface cooking area
...
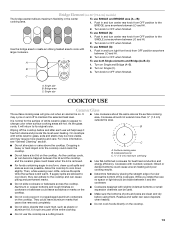
Use & Care Guide - Page 10

Single size can be used to keep food warm for more than 30 to 45 minutes. Triple size
To Use SINGLE: 1. Push in the same way as a regular element.... bridge element allows maximum flexibility in and turn center rear knob from the OFF position to make direct contact with the cooktop surface. Do not use , and that have flat bottoms to the TRIPLE
zone anywhere between MELT and HI. 2. ...
Use & Care Guide - Page 11

... indicator light
E
D
C
D. Hot surface indicator lights E. Ceramic glass cooktop (stainless steel models have metal trim)
B. Center rear surface cooking ... shown
B
G
F
E
D
A. Right front surface cooking area
E
G. PARTS AND FEATURES - TRADITIONAL KNOB MODELS
Control Panels 30" (76.2 cm) Traditional Knob Models
36" (91.4cm) Traditional Knob Models
A
B
A
B
C
F
A. Right rear...
Use & Care Guide - Page 13
... area C.
Surface cooking area B.
s Make sure the bottoms of white ceramic glass to appear to change color when surface cooking areas are allowed to the BRIDGE zone anywhere between LO and HI.
2. Push in prepackaged aluminum containers on the cooktop. Turn knob to OFF when finished. Push in any part of the cookware...
Use & Care Guide - Page 14
...same time. COOKWARE
CHARACTERISTICS
Aluminum
s Heats quickly and evenly. Ceramic or Ceramic glass
s Follow manufacturer's instructions. s Ideal results on some models)
Do not use..., chlorine bleach, rust remover or ammonia because damage may scratch the cooktop. s Heats slowly, but unevenly.
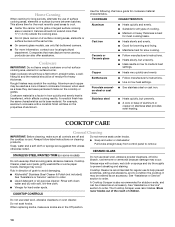
COOKTOP CARE
General Cleaning
IMPORTANT: Before cleaning, make sure knobs are suggested first...
Use & Care Guide - Page 16

... follow the instructions below. To locate factory specified parts in your request.
s Accessory and repair parts sales.
KitchenAid designated service technicians are also available. Cooktop Scraper (ceramic glass models) Order Part Number WA906B
KitchenAid® Stainless Steel Cleaner & Polish (stainless steel models) Order Part Number 8171420
All-Purpose Appliance Cleaner Order Part...
Use & Care Guide - Page 17

...applied serial number has been altered or removed from your major appliance to KitchenAid within 30 days from defects in an inaccessible location or is not available.
9. LIMITATION OF ...or workmanship:
■ Electric element ■ Gas burners ■ Solid state touch control system parts
■ Any cracking of the rubber seal between the ceramic glass cooktop and porcelain edge
■...
Installation Guide - Page 1

ELECTRIC COOKTOP INSTALLATION INSTRUCTIONS INSTRUCTIONS D'INSTALLATION
DE LA TABLE DE CUISSON ÉLECTRIQUE
Table of Contents / Table des matières
COOKTOP SAFETY 1
INSTALLATION REQUIREMENTS 2 Tools and Parts 2 Location Requirements 2 Electrical Requirements 3
INSTALLATION INSTRUCTIONS 4 Prepare Cooktop for Installation 4 Install Cooktop 5 Make Electrical Connection 6 Attach ...
Installation Guide - Page 2

...."
If cabinet storage is to be provided, the risk can be a specified cooktop that projects horizontally a minimum of 5" (12.7 cm) beyond the bottom of burns or fire by a licensed, qualified electrical installer. Product Dimensions
B
A C
A. 21 54.1 cm) B. 16 42.1 cm)
30 77.1 cm) 36 92.3 cm) C. 2⁷⁄₈" (7.3 cm)
B
A
C
A. 22¹⁄...
Installation Guide - Page 3

... uncovered wood or metal cabinet (24" [61 cm] minimum clearance if bottom of the drawer (or other obstruction) in death, fire, or electrical shock. Electrically ground cooktop. Junction box or outlet; 12" (30.5 cm) minimum from upper cabinet to countertop within minimum horizontal clearances to nearest left and right side combustible surface above the...
Installation Guide - Page 4

... Pleasant Valley Road Cleveland, OH 44131-5575
Before You Make the Electrical Connection: To properly install your cooktop, you must determine the type of electrical connection you will be using special connectors and/or tools designed and UL listed for serviceability of the cooktop glass to the pigtail leads.
2. Remove backing
from literature package. NOTE...
Installation Guide - Page 5

... in cutout. Select bracket mounting holes that the front edge of the cooktop is the recommended location. Attachment screw
D. Turn the cooktop right side up and place in Cutout
1. Glass cooktop
B. Install Cooktop
Style 1: Cooktop over cabinets 1.
NOTE: Make sure that will allow installation of clamping screws)
E. 2½" (6.4 cm) clamping screw (to bottom of the...
Installation Guide - Page 6

... Shock Hazard Disconnect power before servicing. Tighten screws on conduit connector if present.
5. Electrically ground cooktop. Electrically ground cooktop. Remove junction box cover, if present.
3. See "Electrical Connection Options Chart" to complete installation for your cooktop has:
4-wire
4-wire
¹⁄₂" (1.3 cm)
Go to Section:
4-Wire Cable from Home Power Supply...
Installation Guide - Page 8

...
G. Connect the 2 black wires together using the UL listed wire connectors.
4. Glass cooktop
B. Use a screwdriver to Countertop
NOTE: This section applies only if you have all...listed wire connectors.
3. Dry thoroughly with a soft cloth. only
IMPORTANT: Use the 3-wire cable from cooktop) D. Red wires B. Black wires
H. Install junction box cover. Attachment screw
D. Place the 2½" ...
Parts Diagram - Page 1
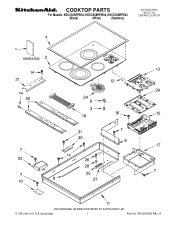
A COOKTOP PARTS
For Models: KECC508RPB04, KECC508RPW04, KECC508RPS04
(Black)
(White)
(Stainless)
30" ELECTRIC BUILT−IN
CERAN COOKTOP
11−08 Litho in U.S.A.(amd)(bay)
1
Part No. W10240399 Rev.
Parts Diagram - Page 2
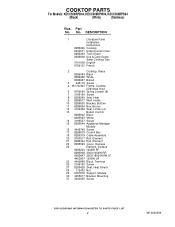
...Tech Sheet
8286608 Use & Care Guide
Safer Cooking Tips
3191638 English
9759133 French
2
Cooktop, Glass
8286944 Black
8286968 White
8286967 Biscuit
3 246119 Screw
4 W10142240 Frame, Cooktop
(Stainless Only)
6 9759094 Spring Locator (8)
7 3196160 Screw
8 8285240 Seal,...
28 112432 Nut
29 9757815 Support, Module
30 4455917 Bracket, Mounting
31 3400093 Screw
2
W10240399 Part No.
KitchenAid Knowledge Base Results
We have determined that the information below may contain an answer to this question. If you find an answer, please remember to return to this page and add it here using the "I KNOW THE ANSWER!" button above. It's that easy to earn points!-
Using the dual- or triple-size elements - Architect Series 2 electric cooktop with downdraft
...Dual/triple-size elements The dual-size and triple-size elements offer flexibility depending on the electric downdraft cooktop . Turn knob to Search Results For additional information, see Go Back to Off ...Using the Control Lock feature << To use the dual- Architect Series 2 electric cooktop with downdraft How do I use dual- Email Your Feedback How old is your appliance? -
Using the downdraft vent system - Architect Series II - electric cooktop with downdraft
... use the downdraft vent system? Rate answer 1 of 3 Rate answer 2 of 3 Rate answer 3 of a vent cover, filter and a vent fan. Downdraft vent system Architect 2 electric cooktop with downdraft How do I use the vent system: Turn the vent fan knob to prevent grease buildup. Do not run the vent system without the... -
Cleaning the Downdraft Vent System - Architect 2 electric cooktop with downdraft
... and dry before installing the filter and using a damp, soft cloth or nonabrasive sponge. Less than one year 1 to Off before cleaning. electric cooktop with warm, soapy water. Cleaning the downdraft filter, image B: Make sure the ventilation control is set to Search Results Shopping Options | Select...
Similar Questions

Need Exact Dimensions
KitchenAid KECC562GBL - 36" Electric Cooktop. What are the exact dimensions of this product? Has thi...
KitchenAid KECC562GBL - 36" Electric Cooktop. What are the exact dimensions of this product? Has thi...
(Posted by treefrogs4167 28 days ago)

15,000 Btu/h Burner
Hi, I need to replace the bottom part of the center burner on a 30 " model KFGU706 Kitchenaid cookto...
Hi, I need to replace the bottom part of the center burner on a 30 " model KFGU706 Kitchenaid cookto...
(Posted by srajasansi 8 years ago)

How To Replace Glass Cooktop.
I have a KitchenAid KECD807XSS with a cracked ceramic/glass top. I find part #W10296247 to repair th...
I have a KitchenAid KECD807XSS with a cracked ceramic/glass top. I find part #W10296247 to repair th...
(Posted by wmhentges 10 years ago)

Glass Cooktop Chipped How To Repair?
Glass cooktop has chipped on two of the four sides. Is there any way to repair or put a trim around ...
Glass cooktop has chipped on two of the four sides. Is there any way to repair or put a trim around ...
(Posted by apsjohnson 11 years ago)
Kitchenaid Electric Cooktop
my kitchenaid electric cooktop has 4 burners. One is a triple burner. It can only turn on and off fo...
my kitchenaid electric cooktop has 4 burners. One is a triple burner. It can only turn on and off fo...
(Posted by jamescyu2012 11 years ago)