KitchenAid KBMS1454SSS Support Question
KitchenAid KBMS1454SSS Support Question
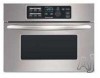
Find answers below for this question about KitchenAid KBMS1454SSS - 24 in. Microwave Oven.Need a KitchenAid KBMS1454SSS manual? We have 3 online manuals for this item!
Question posted by compuquak on February 27th, 2012
Dows The 24' Mw Need A Mounting Kit - Looks Like It Can Slide In.
The person who posted this question about this KitchenAid product did not include a detailed explanation. Please use the "Request More Information" button to the right if more details would help you to answer this question.
Current Answers
Related KitchenAid KBMS1454SSS Manual Pages
Use & Care Guide - Page 1
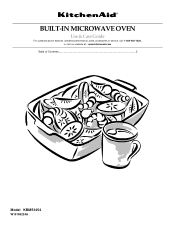
BUILT-IN MICROWAVE OVEN
Use & Care Guide
For questions about features, operation/performance, parts, accessories or service, call: 1-800-422-1230, or visit our website at... www.kitchenaid.com
Table of Contents...2
Model KBMS1454
W10168224A
Use & Care Guide - Page 2

... CONTROL 5 Display 5 Start 6 Cancel/Off 6 Add a Minute 6 Dial 6 Select 6 Clock 6 Tones 6 Demo Mode 6 Control Lock 7 Cooling Fan 7
MICROWAVE OVEN USE 7 Food Characteristics 7 Cooking Guidelines 7 Cookware and Dinnerware 8 Aluminum Foil and Metal 8 Microwave Cooking Power 8 Cook Time Set 9 Doneness 9 Meal Prep Cook 9 Meal Prep Reheat 10 Meal Prep Defrost 10 Sensor Cooking 11...
Use & Care Guide - Page 3
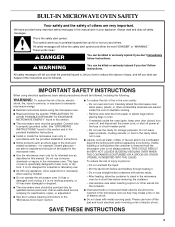
...9632; Liquids, such as whole eggs in this manual. IMPORTANT SAFETY INSTRUCTIONS
When using the microwave oven.
■ Read and follow the safety alert symbol and either the word "DANGER" ...overheat the liquid.
- Do not use corrosive chemicals or vapors in the microwave oven.
■ Use the microwave oven only for storage purposes. THIS COULD RESULT IN VERY HOT LIQUIDS SUDDENLY BOILING ...
Use & Care Guide - Page 4

... serviceman if the grounding instructions are not completely understood, or if doubt exists as to accumulate on the microwave oven.
■ Do not let cord hang over edge of table or counter. ■ Do not mount over a sink.
■ Do not cover racks or any openings on sealing surfaces.
(c) Do not operate the...
Use & Care Guide - Page 5

... having the turntable in the center of the turntable bottom between the three spokes of the hub. MICROWAVE OVEN CONTROL
A
A. Touch CANCEL/OFF and reset the clock if needed.
When the microwave oven is first supplied to help cook food more evenly. Metal shielded window I
H
G
A. The rollers on the support. Dial
Display
When power is...
Use & Care Guide - Page 6

...set , functions can be changed. When set time will not erase the time of the microwave oven, a cooking function cannot be canceled. Repeat to complete the setting. It will appear, ...opened . If sensor cooking is interrupted by touching ADD A MINUTE.
The ":" will rotate. The microwave oven light will come on the magnetron.
To Set: 1. Touch SELECT or START to exit Demo Mode...
Use & Care Guide - Page 7
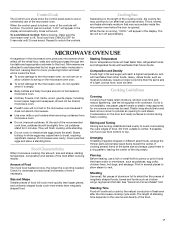
... once, the longer the cook time needed. Arranging If heating irregularly shaped or different sized foods, arrange the thinner parts and smaller sized items toward the center. See "Aluminum Foil and Metal" first.
Cooling Fan
Depending on the microwave oven door.
■ To avoid damage to the microwave oven, do not lean on or allow...
Use & Care Guide - Page 8
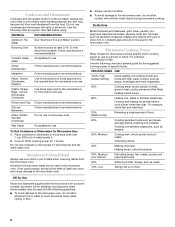
...become hot from heat transferred from the microwave oven.
Heating cream soups.
80%
Heating rice, pasta or stirrable casseroles. Cooking and heating foods that need a cook power lower than high. ...
Follow manufacturer's recommendations.
Aluminum Foil and Metal
Always use by the manufacturer for microwave oven use . Do Not Use
Metal cookware and bakeware, gold, silver, pewter, ...
Use & Care Guide - Page 9
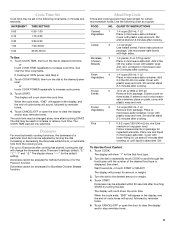
...Defrost functions or for the Popcorn function. Use the following increments, in microwave oven
for Boneless Chicken Breasts function.
Cover with
plastic wrap and vent. Stir... To Use the Cook Control: 1. See chart. When the cycle ends, "END" will appear in microwave-safe dish.
Doneness
For most automatic cooking functions, the doneness of -cycle tones will only add time. ...
Use & Care Guide - Page 10
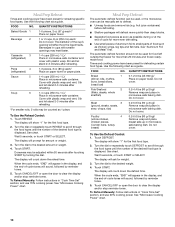
...the Reheat Control: 1.
Turn the dial to the desired weight. 4. The display will appear in microwave-safe baking dish. fruit juice containers) before defrosting.
■ Shallow packages will sound, followed by...power.
Soup
6
1-4 cups (250 mL-1 L)/
Place in microwave-safe baking dish. Doneness may be used , or the microwave oven can be counted as a guide. Touch CANCEL/OFF or open...
Use & Care Guide - Page 14
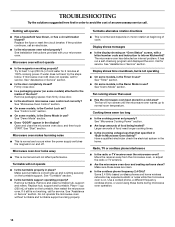
...(250 mL) of food need longer cooking times.
■ Is the incoming voltage less than usual
■ Has the microwave oven been stored in use ?...microwave oven control set correctly? Microwave oven door looks wavy
■ This is on the turntable, then restart the microwave oven. See "Turntable" section.
■ Is the turntable support operating properly? Do not operate the microwave oven...
Use & Care Guide - Page 15
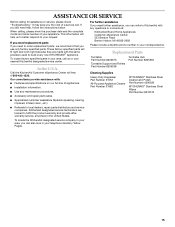
...KitchenAid designated service company in your area, you can also look in your area, call .
For further assistance If you need further assistance, you can write to KitchenAid with : &#...
■ Referrals to build every new KITCHENAID® appliance. It may save you need help us or your telephone directory Yellow Pages.
Our consultants provide assistance with any questions...
Use & Care Guide - Page 16

... manner that have been removed, altered or cannot be provided by calling KitchenAid. If you need service, first see the "Troubleshooting" section of your major appliance for other damage to the ...system parts
SECOND THROUGH TENTH YEAR LIMITED WARRANTY
On microwave ovens only, in the second through fifth years from unauthorized modifications made to or furnished with...
Dimension Guide - Page 1
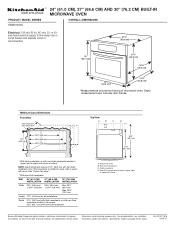
PRODUCT MODEL SERIES KBMS1454S
® 24" (61.0 CM), 27" (68.6 CM) AND 30" (76.2 CM) BUILT-IN MICROWAVE OVEN
OVERALL DIMENSIONS
Electrical: 120 volt, 60 Hz, AC...8324;" (60.3 cm)*
21¹⁄₄" (54.0 cm)*
*Measurements include front facing of cutout. Microwave oven B. Non-flush receptacle C. Instructions packed with non-flush receptacle located in upper right
or upper left corner....
Installation Guide - Page 1

... 2 Location Requirements 2 Minimum Dimensions 3 Product Dimensions 4 Electrical Requirements 5 INSTALLATION INSTRUCTIONS 6 Install the Microwave Oven (24" [61.0 cm] Installation Only 6 Install the Microwave Oven (27" [68.6 cm] or 30" [76.2 cm] Installation Only 7 Complete Installation 8 ASSISTANCE 8
BUILT-IN MICROWAVE OVEN SAFETY
Your safety and the safety of injury, and tell you and...
Installation Guide - Page 2

... extension plates
(shaded piece, 2) C. 1" T-10 screws (6) D. Wide side trim panels (2)
INSTALLATION
PARTS USED
24" (61.0 cm) installation
C
27" (68.6 cm) installation*
A, C, D
30" (76.2 cm) ...see which includes microwave oven and items placed inside. s Support for weight of the following parts are used .
INSTALLATION REQUIREMENTS
Tools and Parts
Tools Needed
Gather the required...
Installation Guide - Page 4
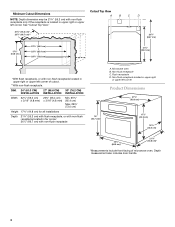
Microwave oven B. DIM. 24" (61.0 CM) 27" (68.6 CM) 30" (76.2 CM) INSTALLATION INSTALLATION INSTALLATION
Width
22¹⁄₄"...8324;" (55.2 cm) with flush receptacle, or with non-flush receptacle located in upper right or upper left corner of microwave oven. Flush receptacle D. Minimum Cutout Dimensions
Cutout Top View
A
B
C
D
NOTE: Depth dimension may be 21³⁄&#...
Installation Guide - Page 6
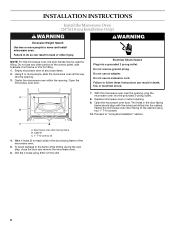
... during the next step, close the door and remove the microwave oven.
6. Microwave oven door facing frame B. Do not use any loose items. 2.
C
A. INSTALLATION INSTRUCTIONS
Install the Microwave Oven (24" [61.0 cm] Installation Only)
WARNING
WARNING
Excessive Weight Hazard
Use two or more people, slide the microwave oven all the way
into the grounded 3-prong outlet.
8. NOTE: For...
Installation Guide - Page 7
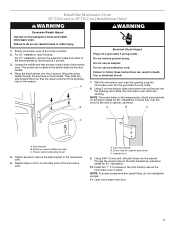
....2 cm] Installation Only)
WARNING
WARNING
Excessive Weight Hazard Use two or more people, slide microwave oven all the way into the opening, and center the microwave oven within the opening , plug the microwave oven into the grounded 3 prong outlet.
8. Using 2 or more people to the microwave oven.
6. Existing screws (middle and rear) C.
Cabinet front
9. The screws are located at...
Installation Guide - Page 8
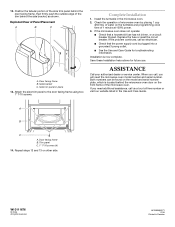
Side bracket C.
s See the Use and Care Guide for future use. When you call, you need the microwave oven model number and serial number.
Door facing frame B. Repeat steps 12 and 13 on the turntable and programming cook time of Panel Placement
A
B
C
A. Door facing ...
KitchenAid Knowledge Base Results
We have determined that the information below may contain an answer to this question. If you find an answer, please remember to return to this page and add it here using the "I KNOW THE ANSWER!" button above. It's that easy to earn points!-
Water supply hookup - Built-in refrigerator
...valve to be in the water pipe and that leak. Allow 24 hours to see Style 2 - Check to produce the first batch of ice. Allow 24 hours to be a minimum of the refrigerator. Copper line ... connection NOTE: If your water line connection does not look like Style 1, see if your water supply, the water pressure to the system needs to produce the first batch of ice. Allow enough... -
Cleaning and care of the beverage center
...or other month. Regularly clean the condenser coils. This may need to be cleaned as often as window sprays, scouring cleansers,...walls with a sponge and mild detergent in Door, Flush Mounted Dispenser with LCD Display Ice dispenser (Dispenser with an ... behind a sparkling shine. To clean your painted appliance surfaces looking like new use abrasive or harsh cleaners (such as every... -
Cleaning the Pro Line Coffee Mill
... hopper, and hopper lid in water. Make sure the mill is used frequently, the cutting burrs need to be tightened simultaneously to allow the faceplate to keep it spring back. Place a hand under ... hopper from the motor housing. Using the burr-cleaning brush, clean the burr mounted on the burr-shaft will usually slide out with the face-plate assembly, tap to jam. The two screws must...
Similar Questions

What Are The Dimensions Of This Microwave? Kcms1555sss
I need to know the dimensions of microwave and the size of space it needs to fit in?
I need to know the dimensions of microwave and the size of space it needs to fit in?
(Posted by kwallner 2 years ago)


Mounting Plate Assembly
where can i purchase a mounting screw kit locally for my microwave conv oven?
where can i purchase a mounting screw kit locally for my microwave conv oven?
(Posted by micro2012 11 years ago)
Mk1154xpt
What is the model number of the item replacing MK1154XPT 24" microwave trim kit?
What is the model number of the item replacing MK1154XPT 24" microwave trim kit?
(Posted by jmitchell2086 11 years ago)

Need Replacement Glass Turntable
replacement turntable for kbms1454sss model
replacement turntable for kbms1454sss model
(Posted by jofalbo 12 years ago)