
Kenmore HE2t Support Question
Kenmore HE2t Support Question
Find answers below for this question about Kenmore HE2t - 3.7 cu. Ft. Front Load Washer.Need a Kenmore HE2t manual? We have 1 online manual for this item!
Question posted by ripcitytower02 on January 22nd, 2013
I Cannot Find A Clear Image Of The He2t Temperature Control Sensor To Service F-
Where can I see an IMAGE of the temp. control sensor?
Current Answers
Related Kenmore HE2t Manual Pages
User Guide - Page 2
...
This Whirlpool Job Aid, "Duet Sport™ Front-Loading Automatic Washer" (Part No. 8178558), provides the technician with the product when servicing the unit. For specific information on the model being serviced, refer to properly diagnose malfunctions and repair the Duet Sport™ Front-Loading Automatic Washer.
WHIRLPOOL CORPORATION assumes no responsibility for training purposes...
User Guide - Page 3

... Requirements 2-1 Installation Instructions 2-6
PRODUCT OPERATION 3-1 Features And Benefits 3-1 Washer Use 3-3 Washer Care 3-12 Troubleshooting 3-15
COMPONENT ACCESS 4-1 Component Locations 4-1 Removing ...The Drain Pump 4-17 Removing The ECO Valve 4-19 Removing The Motor Control Unit 4-20 Removing The Temperature Sensor & Heater 4-22 Removing The Drive Belt And Motor 4-23 Removing ...
User Guide - Page 8
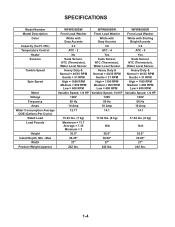
... (Cu.Ft. Max
Width Product Weight (approx)
WFW8300SW
WFW8500SW
WFW8500SR
Front Load Washer
Front Load Washer
Front Load Washer
White with Gray Accents
White with Gray Accents
White with Sterling Bright Accents
3.3
3.6
3.6
ATC - 2
ATC - 4
ATC - 4
No
Yes
Yes
Suds Sensor, NTC (Thermistor), Water Level Sensor
Suds Sensor, NTC (Thermistor), Water Level Sensor
Suds Sensor, NTC...
User Guide - Page 10
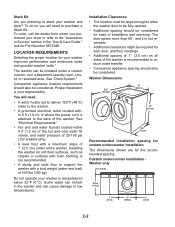
... or surfaces with a total weight (water and load) of installation and servicing.
The washer can cause damage in temperatures below 32°F (0°C). Proper installation is recommended to the back of the washer is your washer in low temperatures. See "Electrical Requirements."
• Hot and cold water faucets located within 6 ft (1.8 m) of where the power cord is attached...
User Guide - Page 15

...or leaks are found. Read and follow these instructions. Remove drain hose from the washer
Gently pull the corrugated drain hose from damage due to get rid of the water... an additional two-thirds turn. Laundry tub drain or standpipe drain
Connect the drain hose form to the cold water faucet. Check the temperature of particles in the water lines... corrugation begins.
Clear the water lines
1.
User Guide - Page 24
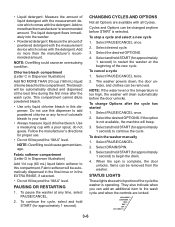
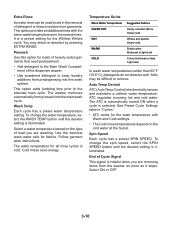
...START is too high, the washer will beep.
3. Select PAUSE/CANCEL.
2. Select and hold START (for approximately 1 second) to the wash cycle and when the controls are available with a pour ...fabric softener to your load.
• Always measure liquid chlorine bleach.
To pause the washer at the beginning of the new cycle. NOTE: If the water level or the temperature is selected. CHANGING...
User Guide - Page 25
... light illuminates, the door is designed for different types of your water pressure, water temperature, detergent, and clothes load. Each cycle is locked. To unlock the controls
Select and hold START (for 5 minutes after the cycle is operating. The washer door unlocks, and items can be changed anytime before START is unbalanced. Cycle Complete...
User Guide - Page 28
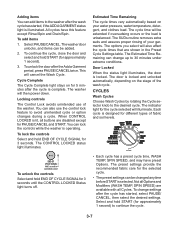
...temperatures depend on the type of Cycle Signal
This signal is cold. The washer continues automatically from the washer...temperature based on the cold water at the faucet.
End of load you are washing. Auto Temp Control
ATC (Auto Temp Control) electronically senses and maintains a uniform water temperature.
Wash Temp
Each cycle has a preset water temperature... laundry ...
User Guide - Page 39
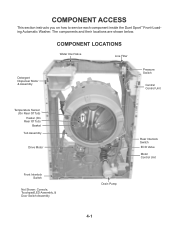
COMPONENT ACCESS
This section instructs you on how to service each component inside the Duet Sport™ Front-Loading Automatic Washer. The components and their locations are shown below.
COMPONENT LOCATIONS
Water Inlet Valve
Line Filter
Detergent Dispenser Motor & Assembly
Pressure Switch
Central Control Unit
Temperature Sensor (On Rear Of Tub) Heater (On Rear Of Tub) Basket...
User Guide - Page 40
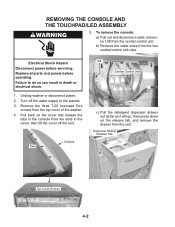
... of the washer. 4. Unplug washer or disconnect power. 2. Turn off the unit. Pull back on the release tab, and remove the drawer from the unit.
Dispenser Drawer Release Tab
Top Cover Screws
4-2 Replace all parts and panels before servicing. REMOVING THE CONSOLE AND THE TOUCHPAD/LED ASSEMBLY
5.
Tabs
Console
UI8
Central Control Unit
Clips...
User Guide - Page 42
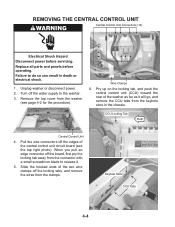
... can result in the chassis. REMOVING THE CENTRAL CONTROL UNIT
Central Control Unit Connectors (12)
Electrical Shock Hazard Disconnect power before operating. Replace all parts and panels before servicing. Remove the top cover from the keyhole slots in death or electrical shock.
1. Wire Clamps
6. Unplug washer or disconnect power. 2. Pull the wire connectors off...
User Guide - Page 60

... Replace all parts and panels before servicing. Heater Wires
Ground Wire 10 mm Nut
d) Pull the heater out of the heater.
10 mm Nut
Electrical Shock Hazard Disconnect power before operating. Unplug washer or disconnect power. 2. To remove the heater: a) Remove the temperature sensor from the heater. Temperature Sensor & Heater
Temperature Sensor & Heater
5. Turn off the water supply...
User Guide - Page 63

... switch, remove the lower front access panel (see page 4-20 for the procedure). REMOVING AN INTERLOCK SWITCH
4. Failure to the washer.
3.
If you are servicing the rear interlock switch, pull the washer away from the wall, and remove the rear panel from the clips. Interlock Switch Wire Connectors
Front Interlock Switch
4-25
Wire...
User Guide - Page 68

...4-23 for the procedure).
20.
Squeeze in on a padded surface.
Remove the temperature sensor and heater from the tub. To remove a shock absorber: a) Remove the 11/... on the standoff tabs to release the standoffs.
Remove the four motor control unit wiring standoffs from the tub (see page 4-22 for the procedure... the washer, and place it contacts the bracket, then turn the nut an additional ...
User Guide - Page 80
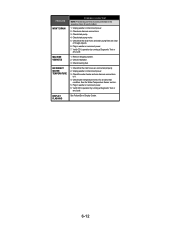
... CCU operation by looking for powered rotations. 6. Plug in washer or reconnect power. 4. Possible Causes/Procedure Door lock mechanism is not tripped after 3 minutes. Unplug washer or disconnect power. 2. Check the water temperature sensor and connection to inlet valves, pressure switch, drain pump and Central Control Unit (CCU).
5. NOTE: To find correct Ohm reading refer...
User Guide - Page 81
...servicing. Possible Causes/Procedure 1.
Possible Causes/Procedure 1. The wires should be driven to the top
of the drive motor.
7.
Unplug washer or disconnect power. 2. Check wire harness connections to the door switch/lock
unit and Central Control... upside down . Check connections of the CLEANING WASHER cycle a load is cleared. Check dispenser motor for drain pump failure.
...
User Guide - Page 83
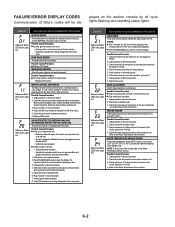
...LED's will display failure code (if available).
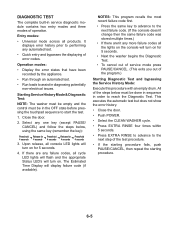
Starting Service History Mode & Diagnostic Test:
NOTE: The washer must be empty and the control must be in the OFF state before pressing the ...• Run through an automated test.
• Run loads to the next step of operation. DIAGNOSTIC TEST
The complete built-in service diagnostic module contains two entry modes and three modes of...
User Guide - Page 86
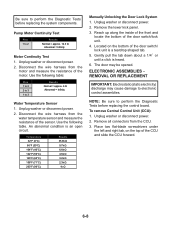
...NOTE: Be sure to 3
Results Normal = approx. 6 Ω Abnormal = Infinity
Water Temperature Sensor
1.
Be sure to 2
Results Normal = approx. 12.3 Ω
Abnormal = Infinity
Motor Continuity Test
1. Pump Motor Continuity Test
Pins 1 to perform the Diagnostic Tests before replacing the control board. Unplug washer or disconnect power.
2. Reach up along the inside of the front...
User Guide - Page 90
... CCU operation by running a Diagnostic Test or
any cycle. Unplug washer or disconnect power.
3. Unplug washer or disconnect power. 2. Check that the inlet hoses are clear
of foreign objects. 6. Check the water heater and wire harness connections to it.
4. See the Water Temperature Sensor section .
5. Check that the drain hose and drain pump filter are...
User Guide - Page 91
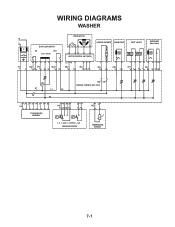
... DRAIN PUMP
INLET VALVES
DISPENSER Motor Switch
VC
VH
HE2 21
DP2 1 2
VH7 1 3
DI6 571
3 56
DR1
K1
L1
L2
K2 N1
HR2 HR1 CENTRAL CONTROL UNIT (CCU)
12 34 5 6 7 8 UI8
TOUCHPAD/LED ASSEMBLY
6 5 34 PR6
22 24 26 21
2 1 11 14
p>
p>
L_0 L_wash L_overflow L_sud PRESSURE SWITCH
1 2 TH2
TEMPERATURE SENSOR
7-1
Similar Questions

Kenmore He2 Model 110.47561600 F20 Error Code.
6 minutes into any cycle the washer stops filling and shows the F20 error code. After researching th...
6 minutes into any cycle the washer stops filling and shows the F20 error code. After researching th...
(Posted by riskoj 6 years ago)

Where Is The Mcu Located On A Kenmore He2t Front Loading Washer
(Posted by DRobRoha 10 years ago)

Kenmore He2t 3.7-cubic-foot Front-loading Washer Wont Start
(Posted by flFe 10 years ago)

Kenmore He2t Front Loading Washer Model# 110.4756
When I turn power on the front panel lights up, but when I push start it all shuts down. Tried unplu...
When I turn power on the front panel lights up, but when I push start it all shuts down. Tried unplu...
(Posted by cpcalder 11 years ago)