Kenmore 3103 Support Question
Kenmore 3103 Support Question
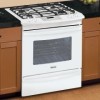
Find answers below for this question about Kenmore 3103 - Elite 30 in. Slide-In Gas Range.Need a Kenmore 3103 manual? We have 2 online manuals for this item!
Question posted by glmciver01 on August 17th, 2012
Exhaust To Exterior Required?
Is a gas range/oven combo required to be vented to the exterior of the home by a hood or microvave combination per Kenmore's design specifications?
Current Answers
Related Kenmore 3103 Manual Pages
Use and Care Guide - Page 2
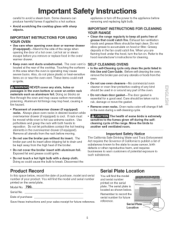
...MY-HOME®.... Kenmore Elite Warranty...Slide-in Range Warranty 2 IMPORTANT SAFETY INSTRUCTIONS 3-5 Product Record 5 Serial Plate Location 5
Protection Agreements 6 Grounding instructions 7 Conversion to Liquefied Petroleum Gas 7 Range Features 8 Before Setting Surface Controls 9=10 Setting Surface Controls 11-12
Surface Cooking
13-14
Before Setting Oven... gives you specific legal rights...
Use and Care Guide - Page 3
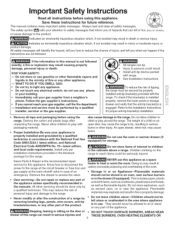
... to safety messages that inform you of a range by a qualified
installer, servicer or the gas supplier. Follow the gas supplier's instructions. ,, if you cannot reach your appliance is in use any part of the appliance unless specifically recommended in serious
packaging material. ,, Proper Installation-Be sure your gas supplier, call your attention to light any...
Use and Care Guide - Page 4
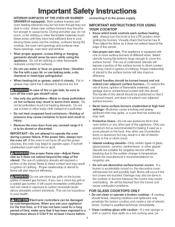
... a sealed gas burner, it closely.
If you use decorative surface burner covers. Do not let clothing or other glazed utensils are the cooktop, surfaces facing the cooktop, the oven vent openings and ...proper pan size. Utensil handles should never be damaged by cold temperatures. oven bottom or any unused range if it does not extend beyond the edge of clothing.
Check the ...
Use and Care Guide - Page 5
...requires businesses to warn customers of potential exposure to reposition. Doing so could catch fire. Serial No. Exhaust fan ventilation hoods and grease filters should be kept away from the high heat of the oven... gasket.
• Remove oven racks.
Model No. 790. Date of the range. Keep oven vent ducts unobstructed. Doing so blocks air flow through the oven and may trap heat, ...
Use and Care Guide - Page 7
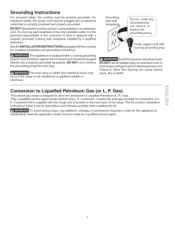
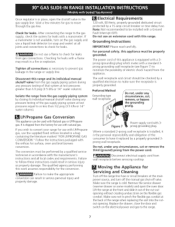
...Gas)
This natural gas range is not installed by a qualified installer or electrician. P.) Gas.
DO NOT use an adapter plug, an extension cord, or remove grounding prong from electrical shock may occur if the range is designed... type wall receptacl,
Do not, under any additions, changes or conversions required in order for conversion. P. conversion. A L. DO NOT Operatethe cooktop...
Use and Care Guide - Page 9

..., CLEANING
AGENTS OR ANY OTHER MATERIAL TO ENTER THE GAS ORIFICE HOLDER OPENING.
Burner Inner Cap
Burner Outer Cap
... Follow the Installation Instructions before installing and using your new range.
2. To install Burner Head, Caps & Skirt, refer... into Burner Head Pin B. Place the removable oven vent cover over the fixed oven
vent cover.
6. Remove all packing material located under...
Use and Care Guide - Page 10

... for simmering delicate sauces, etc.
The small SIMMER burner is located at the right front on the cooktop. This standard burner is equipped with gas surface burners with different BTU ratings. Before Setting Surface Controls
Locations of the Gas Surface Burners
Your range is located at the left rear positions on the cooktop.
Use and Care Guide - Page 14

... oil to the entire surface (front and back of rack and slide out. Preheating on the upper rack in the oven and good baking results. Figure 1
Before Setting Oven Controls
This range has a fan that will turn "ON" after a while. OVEN VENT
C
Removing and Replacing Oven Racks
To remove, pull the rack forward until it from the...
Use and Care Guide - Page 42

... with lubricated porcelain oven racks, which is made for 30 to rinse the cleaners...slide.
Surfaces
How to enter the door vents. Clean using hot, soapy water and a dishcloth. then push the knob into place.
Oven Racks
q
This oven...Range Before cleaning any harsh abrasive cleaning materials on the outside glass of the oven door. Regular cleanings will reduce the effort required...
Use and Care Guide - Page 44
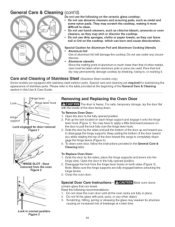
...hinge levers (Figure 2). 4. Special Door Care Instructions = _
Most oven doors
contain glass that of the door toward the range to the fully opened position. 2.
Do not use under any other... storage, lay the door flat with stainless steel exterior parts. To Remove Oven Door: 1. Note: Make sure the hinge supports are required for maintaining the appearance of the door up the...
Use and Care Guide - Page 46
... sufficient space so range can be sure. Call 1-800-4-MY-HOME® (See back cover). Surface burners can be accessible for range clearance. Small scratches do not light.
Sliding or scraping of range until flame is level and can cause scratches. Entire range or oven does not operate. Be sure the gas supply to the range is not level...
Installation Instructions - Page 1
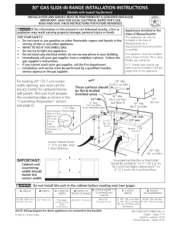
...IF:CUTOUT WIDTH _**
I =: cUTouT DEPTH
GI HEIGHT OFCOUNTERTOP
35 5/8" (90.5cm)36 5/8" (93 cm)
30" (76,2 cm)
Porcelain 315/16"(79.5cm)
Glass
31 1/2" (81 crn)
28 5/16" (71,9 ...
Do not install the unit in your buiJding. * Immediately calJ your gas supplier, calJ the fire department. -- I WIDTH
I FRONT OF RANGE
(C0untert0Pand
I
Cabinet)
I
........... FOR YOUR SAFETY:
-- Do not ...
Installation Instructions - Page 4
... lit manually.
Reset all packing material from the oven
compartments before connecting the gas and electrical supply to the Consumer
Keep these instructions with linoleum or any other utensils before installing range. 2. provided with the consumer.
5.
Important Note to the range. 3. This range has been design certified by the range.
Do not store items of 1/4"(10,16...
Installation Instructions - Page 5
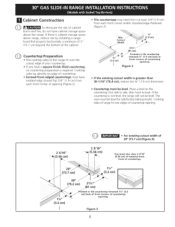
...range will not be level. If the countertop is greater than 30-1116" (76,4 cm), reduce the s4" (1.9 cm) dimension. Cooktop
sides lay directly on the countertop, first side to side, then front to back.
If there is required. Countertop must be level. The oven... is cabinet storage space
above range, reduce risk by installing a range
hood that projects horizontally a minimum of...
Installation Instructions - Page 7
... codes and requirements. Remove the service drawer (warmer drawer on the electrical power and gas to check for the conversion. Do not use a flame to the range.
7
Electrical Requirements
120 volt,...and open the oven door. For personal safety, this range.
Isolate the range from gas connections.
Failure to pinch the flexible gas conduit at the front and slide it out of ...
Installation Instructions - Page 8

...instructions under "Leveling the Range- Install base cabinets 30" (76.2 cm)...range at its final position.
Range Installation
Important Note: Door removal is not a requirement for oven door removal instructions,
Standard Installation
The range cooktop overlaps the countertop at the sides and the range...ceramic glass.
Level the range (see section 9). Slide the range into the cutout opening ...
Installation Instructions - Page 10

Slide the range ... (if required)
1. Disconnect the power from the oven before testing. 11.1 Install Burner Bases and Burner Caps This range is available
to LOWEST POSITION. Make sure the range is properly...is leveled. 3. Electrode
Figure 1 1
11.2 Turn on Electrical Power and Open Main Shutoff Gas Valve
11.3 Check the Igniters
Operation of Surface
Burner Valves (see Figure 11). c. Push in...
Installation Instructions - Page 11
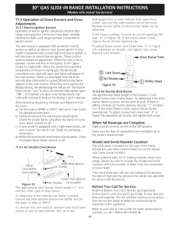
...baffle so that are left the factory.
Replace oven bottom.
/
Burner Tube
(_) Lock Screw_ (_ Air Shutter,,,l_
Figure 14
Orifice Hood
11.5.3 Air Shutter-Broil Burner The approximate flame...or call 1-800-4-MY-HOME ®.
11 d) Within 60 seconds the broil burner should ignite.
If your range. These control systems require no adjustment. When the oven is yellow, increase ...
Installation Instructions - Page 12
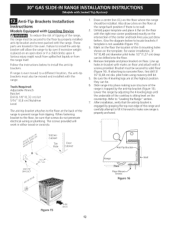
...the range. Line up holes in the oven. Be sure the 4 leveling legs are located...Required: Adjustable Wrench Ratchet Drill & 1/8"(0,32 cm) bit 5/16" (0,8 cm) Nutdriver Level
The anti-tip bracket attaches to the floor at
the range... provided. The screws provided will allow the range to the floor, be installed. Bracket must also be . 6. Slide range into the floor.
4. Serious injury might ...
Installation Instructions - Page 13
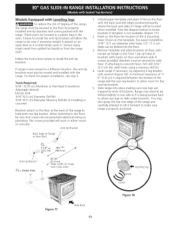
...oven. For easier installation, 3/16" (0.5 cm) diameter pilot holes 1/2" (1.3 cm) deep can be shifted slightly to one side as it . Remove template and place brackets on floor with turned up holes in concrete
Brackets attach to the floor at the back of the range... (23.2 cm) " ,(46.4 cm)
/ ". Slide range into the floor.
3. Tools Required: 5/16" (0,79 cm) Nutdriver or Flat Head Screwdriver ...
Similar Questions

My Gas Stove Oven Display Shows Off Line
(Posted by glindadarnell 10 years ago)

My Gas Range Oven Has Started Burning Food, We Just Got Error Code F
(Posted by mirkadt 10 years ago)

How Do You Remove And Reinstall The Bottom Drawer Of The 3103 Kenmore Range
(Posted by creightonr 12 years ago)

Manual Missing On My New Km Elite Slide In Gas Range Sreial # 9362. Purchased Se
bought at sears outlet 04099 ,date of pruchase, 7/17/11
bought at sears outlet 04099 ,date of pruchase, 7/17/11
(Posted by tootrim 12 years ago)

I Am Getting An Error Code Eo30 With My Kenmore Elite Slide In Range.
The range has already been replaced once and I am still havingthe same error messagewith the second ...
The range has already been replaced once and I am still havingthe same error messagewith the second ...
(Posted by spletting 14 years ago)