Get support for Husqvarna LE121P

Husqvarna LE121P Support Question

Husqvarna LE121P Support Question

Find answers below for this question about Husqvarna LE121P.
Need a Husqvarna LE121P manual? We have 2 online manuals for this item!
Question posted by kentabm26 on June 3rd, 2023

Le121p Model Number For Handle Bar Assembly

The person who posted this question about this Husqvarna product did not include a detailed explanation. Please use the "Request More Information" button to the right if more details would help you to answer this question.

Current Answers

Answer #1: Posted by SonuKumar on June 3rd, 2023 7:34 PM
This answer was accepted by the poster of the original question.
SonuKumar

Member since:
May 9th, 2021

Points: 16,621,300
1,100
points
The Husqvarna LE121P is a walk-behind lawn mower model. If you are looking for information on the handlebar assembly for the Husqvarna LE121P, here are the general steps for assembling the handlebar:

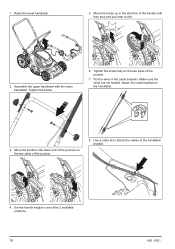
Unpack all the components: Ensure that you have all the parts necessary for the handlebar assembly, including the handlebar itself, bolts, nuts, and any other accompanying hardware.

Position the handlebar: Place the handlebar assembly in the desired position on the mower, aligning it with the mounting holes on the mower's chassis.

Insert the bolts: Insert the bolts through the mounting holes on the handlebar and into the corresponding holes on the mower's chassis.

Attach the nuts: On the underside of the mower's chassis, secure the bolts with the accompanying nuts. Tighten them securely, but be careful not to overtighten.

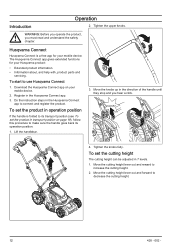
Adjust handlebar height (if applicable): Some models may have an adjustable handlebar height feature. If that is the case, follow the instructions provided in the user manual to adjust the handlebar to your desired height.

Test the handlebar: Once the handlebar is assembled and secured, give it a gentle shake to ensure that it is stable and properly attached to the mower.

It's important to note that the assembly process may vary slightly depending on the specific model and design of the Husqvarna LE121P. For precise instructions, it is recommended to consult the user manual that came with your mower. The manual will provide detailed step-by-step instructions and illustrations specifically tailored to your model, ensuring a successful handlebar assembly.


Please respond to my effort to provide you with the best possible solution by using the "Acceptable Solution" and/or the "Helpful" buttons when the answer has proven to be helpful.

Regards,
Sonu
Your search handyman for all e-support needs!!

Related Husqvarna LE121P Manual Pages

Parts Manual - Page 3

MOWER DECK / CUTTING DECK Ref Part No Description 1 593 29 11-01 FRONT COVER ASSY 2 593 29 21-01 BRACKET 3 ...01 DUST COVER LE121 P, 967682502, 2018-01 Remark Front cover upper Front axle Suspension Front cover low Suspension M6 Height adjustment handle Machined M6*12 M6 hex flange locking Right side Side discharge Side discharge Rear discharge Rear discharge hatch Rear tail Left side rear...
Parts Manual - Page 9

... Remark Battery pocket lid Battery pocket assy battery pocket key Control plate assy Brushless motor 900W Power unit plastic cover assy Engine hood screws To handle QTY KIT 1 1 1 1 1 4 1 16 1
Owner Manual - Page 2

... cut the grass into fertilizer. Do not use Use the product to cut grass in a grass catcher. The grass is a pedestrian-controlled rotary lawn mower. Contents Introduction 2 Safety 6 Assembly 9 Maintenance 16 Troubleshooting 17 Transportation, storage and disposal 19 Operation 12 Technical data 20 Introduction Product description The product is collected in private gardens...
Owner Manual - Page 3

... LE 221R) 14. Grass catcher 5. Battery cover 9. SavE button 12. Speed level indicator (only LE 221R) 428 - 002 - 3 Battery charge indicator and battery button 13. Handle knob 21 20 8. Start inhibitor 4. Cutting height control 10. Product overview 1 2 LE 221R 3 17 4 5 19 22 6 7 1 10 11 18 8 12 9 16 13 14 15 1. Motor...
Owner Manual - Page 4

... chute cover 21. Release motor brake handle to the operator or others. Warning labels Keep persons and animals at a safe distance from the work or maintenance. (model LE 121P/LE 221R) IPX1 -...428 - 002 - 15. Operator's manual 17. Mulch plug Symbols on the product refer to rain (model LE 121P/LE 221R) Start procedure for thrown objects and ricochets. Drive bail (onlyLE 221R) 18....
Owner Manual - Page 6

... in mind that the operator is responsible for damage. Safety instructions WARNING: When using electric lawn mowers, basic safety precautions should always be followed to the product, other materials or the adjacent area...Always exercise care and use it if it was designed. • Do not overreach. Keep handles dry, clean, and free from oil and grease. • Keep guards in place and in...
Owner Manual - Page 7

... hits an object or if vibrations occur, stop the motor, turn the safety key to cut grass lawns only. Always walk when you operate the product. • Stop the motor before you use the ...against the cutting equipment can do the repair. • Never attach the motor brake handle permanently to the handle when the motor is not permitted to the operator from the work in bad weather, ...
Owner Manual - Page 8

Battery and battery charger safety Read the operator's manual for related Husqvarna products only. When the motor brake handle is below the battery lid. Push the motor brake handle in order not to keys, coins, screws or other devices. • Do not use a defective or damaged battery. 8 428 - 002 - The safety key connects...
Owner Manual - Page 9

...of electric shock or short circuit as nails, coins, jewellery. SAVE THESE INSTRUCTIONS Assembly Introduction To assemble the handle WARNING: Before you use the product. • To prevent accidental start the...approved and intact wall sockets. • This machine produces an electromagnetic field during assembly, turn the safety key to change accessories. To reduce the risk of serious ...
Owner Manual - Page 10

... the 2 available positions. 10 428 - 002 - Set the handle height in the cable brackets. Put the wires in one of the product. 8. Use a cable tie to attach the cables to the handlebar. 3. Move the knobs up in the direction of the product. 7. Assemble the upper handlebar with the lower handlebar. Tighten the...
Owner Manual - Page 11

...) and close the rear cover. 3. To assemble the discharge chute 1. Make sure that the discharge chute cover rests on top of the rear cover. To assemble the grass catcher 1. Attach the grass catcher frame...bag on the bottom. Attach the grass bag to the rod of the grass bag. 3. Keep the handle of the frame on the discharge chute. 428 - 002 - 11 Put the mulch plug into the...
Owner Manual - Page 12

... Husqvarna product: • Extended product information. • Information about, and help with, product parts and servicing. Do the instruction steps in the direction of the handle until they stop and you must read and understand the safety chapter. Move the knobs up in the Husqvarna Connect app to increase the cutting...
Owner Manual - Page 13

... battery is 0%-25% charged. The battery is correctly connected to the voltage and frequency specified on the battery charger flashes green one end of the lawn is above 50°C. The battery charger decreases the temperature of the battery charger. 2. Connect one time. 3. The green light on the charger comes on...
Owner Manual - Page 14

...drive speed in the charger. Put a charged battery in battery compartment number 2. 2. For longer operation time, put a second charged battery in battery compartment number 1 below the battery lid. A • Press + and ... will not decrease its charge when the battery is not damaged. Push the motor brake handle in the direction of the handlebar. B To use the drive on the wheels (LE...
Owner Manual - Page 15

...A B 4. Charge the battery if it necessary to have a higher output. Release the motor brake handle to 0 before you do not operate it . To remove the battery, press the two release buttons...cover before you operate the product, the cut 2 times if necessary. • Cut in the lawn. Cut first with the cutting height set high. Press the SavE button (A) to prevent stripes in ...
Owner Manual - Page 16

... they can enter the battery or the motor and cause short circuit or damage to the product. • Do not use of the motor brake handle * X Make sure that it operates correctly. Each season X To do maintenance, you put the battery into the product X Examine the battery charger for damage X Do...
Owner Manual - Page 19

...;C and out of sunlight. • Keep the battery charger where the temperature is charged to "0", remove the battery and wait at least 5 seconds. Fold the handle. 428 - 002 - Remove the grass catcher (if installed). 2. Local regulations can occur. Loosen the lower knobs. 3. Do not keep the battery where static electricity can...
Owner Manual - Page 21

... data for noise pressure level has a typical statistical dispersion (standard deviation) of 0.2 m/s2. Sound levels 3 Sound pressure level at the operators ear, dB (A) Vibration levels 4 Handle, m/s2 Cutting Cutting height, mm Cutting width, cm Blade Bagger capacity, litre LE 121P 77 0.45 - 0.52 20-75 mm 51 Collect 592 87 04...

Similar Questions

Mower Le121p, No Lights On Start Panel . Batteries Both Charged.
Can not start the mower, batteries both full . No lights at the pane
(Posted by Aladhunter1 8 months ago)
What Is A 2012 Husqvarna Hu 775l Lawn Mower In Very Good Condition Worth ?
What is a 2012 Husqvarna HU 775L lawn mower in Very good condition worth ?
(Posted by kpcastles 7 years ago)
Lawn Mower Won't Start
(Posted by nanny8310 9 years ago)
My Husqvarnarz4623 Lawn Mower
My husqvarna lawn mower will not start. It wont even try to turn over or click.
(Posted by teresaandbryancates 9 years ago)
Ask a New Question
Use the box below to post a new question about this Husqvarna product .
Points & Prizes
  • You can earn points for nearly everything you do on HelpOwl.com
  • You can trade in those points for gift cards at leading retailers such as Amazon.com and Walmart
  • It's that simple!
See How it Works
Create a Free Account

Husqvarna Manuals

Find free Husqvarna LE121P manuals and user guides available at ManualOwl.com. Try out our unique manual viewer allowing you to interact with manuals from directly within your browser!

Husqvarna Reviews

View thousands of Husqvarna user reviews and customer ratings available at ReviewOwl.com.

Contact Information

Complete Husqvarna customer service contact information including steps to reach representatives, hours of operation, customer support links and more from ContactHelp.com.

Scoreboard Ratings

See detailed Husqvarna customer service rankings, employee comments and much more from our sister site.

Husqvarna Recalls

Find comprehensive Husqvarna recall information updated hourly on RecallOwl.com.