
2007 Hummer H3 Support Question
2007 Hummer H3 Support Question
Find answers below for this question about 2007 Hummer H3.Need a 2007 Hummer H3 manual? We have 1 online manual for this item!
Question posted by nifilin8 on June 15th, 2014
How To Remove Center Wheel Lug Nut Covers On Hummer H3
The person who posted this question about this Hummer automobile did not include a detailed explanation. Please use the "Request More Information" button to the right if more details would help you to answer this question.
Current Answers
Related Manual Pages
Owner's Manual - Page 1
2007 HUMMER H3 Owner Manual
Seats and Restraint Systems ...7 Front Seats ...8 Rear Seats ...14 Safety Belts ...17 ... Areas ...143 Sunroof ...147 Instrument Panel ...Instrument Panel Overview ...Climate Controls ...Warning Lights, Gages, and Indicators ...Driver Information Center (DIC) ...Audio System(s) ...149 152 170 174 192 201
Driving Your Vehicle ...233 Your Driving, the Road, and Your Vehicle ......
Owner's Manual - Page 166

... the highway. The lamps are not to be used in the center of existing vehicle lighting. One switch is used for the front lower-grille mounted off-road lamps, if the vehicle has them off road. Always remove the covers before removing the lamp covers could damage the off . The off-road lamps remain on...
Owner's Manual - Page 173
... warming grid, and the repairs would not be covered by your warranty. Rear Window Defogger
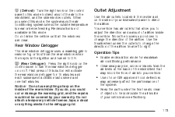
The rear window defogger uses a warming grid to remove fog or frost from the rear window when the...vehicle. Recirculation is near or below freezing. Outlet Adjustment
Use the air outlets located in the center and on the control panel to this button will activate the rear window defogger for maximum
air...
Owner's Manual - Page 243

... right of the transfer case buttons on the center of 4LO Lock mode. The locking rear axle can give your vehicle additional traction from the rear wheels when traveling in off is the only mode ...for more information regarding the transfer case and 4LO Lock mode. 2. The repairs would not be covered by your warranty. Locking Rear Axle
Your vehicle may have this feature on page 111 for ...
Owner's Manual - Page 252
...happens to one other vehicle.
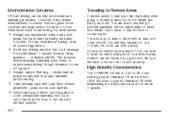
This includes wheel-spinning, breaking down trees, or unnecessary ...removed from any driving practice that could catch fire from the heat of gravity. High Mobility Characteristics
The HUMMER H3 has a 10 inch (25.4 cm) running ground clearance (A) and a 9 inch (22.8 cm) axle to ground clearance (B) while maintaining a low silhouette and a low center...
Owner's Manual - Page 253
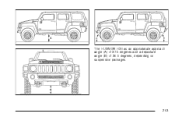
The HUMMER H3 has an approximate approach angle (A) of 37.5 degrees and a departure angle (B) of 35.5 degrees, depending on suspension packages.
253
Owner's Manual - Page 271

This damage would not be covered by your vehicle. Check the engine and oil coolers for additional information. ...off -road with removable side steps. These accumulations can cause glazing and uneven braking. After operation in mud or sand, have the brake linings cleaned and checked. Check the body structure, steering, suspension, underbody shields, wheels, tires, and exhaust...
Owner's Manual - Page 307
Things that all hitch nuts and bolts are automatic transmission fluid, engine oil, axle lubricant, belts, cooling system and brake... help you find them quickly. Trailer Wiring Harness
Light-Duty Trailer Wiring Package
If your vehicle is covered in trailer operation are tight. See the Maintenance Schedule for more information.
307 If you start your dealer or a quali&#...
Owner's Manual - Page 376

...flation pressure matches the recommended pressure on the metal stem in the vehicle. TPMS sensors are underinflated. Remove the valve cap from the tire valve stem. You cannot tell if your vehicle has been sitting for at them.... tire pressure warning light located in the instrument panel cluster, and at each tire and wheel assembly on the Driver Information Center (DIC).
Owner's Manual - Page 382
... fastened, can use a cloth or a paper towel to do this; When you can make wheel nuts become loose after time. See Changing a Flat Tire on page 289. When rotating your vehicle's...and cause an accident. In an emergency, you change a wheel, remove any rust or dirt from places where the wheel attaches to get all wheel nuts are properly tightened, see Loading Your Vehicle on page 391....
Owner's Manual - Page 393

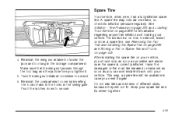
Remove the cover, located on page 95 for more information. 2. Remove the tool bag and jack from its compartment. 5. Turn the wing nut counterclockwise to the jack.
393 To remove the equipment, do the following: 1. See Swing-gate on the inside of the swing-gate, by lifting the two latches.
3. Undo the straps that secure ...
Owner's Manual - Page 394

... remove the spare tire and flat tire:
The spare tire is attached to avoid possible damage.
394 If your vehicle. Close and latch the spare tire cover before completely closing and latching the spare tire cover may result in damage to your vehicle has a spare tire cover release the latch and open the cover. Wheel...
Owner's Manual - Page 395

... lower the spare tire to remove the wheel nuts from the tire. 4. Set it next to the flat end of the wheel wrench in the tool bag.
2. If your vehicle has locking lug nuts, the key is supplied in the slot on the wheel and gently pry the center cap out.
3. Remove the center cap, if equipped, by placing...
Owner's Manual - Page 396
... vehicle has locking lug nuts, the key is supplied in the slot on the wheel and gently pry the center cap out.
2. Turn the wheel wrench counterclockwise to jack up the vehicle using the following instructions.
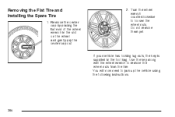
396 Removing the Flat Tire and Installing the Spare Tire
1.
You will now need to loosen the wheel nuts. Use the key...
Owner's Manual - Page 400

... wire brush later, if needed, to get all the wheel nuts and take off the flat tire.
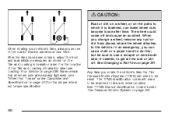
{CAUTION:
Rust or dirt on the wheel, or on the parts to which it is fastened, can use a cloth or a paper towel to the vehicle. Remove all the rust or dirt off and cause an accident...
Owner's Manual - Page 401

Then use oil or grease on studs or nuts. Remove any rust or dirt from the wheel bolts, mounting surfaces and spare wheel.
{CAUTION:
Never use the wheel wrench to tighten the nuts until the wheel is held against the hub.
401 Tighten each wheel nut by hand. Put the wheel nuts back on the mounting surface. 9. Put the spare tire on...
Owner's Manual - Page 402

... clockwise.
13.
Tighten the nuts firmly in the proper sequence and to an accident. Turn the wheel wrench counterclockwise to use the correct wheel nuts. If you must reinstall the center cap. Lower the jack completely.
{CAUTION:
Incorrect wheel nuts or improperly tightened wheel nuts can lead to get new GM original equipment wheel nuts. Be sure to lower the...
Owner's Manual - Page 404

... the tire back and forth slightly to the jack tool bag.
5. Reinstall the center tire cover onto the spare or flat tire. 6. Position the jack and jack tool... make sure the jack base is secure.
If your vehicle has a spare tire cover close the cover and latch the side latch.
2. Use the wheel wrench to the jack by securely wrapping the straps around the jack. Secure the ...
Owner's Manual - Page 405
... the compartment cover by inserting the locator tabs in the holes in flation pressure regularly. Reinstall the wing nut retainer to remove, install or store a spare tire, see Removing the Flat Tire... may lose air over time, so check its wheel together.
405 Turn the wing nut retainer clockwise to secure. Do not mix tires and wheels of different sizes, because they will be available...
Owner's Manual - Page 414

... or 12,000 miles (20 000 km) of purchase, whichever occurs first. Removes soil and black marks from chrome wheels and wire wheel covers. Removes dirt and grime from whitewalls.
Cleans vinyl.
Finish Enhancer
414 Removes dirt, grime, smoke and fingerprints. Removes dust, fingerprints, and surface contaminants. Airborne pollutants can take two forms: blotchy...


