Hotpoint RVM1535DMCC Support Question
Hotpoint RVM1535DMCC Support Question
Find answers below for this question about Hotpoint RVM1535DMCC - 1.5 Cu Ft Microwave Oven.Need a Hotpoint RVM1535DMCC manual? We have 3 online manuals for this item!
Question posted by mcnneley on April 12th, 2013
Turntable Motor
How can I replace the turntable motor?
Current Answers
Related Hotpoint RVM1535DMCC Manual Pages
Installation Instructions - Page 1
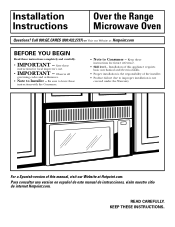
... manual, visit our Website at : Hotpoint.com
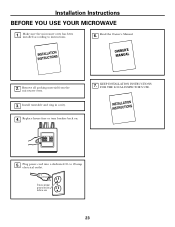
BEFORE YOU BEGIN
Read these
instructions with the Consumer.
• Note to Installer -
Installation Instructions
Over the Range Microwave Oven
Questions? Save these
instructions for local inspector's use.
• IMPORTANT - Installation of the installer.
• Product failure due to leave these instructions completely and carefully...
Installation Instructions - Page 2

... Mounting Plate to Wall 12 Preparation of Top Cabinet 13 Install the Damper 13 Mount the Microwave Oven ..........13, 14 Adjust the Exhaust Adaptor 14 Connecting Ductwork 14
B Outside Back Exhaust 15... Plate to Wall 16 Preparation of Top Cabinet 16 Adapting Microwave Blower for Outside Back Exhaust 16, 17 Mount the Microwave Oven 18
C Recirculating 19-22
Attach Mounting Plate to Wall ...
Installation Instructions - Page 3

... safety, it replaced with a standard three-prong (grounding) wall receptacle to minimize the possibility of electric shock hazard from this product cannot be located in addition to the added weight of this 63-85 pound product, plus additional oven loads of supporting the cabinet load, in the cabinet above the microwave oven. Installation Instructions...
Installation Instructions - Page 7
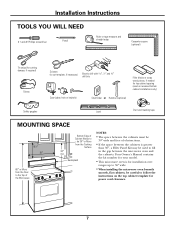
..., if needed for power cord clearance.
7
Your Owner's Manual contains the kit number for your model.
• This microwave oven is for installation over
ranges up to 36″ wide.
• When installing the microwave oven beneath
smooth, flat cabinets, be careful to
be 30″ or More from the Floor to the Top...
Installation Instructions - Page 8

...by probing the wall with the rear wall template for mounting. REMOVING THE MICROWAVE
OVEN FROM THE CARTON/ REMOVING THE MOUNTING PLATE
1 Remove the installation instructions, ...oven and carton over onto the top side. Remove the mounting plate and set aside. Stud finder-a magnetic device that locates nails.
Then place a mark halfway between the edges.
OR
B. The center of the studs. REPLACE...
Installation Instructions - Page 11
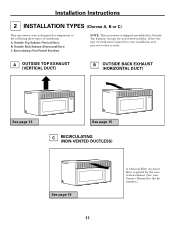
... three types of ventilation required for your Owner's Manual for the kit number.) Select the type of ventilation: A. Installation Instructions
2 INSTALLATION TYPES (Choose A, B or C)
This microwave oven is designed for adaptation to that section. A OUTSIDE TOP EXHAUST (VERTICAL DUCT)
B OUTSIDE BACK EXHAUST (HORIZONTAL DUCT)
See page 12
See page 15
C RECIRCULATING (NON...
Installation Instructions - Page 12

... Bolt
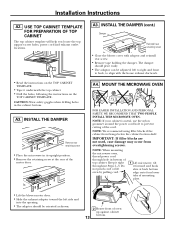
Remove the template from the rear wall. CAUTION: Be careful to 3⁄4″ onto each bolt. Prepare Top Cabinet A3. Connect Ductwork
A1.
Mount Microwave Oven A5. Check Damper Operation A4. Wall Bolt End
3 Place the mounting plate against the wall and insert the toggle wings into drywall and reattach the...
Installation Instructions - Page 13
...filler blocks are not used, case damage may occur from overtightening screws. NOTE: When mounting the microwave oven, thread power cord through hole in bottom of the cord. NOTE: If your cabinet is metal... microwave in the cabinet bottom. Do not pinch cord or lift oven by pulling cord.
1 Lift microwave, tilt it forward and hook slots at the rear of mounting plate.
• Lift the blower motor ...
Installation Instructions - Page 14

... screw completely.
6 Tighten the outer two screws to the top of the microwave oven. (While tightening screws, hold the microwave oven in place against the wall and the top cabinet.)
1 Extend the house duct... down to connect to bottom of Cabinet Recess
Self-Aligning Screw
Microwave Oven Top
4 Insert 2 self-aligning screws through top center cabinet hole. Turn two full turns...
Installation Instructions - Page 15

Adapt Blower for Back Exhaust B6. Mount the Microwave Oven
B1. Prepare Top Cabinet B5. PREPARING THE REAR WALL FOR OUTSIDE BACK EXHAUST
The rear wall template should be positioned accurately as shown on page 9.
&#...
Installation Instructions - Page 16

... mounting plate against the wall and insert the toggle wings into drywall and reattach the toggle wings to 3⁄4″ onto each bolt.
Blower Motor
Back of Microwave
Blower Door Screw 2 Open the blower door by lifting it underneath the top cabinet. • Drill the holes, following the instructions on the TOP...
Installation Instructions - Page 17

... to the blower unit. Reinstall the original blower motor screw through the adaptor and into the opening . Back of the oven.
Disconnect the wires only if it partially out of the microwave and the gray-colored inlet sleeve faces downward. Adaptor
Back of the microwave. ADAPTING MICROWAVE BLOWER FOR OUTSIDE BACK EXHAUST (cont.)
3 Carefully slide...
Installation Instructions - Page 18

...cabinet.
7 Install grease filter. See the Owner's Manual packed with the microwave.
18
NOTE: When mounting the microwave oven, thread power cord through hole in place against the wall and the ...will be completely tightened later.) Be sure to the top of the microwave oven. (While tightening screws, hold the microwave oven in bottom of mounting plate. IMPORTANT: If filler blocks are not used...
Installation Instructions - Page 19

... C2.
The wood screw must be sure that the mounting plate is level and centered left to 3⁄4″ onto each bolt. Check Microwave Assembly C4.
Mount the Microwave Oven C6. ATTACH THE MOUNTING PLATE TO THE WALL
3 Place the mounting plate against the wall and insert the toggle wings into drywall and...
Installation Instructions - Page 20

... that the black-colored exhaust outlet faces the front of Microwave
5 Roll the assembled blower unit so that hold the blower motor in the microwave. Note: The blower wires are long enough to the blower unit.
Blower Motor
Back of Microwave
3 Carefully slide the blower motor toward the right, and lift it is necessary for additional...
Installation Instructions - Page 23
... installed according to 20-amp
electrical outlet. Remove all packing material from the
microwave oven.
3.
Ensure proper ground exists before use
23 Read the Owner's Manual.
2. Plug power cord into a dedicated 15-
to instructions.
6. Install turntable and ring in cavity. 4. Replace house fuse or turn breaker back on.
7. KEEP INSTALLATION INSTRUCTIONS FOR THE LOCAL...
Use and Care Manual / Warranty - Page 10
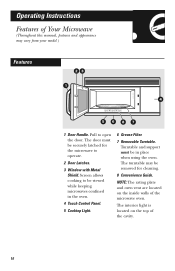
Operating Instructions
Features of the microwave oven. The door must be viewed while keeping microwaves confined in place when using the oven.
Pull to operate.
2 Door Latches.
3 Window with Metal Shield. The turntable may vary from your model.)
Features
23 1
4
5687
1 Door Handle. Screen allows cooking to be in the oven.
4 Touch Control Panel.
5 Cooktop Light.
6 Grease...
Use and Care Manual / Warranty - Page 30

... mild soap and water or in a selfcleaning oven.
Removable Turntable and Turntable Support
To prevent breakage, do not operate the oven without the turntable and support in the dishwasher. How to Clean...; Remember, do not place the turntable into water just after using. NOTE: Be certain the power is off before cleaning any part of your microwave.
Wash it carefully in warm, sudsy...
Quick Specs - Page 1

...of light covers. Over-the-Range Microwave Oven
rvm1625 1535 Dimensions (in inches)
...Cu. width required
12" MIN. Recirculating Charcoal Filter Kit To be vented to the outside.
21-3/4 Door open
29-7/8
15-1/16 16-1/2
15-3/4
Important Information: When installing the microwave oven... over a range, allow minimum of 2" from bottom of Counter Saver Plus microwave oven to...
Quick Specs - Page 2
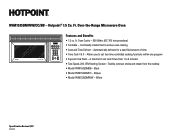
...; Two-Speed, 200-CFM Venting System - White
Specification Revised 1/07 440024 Oven Cavity - 950 Watts (IEC-705 test procedure) • Turntable - Black • Model RVM1535DMCC - Hotpoint® 1.5 Cu. ft. Allows you to ensure even cooking • Auto and Time Defrost - Over-the-Range Microwave Oven
Counter Saver Plus
RVM1535DMWW/BB/CC RVM1635DMWW/BB/CC
Features and Benefits...
Similar Questions

What Is The Wattage Of Hotpoint Mod#rvm1535dm2ww. Ser.#hr900175b Mfg’d 5/2008
(Posted by Bethandrog62 3 years ago)

What Is The Wattage On The Hotpoint Rvm1535dm2ww?
what is the wattage?
what is the wattage?
(Posted by kingvic32000 7 years ago)

Microwave Just Quit Working While I Was Boiling Water
my microwave quit working while i was boiling water it shut off and there is no power is there a sim...
my microwave quit working while i was boiling water it shut off and there is no power is there a sim...
(Posted by corvicrice 9 years ago)
My Hotpoint Dhs53x Top Oven Has Stopped Working. Could The Safety Mechanism Have
My Hotpoint DHS53X top oven has stopped working. Could the safety mechanism have activated and can I...
My Hotpoint DHS53X top oven has stopped working. Could the safety mechanism have activated and can I...
(Posted by aliclark 10 years ago)

'where Can I Find Templates For Rvm1535dm2bb Over The Range Microwave.'
(Posted by mainesmermaid 12 years ago)