Hitachi NT65MA3 Support Question
Hitachi NT65MA3 Support Question
Find answers below for this question about Hitachi NT65MA3 - 2-1/2 Angled Finish Nailer.Need a Hitachi NT65MA3 manual? We have 1 online manual for this item!
Question posted by skyefredriksen on April 29th, 2012
Loading
HOW DO I RELOAD A HITACHI NT65MA3 NAILGUN?
Current Answers
Related Hitachi NT65MA3 Manual Pages
Instruction Manual - Page 1

E036
Sep. 2006
SPECIFICATIONS AND PARTS ARE SUBJECT TO CHANGE FOR IMPROVEMENT MODEL
NT 65MA3
Hitachi
Power Tools
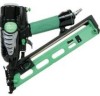
FINISH NAILER NT 65MA3
TECHNICAL DATA AND
SERVICE MANUAL
N
LIST No.
Instruction Manual - Page 4
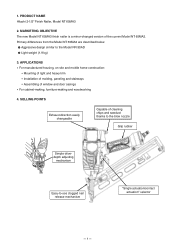
...use clogged nail release mechanism
"Single actuation/contact actuation" selector
--- 1 --- MARKETING OBJECTIVE The new Model NT 65MA3 finish nailer is a minor-changed version of window and door casings For cabinet-making, furniture-making and woodworking
4. SELLING POINTS
...to the Model NR 90AD Light weight (1.9 kg)
3. PRODUCT NAME Hitachi 2-1/2" Finish Nailer, Model NT 65MA3
2.
Instruction Manual - Page 5
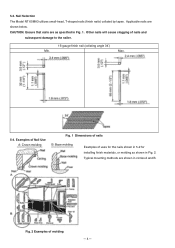
...) 1
Optional accessories
Full sequential actuation mechanism kit
(Code No. 884320)
(Sequential trip mechanism kit)
Pneumatic tool lubricant (30 cc (1 oz) oil feeder) (Code No. 877153)
Pneumatic tool lubricant (120 cc (4 oz) oil feeder) (Code No. 874042)
Pneumatic tool lubricant (1 ltr (1 quart) can)
(Code No. 876212)
Grease (ATTOLUB No. 2) (500 g (1.1 lbs))
(Code No. 317918...
Instruction Manual - Page 7
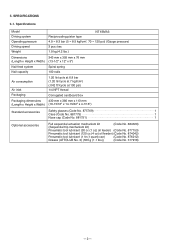
Typical mounting methods are shown below. Nail Selection The Model NT 65MA3 utilizes small-head, T-shaped nails (finish nails) collated by tapes. Fig. 2 Examples of nails and
subsequent damage to the nailer.
15-gauge finish nail (collating angle 34û)
Min. Applicable nails are shown in circles A and B. Examples of Nail Use A: Crown molding
Fig...
Instruction Manual - Page 8
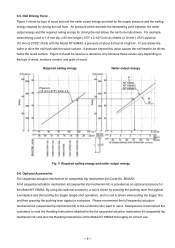
... nail to be used as an optional accessory for the Model NT 65MA3. Required nailing energy
Nailer output energy
Plywood (12 mm (.472") thick) x 6
P
S NT 65MA NT 65MA2 NT 65MA3
NT65MA3
Fig. 3 Required nailing energy and nailer output energy 5-6. Optional Accessories Full sequential actuation mechanism kit (sequential trip mechanism kit) (Code No. 884320...
Instruction Manual - Page 9
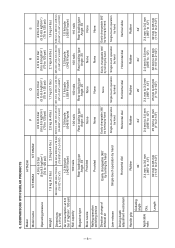
COMPARISONS WITH SIMILAR PRODUCTS
Maker Model name
Operating pressure
HITACHI
NT 65MA3
NT 65MA2
4.9 to 8.3 bar (5 to 8.5 kgf/cm2 )
(70 to 120 psi)
P
...ft3/cycle)
110 nails
Magazine type
Rear loading type Angle: 34û
Rear loading type Angle: 34û
Rear loading type Angle: 25û
Rear loading type Angle: 34û
Rear loading type Angle: 34û
Blow nozzle
Provided
None...
Instruction Manual - Page 10
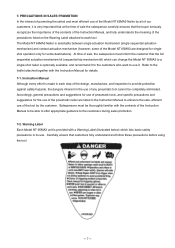
...Manual for details. 7-1. Warning Label Each Model NT 65MA3 unit is made in each tool. 7. The Model NT 65MA3 Nailer is very important that at the time of sale the salesperson carefully ensures that the ...appropriate guidance to enhance the safe, efficient use of the Model NT 65MA3 Nailer by all of the tool by the customer. Carefully ensure that the full sequential actuation mechanism kit (...
Instruction Manual - Page 11
...101-2002
1926.102 Eye and face protection 1926.302 Power-operated hand tools Portable, Compressed-Air-Actuated, Fastener Driving Tools-Safety Requirements for applicable items. Some applicable items are related items in Fig..., there are outlined below . Related Laws and Regulations As nailers and staplers are described below . Primary differences from the Model NT 65MA2 are designed to the Model...
Instruction Manual - Page 17
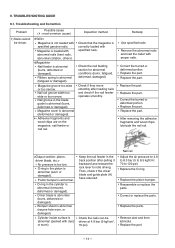
...Remove the abnormal nails and load the nailer with dust, or worn). Replace the part.
Replace the part. Piston bumper is abnormal (deformed or damaged). Bumper sheet is loaded with abnormal nails (bent ...piston is abnormal (removed, deformed or damaged). O-ring in the back position after loading nails and check if the nail feeder operates smoothly.
TROUBLESHOOTING GUIDE
9-1. Nail rail...
Instruction Manual - Page 18
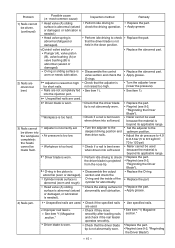
...check the O-ring and the inside surface is not abnormally worn.
Apply grease. See item 1). Nailer cannot be used because the material is bent even when driven into soft wood.
See item "1)... blade is not held in the piston is needed ). Check if they move smoothly after loading nails, and check if the nail feeder operates smoothly.
Cylinder inside of the cylinder for ...
Instruction Manual - Page 22
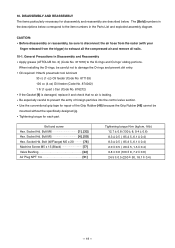
... 50, 18.1 0.4)
--- 19 --- CAUTION: Before disassembly or reassembly, be sure to disconnect the air hose from the nailer (with your finger released from the trigger) to damage the O-rings and prevent dirt entry. When installing the O-rings,... necessary for each part
Bolt and screw Hex. Socket Hd. Oil required: Hitachi pneumatic tool lubricant 30 cc (1 oz) Oil feeder (Code No. 877153) 120 cc...
Instruction Manual - Page 23

... [25] (with the Bumper Sheet [26] assembled) can now be removed. Head Valve (A) [10]
Cylinder [11]
Cylinder O-Ring (I.D 63.1) [12]
O-Ring (P-46) [13] O-Ring (I .D 20.8) [9]
[Tools required] Hex. Socket Hd. Socket Hd. Bolt M6 x 12 [1] with a hex. The Plate [2] and the Top Cover [3] can be removed. Socket Hd.
Disassembly and Reassembly...
Instruction Manual - Page 24

... it . Note the following points: Apply grease to the Exhaust Cover [5].
(2) Disassembly and reassembly of the Valve Bushing [22], Plunger [18], etc. (See Fig. 14.) [Tools required]
Socket wrench (14 mm) Flat-blade head screwdriver
(a) Disassembly Remove the Valve Bushing [22] with a socket wrench (14 mm ). Mount the Retaining Ring (E-type...
Instruction Manual - Page 25

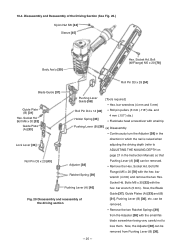
... Bushing (A) [70]
Change Knob [57]
Head Valve O-ring (I.D 16.8) [60]
(a) Disassembly Remove the Retaining Ring (E-type) for D6 Shaft [27]
Roll Pin D3 x 28 [54]
[Tools required] Flat-blade screwdriver Roll pin puller (3 mm (.118") dia.) Hex. Fig. 15 Disassembly and reassembly of the control valve section
Remove
Trigger (A) [53] Force...
Instruction Manual - Page 28
... the two Ratchet Springs [39]
from Pushing Lever (B) [36].
--- 25 --- Socket Hd. Socket Hd. Bolt M6 x 30 [32]
Guide Plate (A) [33]
Pushing Lever Guide [58]
[Tools required] Hex. Now, the Blade
Guide [37], Guide Plates (A) [33] and (B)
Fig. 20 Disassembly and reassembly of the Driving Section (See Fig. 20.) Nylon Nut...
Instruction Manual - Page 29

... removed.
(b) Reassembly Disassembly procedures should be disassembled. Bolt M5 x 16 [50]
Body Ass'y [30]
Fig. 21 Disassembly and reassembly of the cap (See Fig. 21.) [Tool required]
Hex. Bolts M5 x 16 [50] with the Body Ass'y [30]. Pull out the Roll Pin D4 x 14 [42] with the roll pin puller (4 mm...
Instruction Manual - Page 30

...Flange) M5 x 20 [78] should be removed. Socket Hd. Remove the two Machine Screws M5 x 15 (Black) [77] with Hitachi pneumatic tool lubricant to smooth the movement of Nail Feeders (A) [74] and (B) [80].
--- 27 --- Socket Hd. Socket Hd. Bolt (W/Flange)....5 x 20 (Stainless) [73]
Nail Feeder (A) [74]
Nail Feeder (B) [80]
Pushing Spring [75]
[Tools required] Phillips screwdriver Hex.
Instruction Manual - Page 31
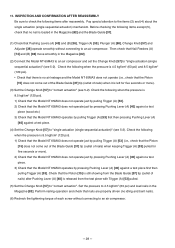
...screw without connecting to an air compressor. Check the following items after Pushing Lever (A) [40] is loaded in the Magazine [82] and the Blade Guide [37].
(1) Check that the Model NT 65MA3 ...special attention to "contact actuation" (see 5-2). Set the pressure to 4.5 kgf/cm2 (63 psi) and load nails in the Magazine [82].
(2) Connect the Model NT 65MA3 to an air compressor and set the ...
Instruction Manual - Page 35

SOCKET HD. CODE NO.
52
DESCRIPTION HITACHI LABEL
NO. USED
1
53 884-145 TRIGGER (A)
1
54 949-865 ROLL PIN D3X28 (10 PCS.)
3
55 959-155 STEEL BALL D3.97 (10 PCS.)
1
56 ...
Similar Questions

Hitachi Framing Nailer Nr83a
My framing nailer fires two nails at a time . What can I do to solve the problem?
My framing nailer fires two nails at a time . What can I do to solve the problem?
(Posted by rahundl 5 years ago)

Nt65ga Will Not Fire
NT65GA Does not fire when trigger is pulled. Battery has full charge.
NT65GA Does not fire when trigger is pulled. Battery has full charge.
(Posted by dmcgeeoo6 7 years ago)

I Can Adjust The Mitre Angle All The Way On The Right But It Stops At 10 Degrees
I can adjust the mitre angle all the way on the right but it won't budge past 10 degrees when I try ...
I can adjust the mitre angle all the way on the right but it won't budge past 10 degrees when I try ...
(Posted by rivuletcottage 9 years ago)

Why Do Thes Lion Battery Fail Under Load And They Will Not Charge Any More Im On
(Posted by okeefem56 11 years ago)

What Is Noise Level When This This Tool Is In Operation
(Posted by steve38861 11 years ago)