Hitachi C10FSB Support Question
Hitachi C10FSB Support Question
Find answers below for this question about Hitachi C10FSB - 10 Inch Sliding Dual Bevel Compound Miter Saw.Need a Hitachi C10FSB manual? We have 2 online manuals for this item!
Question posted by Kreedbc on November 11th, 2020
Laser
I have owned 5 of the 10fsh saws in 20 years. Best saw ever! Have a 10" festool kapex....much rather use hitachi!...my question is can I add a laser to the fsb I just ordered.? Very handy when cutting stair parts
Current Answers
Answer #1: Posted by Troubleshooter101 on November 12th, 2020 3:35 AM
Troubleshooter101

Member since:
September 30th, 2015 Points: 2,927,030

Member since:
September 30th, 2015 Points: 2,927,030
Please check this user manual for the product:-
https://www.hikoki-powertools.com/manual_view_export/pdf/C99115015_C10FSH_904.pdf
Thanks
Please respond to my effort to provide you with the best possible solution by using the "Acceptable Solution" and/or the "Helpful" buttons when the answer has proven to be helpful. Please feel free to submit further info for your question, if a solution was not provided. I appreciate the opportunity to serve you!
Troublshooter101
Related Hitachi C10FSB Manual Pages
Instruction Manual - Page 4

... the workpiece in use.
20. If it has first come to use only recommended accessories in order to avoid injury:
DO's
ALWAYS OBSERVE THE FOLLOWING RULES TO ASSURE SAFE USE OF THIS TOOL:
1. Always confirm that they will fit in a polarized outlet only one
blade is not in order to reduce the
risk of the slide
compound saw.
25. ALWAYS...
Instruction Manual - Page 5
... starting the tool.
20. Always confirm that overhang the table of the saw blade with steel toes) and eye protection
when operating the POWER TOOL.
4. Never operate the tool while wearing loose clothing, a necktie or jewelry, or while your hands out of the path of the slide
compound saw . 13. Always handle the POWER TOOL carefully. Always use of nails...
Instruction Manual - Page 6

... may dissolve. 16. Always wear eye protection when using the tool. 10. Never perform any freehand operation with solvents because the plastic may cause hazardous conditions.
20. Always disconnect power before using the slide compound saw blade. 6. Repairs should be conducted only by a Hitachi authorized service center.
6 Never use only identical replacement parts. Always keep hands out of...
Instruction Manual - Page 8

... (A)
Saw Blade
Indicator (For right bevel scale)
Leser Marker (Only C10FSH) Vise Assembly
Safety Cover
Rotation Direction
Fence (A)
Indicator (For miter scale) Table Insert
Fence (B)
Sub Fence Fig. 1
Turntable
Lever
Side Handle
Trigger Switch 5mm Screw
Nameplate Spindle Lock
Belt Cover
Switch (for Laser marker) (Only C10FSH)
Locking Pin
Adjuster (Only C10FSH) (for Laser marker)
Slide...
Instruction Manual - Page 9

English
SPECIFICATIONS
Item
Model
C 10FSH / C 10FSB
Motor
Type
Series commutator motor
Power source
Single-phase AC 60Hz
Voltage (Volts)
120
Full-load current (Amp)
12
Laser Marker Maximum output
Instruction Manual - Page 13

.... 9-b
[Right bevel angle cutting] Fig. 9-c
Table inserts are so fixed that the saw blade can be cut . Before using the tool, eliminate this gap in accordance with the edge of the table insert, securely tighten the 6mm machine screws of the workpiece is remarkably reduced, if the table insert is in Fig. 10-a. After aligning...
Instruction Manual - Page 14

...lower limit position of the saw blade. Confirmation for use the sub fence.
In the case of left bevel angle cutting or 1-3/16" (30mm) in right bevel angle cutting, adjust the lower... 10-b), and fully tighten it is Equipped with a wide back face. Left bevel angle cutting
Right bevel angle cutting Direct angle cutting
Turn
This power tool is
turned counterclockwise, the main body or saw...
Instruction Manual - Page 16
... trigger for use the sub fence (A). CAUTION:
In some part of the tool, causing in unexpected accidents. * Do not remove the laser marker to be installed on the ink line (Fig. 16).
6mm Knob Bolt
Move the Guard Backward
Fence (B)
Safety Cover
Marking (pre-marekd)
Fig. 17
(2) Miter cutting and compound cutting (Miter cutting + bevel cutting) Upon...
Instruction Manual - Page 18

... side of the saw blade, align the laser line with the right side of the laser line is in order. When the trigger switch is necessary to warning sign while the tool is being
operated....When aligning the ink line, slide the workpiece little by vise at a position where the laser line overlaps with the laser line.
Laser Line
(3) After adjusting the position of the laser line. Work on the ...
Instruction Manual - Page 19

... with the laser line. If there is left miter and right bevel + right miter), mount the vise asembly on the handle will not contact the saw blade is used, align the laser line with the left miter angle, a workpiece of the cut into which the tip of the motor head. For other compound cutting (left bevel + right miter, right bevel + left in...
Instruction Manual - Page 20

... to page 9 "SPECIFICATIONS" for 10 minutes or so, and then restart...Slide cutting)
L
1 Pull Forward 3 Push Rearward to Cut
L
Workpiece
Fig. 30
Handle
2 Press Down
(1) Workpieces up to cut material from the receptacle whenever the tool is still rotating, the cut in the same manner as indicated in paragraph 6-(1) above.
20 If the handle is raised while the saw blade is not in use...
Instruction Manual - Page 21

... to rest on the right or left 45° bevel cutting position
or a workpiece of 1-3/8" (35mm) height in paragraphs 4,5 and 6 above in order to reduce the risk of injury. * Never put your hand on the side handle during the cutting operation because the saw blade comes close to the side handle when the...
Instruction Manual - Page 22
... the turntable has been set the indicator to the left during compound cutting because the saw backwards with the right or left hand. Compound cutting procedures
Compound cutting can be performed by sliding the
round portion of (θ) 38° and 45°.
English
8.
For miter cut it by following the instructions in Fig. 33. NOTE...
Instruction Manual - Page 23
..., the fixing pin will enter one step and fit into the main unit.
Head
Head
Bevel Angle Scale
Bevel Angle Scale
1
4
2
3
Fence
Fence
Base
Base
Miter Angle Scale Fig. 38
Turntable
Miter Angle Scale Fig. 39
Turntable
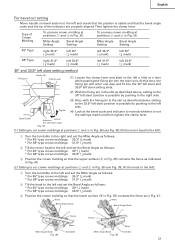
23 Miter Angle Setting
Bevel Angle Setting
45° Type
right 35.3° ( mark)
left 30° ( mark)
left...
Instruction Manual - Page 24
...easier cuts of crown molding without tilting the saw blade. English
Fence
Fence
A
B
B
A
Table on ...Bevel Angle Scale
1
3
2
Fence
Fence
Miter Angle Scale
Base Turntable
Fig. 42
Turntable
Base
Miter Angle Scale
Fig. 43
Fence
B
A
Table on Base Fig. 44
Fence A
B
Table on Base Fig. 41
(3) Setting to secure the
crown molding Stoppers.
[Optional accessories used...
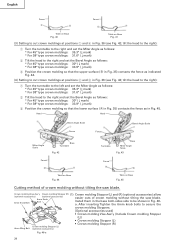
Instruction Manual - Page 25
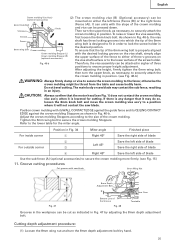
... bolt is designed to fit in order to lock the screw holder in...If there is lowered for the miter angle. Refer to securely attach the... tighten the 6mm wing bolt; Do not bevel cutting. Cutting depth adjustment procedure:
(1) Loosen... fence to either the left side of blade
Use the sub fence (A) (optional accessories) to secure... the fence;
The main body or saw blade may do so, loosen the 6mm...
Instruction Manual - Page 26

...full of the dust bag when the saw blade rotates. Duct
(2) During bevel and compound cutting, attach the dust bag at either end of a U-shaped workpiece, use a wood plate to protect the workpiece ...into the receptacle. * If the bolts are properly tightened before it using tools other than normal during bevel cutting. Sawdust will cause inefficient cutting and possible overload of the ...
Instruction Manual - Page 29

... to the saw blade by an AUTHORIZED HITACHI POWER TOOL REPAIR CENTER ONLY. Oil supply points: * Rotary portion of hinge * Rotary portion of vise assembly * Rotary portion of guard (C)
Guard
After long-term use . Pulley (B)
Fig. 56
10.
Replacement of holder (A)
11. Refer to the pulleys.
SERVICE AND REPAIRS
All quality power tools will be protected...
Parts List - Page 1

Hitachi Power Tools
LIST NO. E933
ELECTRIC TOOL PARTS LIST
SLIDE COMPOUND SAW Model C 10FSB
2004 • 2 • 13 (E2)
1 2 3 4 56 7
40 41
8 9 10 11 12
14 15 16 13 17 18 19 20
21 22 23 24
25
26
27 28 29 30 29
31 32 33 9 10 35 34 10 9 36
37 38 39
601
603 602 618
604...
Parts List - Page 7
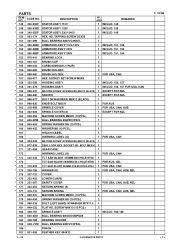
...
163 949-258 MACHINE SCREW M6X20 (10 PCS.)
1
164 606-ZZM BALL BEARING 606ZZC2PS2L
1
165 949-455 SPRING WASHER M6 (10 PCS.)
1
166 949-425 WASHER M6 (10 PCS.)
1
167
HITACHI LABEL
1
168
WARNING LABEL (G)
1...FOR USA, CAN
* 173 322-443 TCT SAW BLADE 255MM-D30 HOLE-NT40 1
* 173
TCT SAW BLADE 262MM-D25.4 HOLE-NT60 1 FOR AUS, NZL
* 173 310-878 TCT SAW BLADE 255MM-D15.88 HOLE-NT40 1 FOR USA...
Similar Questions

That's The Original Hitachi Japonês?
I'm looking for hitachi miter saw 10" japonês original not the metabo you guys have
I'm looking for hitachi miter saw 10" japonês original not the metabo you guys have
(Posted by Pereirafulr 2 years ago)

How To Adjust Cut Depth Hitachi 10 Compound Miter Saw Manual
(Posted by dbrag 9 years ago)

Switch Handle Broken Off. Cannot Operate Saw.
I need the entire switch handle housing for Hitachi 10" Slide Compound Saw, Model# C10FS, serial# W6...
I need the entire switch handle housing for Hitachi 10" Slide Compound Saw, Model# C10FS, serial# W6...
(Posted by bob02909 10 years ago)
Where Can I Get A Free Manual On The Hitachi C12rsh 12' Slide Compound Miter Saw
(Posted by kathy86883 14 years ago)