HP ProBook 4410s Support Question
HP ProBook 4410s Support Question
Find answers below for this question about HP ProBook 4410s - Notebook PC.Need a HP ProBook 4410s manual? We have 29 online manuals for this item!
Question posted by edimarin8 on August 20th, 2011
Que Debo Hacer Para Solucionar Problemas De Recalentamiento?
esta a un mes de cumplir 2 años de uso, y a medida que pasa el tiempo he notado que la portatil se me ha ido recalentando al punto de que el touch, la parte donde esta el disco duro y abajo se sienta bastante caliente.. se me ha apagado 2 veces y no prende al momento sino al ratico. Instale SpeedFan y me ha dado las temperaturas los core han subido a 78Grados una temperatura bastante alta.. y otros partes de la tarjeta madre a 70, 60, 68.. no se si colocarle una base con unos fancooler sea la solucion, el leido q tiene que ver con la GPU del chip de nvidia.. quisiera saber su opinion! Gracias!
Current Answers
Related HP ProBook 4410s Manual Pages
HP ProtectTools - Windows Vista and Windows XP - Page 71
... QuickLook 2 TXT technology Display Diagnostic URL HDD Translation Mode Virtualization technology
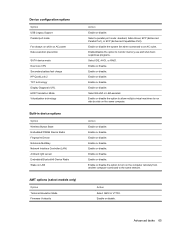
Built-in device options
Option Wireless Button State Embedded WWAN Device Radio Fingerprint Device Notebook MultiBay Network Interface Controller (LAN) Ambient light sensor Embedded Bluetooth® Device Radio Wake on LAN
AMT options (select models only)
Option Terminal Emulation Mode...
HP ProtectTools - Windows Vista and Windows XP - Page 93
... backup fails without displaying notice of the failure. This works properly to provide future product releases with the mapped drive. HP is scheduled for HP Notebook 1.1B implementations, as well as supporting HP Desktop 1.2 implementations. If the Automatic Backup is working to any local drive. This option to occur upon logon...
Management and Printing - Windows XP, Windows Vista and Windows 7 - Page 5

... of management software installed on computer model and/or version of certain system software and hardware components NOTE: Support for managing client (user) desktop, workstation, notebook, and tablet computers in a networked environment. 1 Using Client Management Solutions
Client Management Solutions software provides standards-based solutions for specific features described in this section...
Security - Windows XP, Windows Vista and Windows 7 - Page 20
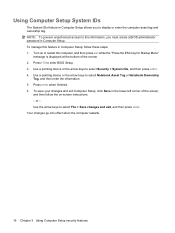
... allows you must create a BIOS administrator password in the lower-left corner of the screen. 2. Use a pointing device or the arrow keys to select Notebook Asset Tag or Notebook Ownership
Tag, and then enter the information. 5. or - Press enter when finished. 6. Turn on -screen instructions. - Your changes go into effect when the...
Drives - Linux - Page 5
Do not touch the connector pins on a removable drive or on it down the computer. do not drop a ... an external hard drive, initiate Suspend and allow the screen to a disc. Before handling a drive, discharge static electricity by touching the unpainted metal surface of information, observe these precautions: Before you are unsure whether the computer is writing to clear, or ...
Drives - Linux - Page 10
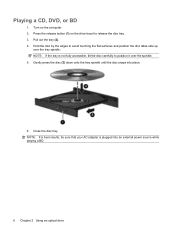
... the drive bezel to position it over the tray spindle. Press the release button (1) on the computer. 2. Hold the disc by the edges to avoid touching the flat surfaces and position the disc label-side up
over the spindle. 5. NOTE: For best results, be sure that your AC adapter is not...
Drives - Linux - Page 13
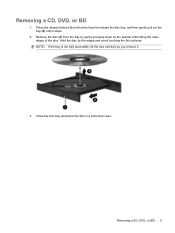
... tray is not fully accessible, tilt the disc carefully as you remove it stops.
2. Remove the disc (3) from the tray by the edges and avoid touching the flat surfaces.
Close the disc tray and place the disc in a protective case. Press the release button (1) on the spindle while lifting the outer...
Drives - Linux - Page 14
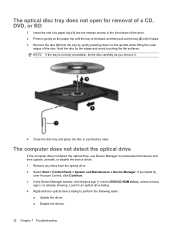
... tray and place the disc in the front bezel of a CD, DVD, or BD
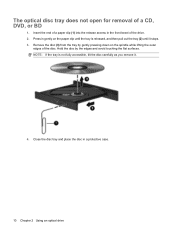
1. Remove the disc (3) from the tray by the edges and avoid touching the flat surfaces. NOTE: If the tray is released, and then pull out the tray (2) until it .
4. Insert the end of a paper clip (1) into the...
Drives - Windows Vista - Page 5
... a drive to the following cautions before handling drives. Refer to magnetic fields. Do not touch the connector pins on a removable drive or on luggage, such as conveyor belts, use... to vibration. Security devices with cleaning products. Before handling a drive, discharge static electricity by touching the unpainted metal surface of magnetism and will not damage a drive.
1 Do not type...
Drives - Windows Vista - Page 10
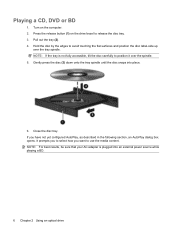
... spindle until the disc snaps into an external power source while playing a BD.
6 Chapter 2 Using an optical drive Turn on the drive bezel to avoid touching the flat surfaces and position the disc label-side up
over the spindle. 5. Hold the disc by the edges to release the disc tray. 3. It...
Drives - Windows Vista - Page 16

... tray is not fully accessible, tilt the disc carefully as you remove it stops.
2. Remove the disc (3) from the tray by the edges and avoid touching the flat surfaces. Close the disc tray and place the disc in a protective case.
12 Chapter 2 Using an optical drive Removing a CD, DVD, or BD...
Drives - Windows Vista - Page 36
... to DVD/CD-ROM drives, unless a minus
sign (-) is already showing. Remove the disc (3) from the optical drive. 2.
If prompted by the edges and avoid touching the flat surfaces. Insert the end of a paper clip (1) into the release access in a protective case. NOTE: If the tray is released, and then pull...
Drives - Windows XP - Page 5

...the battery is sufficiently charged before writing to media. Before handling a drive, discharge static electricity by touching the unpainted metal surface of magnetism and will not damage a drive.
1 If you move the ...allow the screen to clear, or properly disconnect the external hard drive. Do not touch the connector pins on a removable drive or on luggage, such as conveyor belts, use excessive ...
Drives - Windows XP - Page 10

... until the disc snaps into an external power source while playing a BD.
6 Chapter 2 Using an optical drive Hold the disc by the edges to avoid touching the flat surfaces and position the disc label-side up
over the spindle. 5. If you want to position it over the tray spindle. NOTE: For...
Drives - Windows XP - Page 16
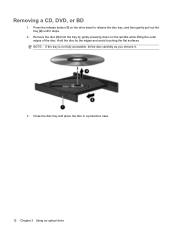
... the release button (1) on the spindle while lifting the outer edges of the disc. Remove the disc (3) from the tray by the edges and avoid touching the flat surfaces.
Drives - Windows XP - Page 36

... not open for the optical drive listing. 5. NOTE: If the tray is already showing. Remove any discs from the tray by the edges and avoid touching the flat surfaces. Right-click the optical device listing to Disc Drives or DVD/CD-ROM
drives, unless a minus sign (-) is not fully accessible, tilt...
Memory Modules - Linux - Page 5

... you. 6. To add or replace a memory module: 1. Shut down the computer through the operating system. 3. Remove the battery from the computer.
1 Before beginning any procedure, touch a grounded metal object to the computer. 4. If you are discharged of electric shock and damage to the equipment, unplug the power cord and remove all...
Memory Modules - Linux - Page 8
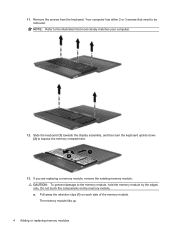
..., hold the memory module by the edges only. Pull away the retention clips (1) on the memory module. Remove the screws from the keyboard. Do not touch the components on each side of the memory module. The memory module tilts up.
4 Adding or replacing memory modules Your computer has either 2 or 3 screws...
Memory Modules - Linux - Page 9
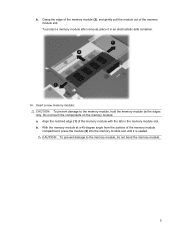
... of the memory module (2), and gently pull the module out of the memory module with the tab in an electrostatic-safe container.
14. b. Do not touch the components on the memory module. With the memory module at a 45-degree angle from the surface of the memory module compartment, press the module...
Memory Modules - Windows Vista - Page 5

... module to the vacant expansion memory module slot or by briefly pressing the power button. To add or replace a memory module: 1.
Before beginning any procedure, touch a grounded metal object to the computer. 4. Remove the battery from the computer.
1 To reduce the risk of static electricity. Adding or replacing memory modules
The...
Similar Questions

Comment Activé Tactile Hp Touchsmart Tm2-2000 -el Notebook Pc
(Posted by simohammedbouslama 9 years ago)

Hp Probook 4530s Notebook Pc Hp Probook 4730s Notebook Pc How To Turn On Pad
(Posted by asusro 10 years ago)

Hp Probook 4530s Notebook Pc Hp Probook 4730s Notebook Pc How To Turn On Touch
pad
pad
(Posted by kbjcca 10 years ago)

Touch Pad Hp Pavilion Dv4-1120us Entertainment Notebook Pc
I want to download driver/software touchpad hp pavilion dv4-1120us Entertainment notebook PC for win...
I want to download driver/software touchpad hp pavilion dv4-1120us Entertainment notebook PC for win...
(Posted by sientmon 11 years ago)

A Disk Read Error Occurred On Compaq Presario C700 Notebook Pc Intel(r) Dual Cpu
HP C770US fe932ua Research for this Hewlett-Packard item Add to My Products! Save this ite...
HP C770US fe932ua Research for this Hewlett-Packard item Add to My Products! Save this ite...
(Posted by billsullivan1952 13 years ago)