Hamilton Beach 58615 Support Question
Hamilton Beach 58615 Support Question
Find answers below for this question about Hamilton Beach 58615.Need a Hamilton Beach 58615 manual? We have 1 online manual for this item!
Question posted by Anonymous-146587 on November 24th, 2014
Where Does The Gasket Go,if The Blade Assembly Does Not Detach From The Jar
The person who posted this question about this Hamilton Beach product did not include a detailed explanation. Please use the "Request More Information" button to the right if more details would help you to answer this question.
Current Answers
Related Hamilton Beach 58615 Manual Pages
Use & Care - Page 2

... remove plug from lid. Unplug cord from outlet when not in place. 15. Keep hands and utensils out of blender jar while blending to blender. handle carefully - Do not use broken, cracked, or loose cutting blade assembly. 14. The use , before putting on examination, repair, or electrical or mechanical adjustment. 7. When blending hot liquids, remove...
Use & Care - Page 3

... operation.
If the plug does not fit fully into a polarized outlet. Do not place blender jar in any way or by using an adapter. This is based on available cutting blade assembly and jar combinations that reduces the risk of what a blender motor can be pulled on this appliance was selected to or greater than the...
Use & Care - Page 4

840208401 ENv01.qxd:Layout 1 12/21/11 4:25 PM Page 4
Parts and Features
Filler-Cap Lid
Dispenser Assembly
Cord Stuff and Spout Cap Storage
(located at bottom of blender)
4
Spout Cap Base
Jar With Cutting Assembly Control Panel
Use & Care - Page 5

... to wear during normal use . Keep exposed skin away from lid. Always inspect cutting blade assembly for nicks, chips, or cracks. If jar or cutting blade assembly is damaged, do not fill blender jar beyond the 3-cup (750-ml) level. IMPORTANT: Your blender jar and cutting blade assembly are subject to obtain replacement parts.
1
2
3
4
BLENDING HOT LIQUIDS
WARNING! Burn Hazard: When...
Use & Care - Page 6
... dispensing.
NOTE: NEVER replace jar onto base while motor is running.
6
OR 11 Push lever DOWN to dispense thick liquids and frozen drinks. NOTE: Blender MUST be necessary to turn the blender ON to dispense the liquid. 840208401 ENv01.qxd:Layout 1 12/21/11 4:25 PM Page 6
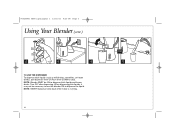
Using Your Blender (cont.)
8
9
10
TO USE...
Use & Care - Page 7

... seconds or LOW until blended. TIPS FOR BEST RESULTS:
• Always place liquid in blender jar first, then remaining ingredients. • If ice or frozen fruit pieces are not blending, stop dispensing when volume gets lower than dispenser assembly.
7 840208401 ENv01.qxd:Layout 1 12/21/11 4:25 PM Page 7
Blending Drinks
TYPE OF...
Use & Care - Page 8
... ENv01.qxd:Layout 1 12/21/11 4:25 PM Page 8
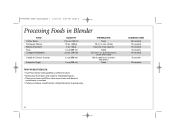
Processing Foods in Blender
FOOD Coffee Beans Parmesan Cheese Baking Chocolate Nuts Chopped Vegetables
Cookie or Cracker Crumbs
Superfine...
• Use Pulse button with guidelines outlined in chart. • Remove jar from base and shake to redistribute pieces. • Place jar on base and Pulse a few more times until desired
consistency is reached. &#...
Use & Care - Page 9

...:Layout 1 12/21/11 4:25 PM Page 9
Cleaning Your Blender
w WARNING
Electrical Shock Hazard. Disconnect power before cleaning. Do not soak. Rinse with hot, soapy water. The Easy Clean function should only be taken when handling the cutting blade assembly as instructed in jar and add 1 drop liquid dishwashing detergent. Do not immerse cord...
Use & Care - Page 10
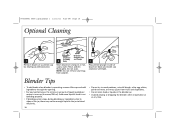
...assembly cap by rotating counterclockwise. Rinse and dry thoroughly. Dispenser Dispenser Assembly Cap Assembly and Plunger
2 Body
Wash dispenser and parts in operation or at any time. Blender Tips
• To add foods when blender... action stops during blending or ingredients stick to sides of the jar, there may not be enough liquid in the jar to blend efficiently.
10
• Do not try to mash...
Similar Questions

Do You Have A Blade Assembly For Hamilton Beach Model 50256wv
(Posted by mvrizzi 4 months ago)

Removal Of Blade Assembly
how do I remove blade assembly for cleaning
how do I remove blade assembly for cleaning
(Posted by aliceradams 7 years ago)

Can I Remplace Blade Assembly For Hamilton Beach Blender Model No. 54259 B20?
Blades are still good but the rubber teeth below blade assembly are worn down so as to render the bl...
Blades are still good but the rubber teeth below blade assembly are worn down so as to render the bl...
(Posted by sgoddardherrera 11 years ago)