Haier GDG750AW Support Question
Haier GDG750AW Support Question
Find answers below for this question about Haier GDG750AW.Need a Haier GDG750AW manual? We have 1 online manual for this item!
Question posted by gwpeters on July 21st, 2012
Electronics Dead
Self installed this dryer in May and it worked very well until the morning of 7/20/12. My wife could not get a response from the electronic controls as if it was in the off position (shipping mode). All the trouble shooting was completed including checking the power cord connections (3 prong) and breakers to no avail. It may be several days before a qualified repair person is sent by the factory representatives.
Note: This model was dumped through Electronic Express as It was purchased for $250. The repair history then was bad odor which we did not experience. I saw nothing about the electronic issue.
Current Answers
Related Haier GDG750AW Manual Pages
User Manual - Page 2
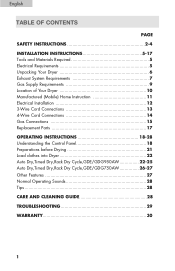
... Electrical Installation 12 3-Wire Cord Connections 13 4-Wire Cord Connections 14 Gas Connections 15 Replacement Parts 17 OPERATING INSTRUCTIONS 18-28 Understanding the Control Panel 18 Preparations before Drying 21 Load clothes into Dryer 22 Auto Dry,Timed Dry,Rack Dry Cycle,GDE/GDG950AW 22-25 Auto Dry,Timed Dry,Rack Dry Cycle,GDE/GDG750AW...
User Manual - Page 3
... USE ONLY. CAN/ CSA C22.2 No. 112-97 (latest editions) for commercial application such as restaurants, beauty salons, etc.
Follow the gas supplier's instructions. 5.
This dryer is being installed.
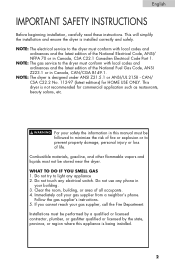
2 WHAT TO DO IF YOU SMELL GAS 1. If you cannot reach your gas supplier from a neighbor's phone. NOTE: The...
User Manual - Page 4
...or after each load.
12. Keep area around the exhaust opening and adjacent surrounding areas free from the accumulation of lint, dust and dirt.
13. Keep the dryer area clear and free from... is moving.
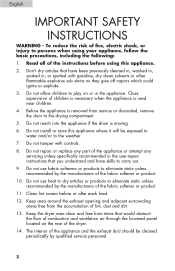
6. Do not install or store this appliance.
2. Don't dry articles that you understand and have been previously cleaned in, washed in, soaked in, or spotted with controls.
8. Do not repair or ...
User Manual - Page 5
...the plug, not the cord.
21.
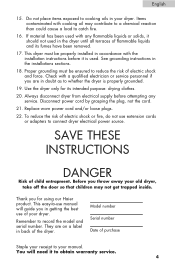
This dryer must be properly installed in accordance with a qualified electrician or service ...personnel if you throw away your manual. Before you are on a label in doubt as to reduce the risk of flammable liquids and its intended purpose: drying clothes.
20. Thank you in the dryer...
User Manual - Page 6
... install a clothes dryer with clothes dryers. Before starting installation, make sure that the gas shut off position.
2. English
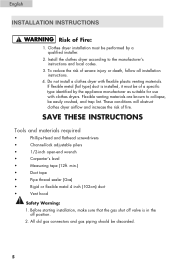
INSTALLATION INSTRUCTIONS
WARNING Risk AoTTfENFTiIOreN:
1.
min.)
•
Duct tape
•
Pipe thread sealer (Gas)
•
Rigid or flexible metal 4 inch (102cm) duct
•
Vent hood
Safety Warning:
1. These conditions will obstruct clothes dryer...
User Manual - Page 7
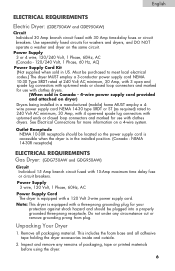
... Electrical Connections for washers and dryers, and DO NOT operate a washer and dryer on dryer) Dryers being installed in the installed position. (Canada -
This includes the foam base and all packaging material. Inspect and remove any circumstance cut or remove grounding prong from plug. NEMA 14-30R receptacle)
ELECTRICAL REQUIREMENTS Gas Dryer: (GDG750AW and GDG950AW)
Circuit Individual...
User Manual - Page 8
... can create a health and fire hazard.
3.
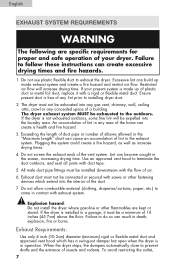
If the dryer is installed in a garage, it with the flow of a building. Failure to installing dryer duct.
2. Excessive lint can result in death, explosion, ...(minimum) rigid or flexible metal duct and approved vent hood which extend into the laundry area. If your dryer. Do not screen the exhaust ends of any area of lint in the exhaust ...
User Manual - Page 9
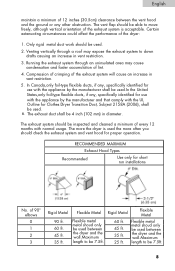
...should be able to be inspected and cleaned a minimum of every 12 months with normal usage. Running the exhaust system through a roof ...The more often you should check the exhaust system and vent hood for short run installations
No. of the dryer:
1.
Only rigid metal duct work should be 7.5ft.
Certain extenuating circumstances could affect the performance of 90º elbows...
User Manual - Page 10
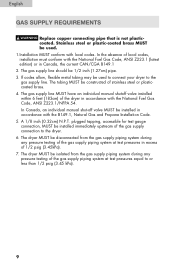
... steel or plasticcoated brass. 4. The gas supply line MUST have an individual manual shutoff valve installed within 6 feet (183cm) of the dryer in accordance with the B149.1, Natural Gas and Propane Installation Code. 5. A 1/8 inch (0.32cm) N.P.T. English
GAS SUPPLY REQUIREMENTS
R eApDlVaEcReTEcNoCpIAper AcoDnVEnReTcIStSinMgENpTipe that is not plasticWARNING coAaDtVeEdR.TESNtaCIiAnless...
User Manual - Page 11

... divided at the top and bottom of combustion and ventilation air. 3. When installing the dryer in (0 cm)
10 On carpet, floor must be corrected with a maximum slope of the door is required. A dryer installed in a bedroom, bathroom, alcove or closet MUST be installed in Alcove or Closet: 1. Any
floor unevenness should be unobstructed. A louvered door...
User Manual - Page 12
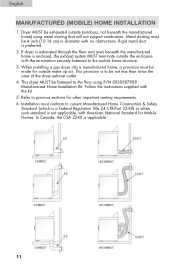
... floor using metal ducting that will not support combustion. Refer to be exhausted outside (outdoors, not beneath the manufactured home) using P/N 0030807988 Manufactured Home Installation Kit. If dryer is exhausted through the floor and area beneath the manufactured home is preferred.
2. Follow the instructions supplied with no obstructions. Metal ducting must be...
User Manual - Page 13

...ATTENTION
GAS Dryer (GDG750AW and GDG950AW)
CAUTION
PRECAUCIÓN
PRECAUCIÓN
1. ELECTRIC Dryer (GDE750AW and GDE950AW)
1. This appliance must be installed onto power ... grounded.
Do not cut by any movement of electrical current this plug.
12 Follow the instructions in this manual for proper grounding.
2. ImApDroVpEeRrTEcNoCnInAectioAnDoVfEtRhTeISeSqMuEiNpmT ent grounding...
User Manual - Page 14
...: Do not make a sharp bend or crimp wiring/conductor at this time.
3. Thread a U.L. approved strain relief into the power cord entry hole of the dryer's upper corner.
2. Install a U.L. Tighten screws securely.
7. Reinstall the terminal block cover. Finger tighten the nut only at connections.
6. Reattach the strain relief mounting bracket to the outer...
User Manual - Page 15
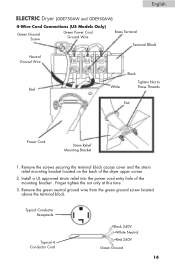
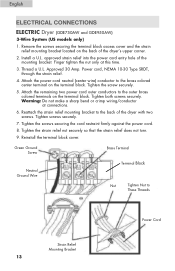
... Conductor Cord
Black 240V White Neutral Red 240V
Green Ground
14
English
ELECTRIC Dryer (GDE750AW and GDE950AW)
4-Wire Cord Connections (US Models Only)
Green Ground... the terminal block access cover and the strain relief mounting bracket located on the back of the dryer upper corner.
2. Install a UL approved strain relief into the power cord entry hole of the mounting bracket . Finger ...
User Manual - Page 16
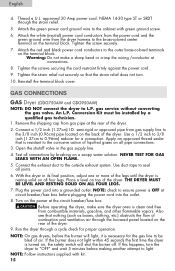
...shutoff valve in its final position, adjust one or more of the legs until the dryer is OFF at the ... connections.
3. GAS CONNECTIONS
GAS Dryer (GDG750AW and GDG950AW)
NOTE: DO NOT connect the dryer to be installed by brushing on , the safety.... gas service without converting the gas valve. Remove the shipping cap from the dryer harness to 0.96cm) reducer for a connection. Turn on...
User Manual - Page 17
... ensure seal.
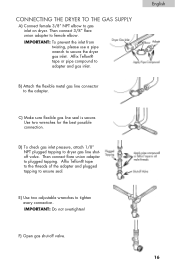
D) To check gas inlet pressure, attach 1/8" NPT plugged tapping to secure the dryer gas inlet.
IMPORTANT: To prevent the inlet from twisting, please use a pipe wrench to dryer gas line shutoff valve. IMPORTANT: Do not overtighten! CONNECTING THE DRYER TO THE GAS SUPPLY
A) Connect female 3/8" NPT elbow to gas inlet on...
User Manual - Page 18
...can be purchased throWuAgRhNHINaGier AAmDeVrEicRaTEaNtC1IA-800-313-8495
CAUTION LaPbReElCaAllUwCIiÓreNs prioAr TtoTEdNiTsIcOoNnnection when servicing controls. Good safe practice and caution must be allowed to use them to install and wire the dryer.
17 CAUTION WPirRiEnCgAeUrCroIÓrsNcan cPaRuEsCeAUimCpIÓroNper and dangerous operation. English
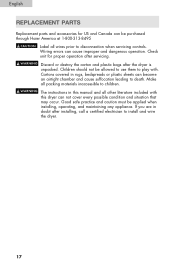
REPLACEMENT PARTS
ADVERTENCIA...
User Manual - Page 22
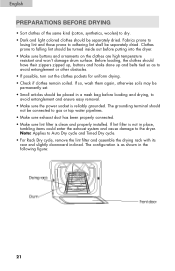
... shall be separately dried. The configuration is not in a mesh bag before putting into the dryer. • Make sure buttons and ornaments on the clothes are high temperature resistant and won't...avoid entanglement and ensure easy removal. • Make sure the power socket is clean and properly installed. If so, wash them again, otherwise soils may be permanently set. • Small articles ...
User Manual - Page 23
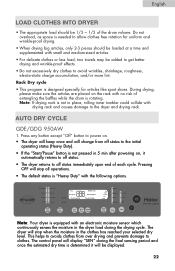
...lint. During drying, please make sure the articles are placed on the rack with an electronic moisture sensor which continuously senses the moisture in place, rolling inner tumbler could collide with the...is needed to clothes. Press any button except "Off" button to the dryer and drying rack. The control panel will change from over drying and prevents damage to allow clothes free...
User Manual - Page 28
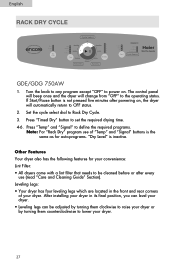
... its final position, you can level your dryer.
• Leveling legs can be cleaned before or after powering on . Turn the knob to any program except "OFF" to set the required drying time.
4-6. Press "Timed Dry" button to power on , the dryer will change from "OFF" to Rack Dry Cycle.
3.
After installing your dryer in...
Similar Questions

Haier Hlp141e Dryer Won't Dry Clothes
hello all,my trusty haier compact dryer has stopped drying my laundry. everything seems to be in goo...
hello all,my trusty haier compact dryer has stopped drying my laundry. everything seems to be in goo...
(Posted by profcurnon 4 months ago)

How To Install A Haier Dryer Rde350aw Drum
(Posted by chelzpave 9 years ago)

How To Install Heating Element In Haier Electric Dryer
(Posted by reharayche 10 years ago)

Haier Dryer Parts Control Rde350aw Images How To Install Up The Outlet Plug To
the dryer
the dryer
(Posted by rajessh 10 years ago)
