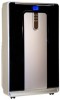
Haier CPN12XH9 Support Question
Haier CPN12XH9 Support Question
Find answers below for this question about Haier CPN12XH9.Need a Haier CPN12XH9 manual? We have 1 online manual for this item!
Question posted by ehlinebarger on May 5th, 2014
My Haier Portable Air Conditioner Is Flashing Stop And Will Not Turn On.
The person who posted this question about this Haier product did not include a detailed explanation. Please use the "Request More Information" button to the right if more details would help you to answer this question.
Current Answers
Answer #1: Posted by trevgemmer on July 9th, 2015 6:18 AM
trevgemmer

Member since:
July 9th, 2015 Points: 60
Member since:
July 9th, 2015 Points: 60
Mine is also the Commercial Cool (model #CPN10XC9)... I just cut and pasted my answer from a similar complaint.
After about 2 hours I finally got this figured out, and I couldn't find a fix anywhere online... just a lot of people with the same problem... here's the fix.
- On the back casing, there are 15 screws total (6 on each side, 1 under the air filter, 1 in the center, and 1 in the middle by the drain)... remove the back casing and you will see a mechanical kill switch 8" below the 5" air exhaust that has two quick disconnect terminals on it... if the reservoir directly below the switch isn't full of water, the "stop" problem is in that circuit somewhere. The problem with my unit was not the switch itself, but first things first. To test the switch, you can use the lowest Ohm reading if you have a multi-meter, and simply touch each terminal and check for a reading... if you get a reading, there is continuity in the circuit, and the problem is not the switch. If you do not have a multi-meter, simply disconnect the terminals and hold them so the metal on them is touching, and plug the unit in... this will bypass the kill switch. If the unit doesn't start working as it should while bypassing the switch, the problem is not the switch. If you do happen to have a bad switch you can either splice the two wires together (keep in mind you will no longer have that flood protection, so make sure you use the typical drain system if you go this route), or you can replace the switch, but good luck getting to the screws!
- Unfortunately, the more likely problem is simply that the kill switch didn't get plugged into the mother-board and it didn't get caught during China's immaculate quality control program... this scenario also makes for discontinuity in the "stop" circuit. If your switch is good, be prepared to dig your heals in a bit... you've got about 20 minutes left if you're mechanical, and probably about an hour left if you're not.
- UNPLUG THE UNIT!
- READ THIS WHOLE STEP BEFORE STARTING THE STEP... Remove the front casing, and don't worry about disconnection the white wire bundle... the bundle can stay connected. Let me save you some frustration and tell you where the screws are... using just your hands, gently removing the black trim from the front of the unit (I found it easiest to start at the bottom) and you will notice 2 screws that will need to be removed near the top of the unit under that trim. There are also two white brackets on the sides in the back of the unit... simply pull these brackets outward, and the front panel should come right off with a little shimmying at the top of the unit. Again, for safety, make sure the unit is unplugged before continuing and keep your hands and tools away from capacitors.
- With the front casing now removed, you should see a large white round plastic casing approximately 6-8" below where the cool air is designed to come out. Do not pry this casing apart... to open this case, simply press a slotted screwdriver into the nubs at each of the 5 connection points while gently peeling the casing open with your hands. The connection in the middle is the most difficult to access, so I found it easiest to get the sides apart first.
- If your defect is like mine, take a look directly below where the white wire bundle is plugged in and you will see a reddish 2-prong port with nothing in it... guess what is supposed to be in it... the switch we mentioned earlier. If you are having a hard time finding what is supposed to plug into that port, just follow the wires up from the float kill switch mentioned earlier, and it should be there. If you plug the unit in to test it and you still don't have a fix, at least you know what you need to do. The two prongs in the reddish port under the white wire bundle need a closed circuit to be happy, so make them happy and you'll have a functioning unit. Remember that this is a high-efficiency unit, so it will take about 5 minutes to start getting cold. Please let me know that my fix helped you save some money, and it will encourage me to take the time to do this next time... trev.gemmer g mail. God bless.
Related Haier CPN12XH9 Manual Pages
Product Manual - Page 2
... service calls during the warranty period the following information will be obtained from the serial label, which is on your air conditioner. Also, do not forget to -operate Commercial Cool air conditioner. English
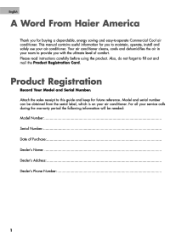
A Word From Haier America
Thank you for buying a dependable, energy saving and easy-to fill out and mail the Product Registration Card...
Product Manual - Page 3
...or where the atmosphere is frayed or otherwise damaged.
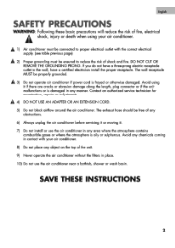
SAVE THESE INSTRUCTIONS
2 Avoid using your air conditioner. 8) Do not place any manner. Avoid any chemicals coming in contact with the correct ...table previous page)
A 2) Proper grounding must be connected to proper electrical outlet with your air conditioner. DO NOT CUT OR
REMOVE THE GROUNDING PRONG. If you do not have a three-...
Product Manual - Page 5
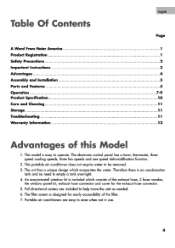
... of Contents
A Word From Haier America Product Registration Safety Precautions Important Instructions Advantages Assembly and Installation Parts and Features Operation Product Specification Care and Cleaning Storage Troubleshooting Warranty Information
English
Page
1 1 2 3 4 5 5 7-9 10 1 1 1 1 1 1 12
Advantages of the filter. 7. Portable air conditioners are included to store when...
Product Manual - Page 7
...
I
F.
9
F.
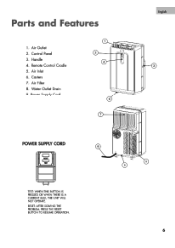
Water Outlet Drain 9. English 3
6 Casters 7.
TEST: WHEN THIS BUTTON IS PRESSED OR WHEN THERE IS A CURRENT LEAK, THE UNIT WILL NOT OPERATE.
Parts and Features
1. Air Inlet 6. Handle 4. Air Outlet 2. Air Filter 8.
Product Manual - Page 8

English
Operation
NOTE: Wait for 24 hours to turn on
this air conditioner. 3. After a normal shut down, wait for 3 minutes before restarting the unit so as drapes, curtains, blinds, etc. 6. Do not place the air conditioner in a low Fan cool mode. Keep unit at least 1 foot away from the water drain pipe
and drain out any...
Product Manual - Page 9
... in the cool mode. LCD Display When STOP indicator light turns on draining the air conditioner.
8 English
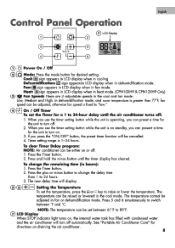
Control Panel Operation
0 LCD Display
0
2
3
5 u00u.71g•; Heat: Jsign appears in LCD display when in heat mode. (CPN10XH9 & CPN12XH9 Only)
0 Fan Speeds There are 3 adjustable speeds in dehumidification mode.
See 'Portable Air Conditioner Care" for
the unit to 24-hour...
Product Manual - Page 10
....
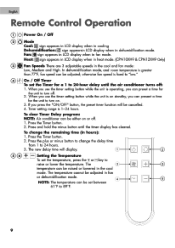
Press and hold the minus button until the air conditioner turns off: 1. Press the plus or minus button to change the remaining time (in the cool and fan mode: Low, Medium and High. Heat: ®sign appears in LCD display when in heat mode. (CPN10XH9 & CPN12XH9 Only)
CE Fan Speeds There are 3 adjustable speeds...
Product Manual - Page 11
English
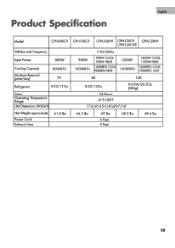
Product Specification
Model
CPN08XC9 CPN10XC9 CPNI 0XH9 CPN12XC9 CPN12XH9 CPN12XC9-E
Voltabe and Frequency
Input Power
800W
Cooling Capacity
Moisture Removal (pints/day)
80008TU 75
Refrigerant
R-22/11Oz
Timer
Operating Temperature Range
Unit Dimensions (WxDxH)
...
Product Manual - Page 12
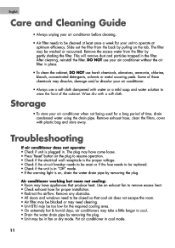
...8226; Press "Reset" button on the tab. After cleaning, reinstall the filter.
Troubleshooting
If air conditioner does not operate: • Check if unit is plugged in the filter. Remove the ...remove excess heat. • Check exhaust hose for proper installation. • Redirect the airflow. Air conditioner working but room not cooling: • Room may be replaced. • Check if the...
Product Manual - Page 13
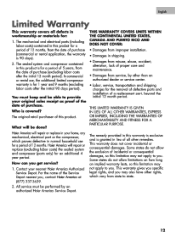
...date of purchase. For the name of purchase • Damages from service, by an authorized Haier America Service Depot. warranty is 90 days).
2.
Who is for a period of incidental or ...:
period of 12 months, from the date of the Service Depot nearest you . your nearest Haier America Authorized Service Depot. OR IMPLIED, INCLUDING THE WARRANTIES OF MERCHANTABILITY AND FITNESS FOR A
What ...
Product Manual - Page 35
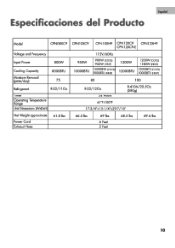
EsPond
Especificaciones del Producto
Model
CPN08XC9 CPN10XC9 CPN10XH9 CPN12XC9 CPN12XH9 CPN12XC9-E
Voltage and Frequency Input Power
800W
Cooling Capacity
Moisture Removal (pints/day)
8000BTU 75
Refrigerant
R-22/11Oz
Timer
Operating Temperature Range
Unit Dimensions (WxDxH)
...
Similar Questions


How To Keep Haier Portable Air Conditioner Troubleshooting
(Posted by rescar 10 years ago)
My Haier Portable Air Conditioner Won't Turn On
(Posted by dolaCHa 10 years ago)

Why Does My Portable Air Conditioner Commercial Cool Say Stop
(Posted by Brianmad 10 years ago)