Graco 2797VIB3 Support Question
Graco 2797VIB3 Support Question
Find answers below for this question about Graco 2797VIB3 - Digital Deluxe Video iMonitor.Need a Graco 2797VIB3 manual? We have 1 online manual for this item!
Question posted by trishmul on July 19th, 2010
Graco Deluxe Video Monitor Troubleshooting
I have a Graco 2797VIB3 Digital Deluxe Video iMonitor. The monitor keeps going off. The green light does come on, stays on for about 10 seconds then shuts off. I have tried replacing the batteries w/ brand new ones. If I unplug the unit from the wall and plug it back in, the green light will come on for 10 seconds.
The on button seems stuck to me. I was going to try to access it. After taking out the 3 screws in the back middle portion of it, I didn't want to pry it open too hard for fear of breaking it. It appears to me that it should be able to be opened but figured I would go online first to see if:
anyone has had this issue and
if anyone has actually opened up their monitor.
Thank you in advance for your help!
Current Answers
Answer #1: Posted by amb3rm on October 27th, 2010 9:52 AM
amb3rm

Member since:
October 27th, 2010 Points: 1,100
Member since:
October 27th, 2010 Points: 1,100
I tried the answer above and it didn't work, so i called Graco and they told me to try the same thing. I did it a few times and on about the third time it worked. She said the monitors got disconnected from each other for some reason. Something interfered with the connection because it's a digital connection, not an analog one. So you have to follow the above process to "reconnect" them to each other.
Place both units next to each other and turn them off. On the parent unit, hold down the "volume down" button, then turn the unit on. Wait until you hear a beap, and the volume lights will come on, then let go. Then press the "volume down" button again until you hear the same beap, and all the lights will stay on. (I had to try this a few times before it worked). Then turn the power on the nursery unit, and they should be connected.
Related Graco 2797VIB3 Manual Pages
Instruction Manual - Page 1
to turn camera on. 2 Place camera facing baby.
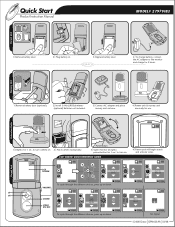
Quick Start
Product Instruction Manual
R R
MODEL# 2797VIB3
R
Parent Unit
Nursery Unit
Activating Units
1 Remove battery door.
2 Plug battery in.
3 Replace battery door.
4 To charge battery, connect the AC adapter to turn on. Power Button
3 Open monitor and press power button for 1 sec. LCD SCREEN
12 Hour(am/pm) 24 Hour
VOLUME...
Instruction Manual - Page 4

R
R
OWNER'S MANUAL
Keep Instructions For Future Reference
©2008 Graco ISPM024BA 3/08
Instruction Manual - Page 5

When using the monitor, you must still provide the supervision necessary for the continued safety of children. Do not cover the Nursery Unit or Parent Units...immerse any object such as a medical monitor. Clean only with any part of the Nursery Unit, Parent Units, or docking station in the monitoring of each other.
• STRANGULATION HAZARD. Keep the adapter cords out of the reach...
Instruction Manual - Page 8
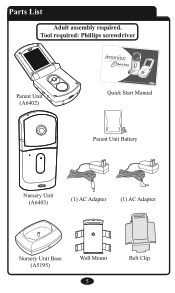
Quick Start Manual
Parent Unit Battery
R
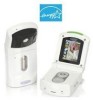
Nursery Unit (A6403)
(1) AC Adapter (1) AC Adapter
Nursery Unit Base (A5195)
Wall Mount 5
Belt Clip Tool required: Phillips screwdriver
R
Digital Color Video Baby Monitor
Quick Start Product Instruction Manual
Parent Unit (A6402)
OWNER'S MANUAL Keep instructions for future use.
Parts List
Adult assembly required.
Instruction Manual - Page 9
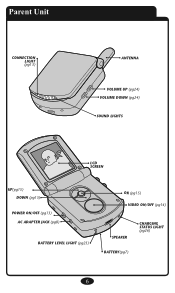
Parent Unit
CONNECTION LIGHT (pg13)
ANTENNA
VOLUME UP (pg24) VOLUME DOWN (pg24) SOUND LIGHTS
LCD SCREEN
UP(pg15) DOWN (pg15)
POWER ON/OFF (pg13) AC ADAPTER JACK (pg8)
BATTERY LEVEL LIGHT (pg25)
OK (pg15) VIDEO ON/OFF (pg14)
SPEAKER
CHARGING STATUS LIGHT (pg26)
BATTERY(pg7)
6
Instruction Manual - Page 13
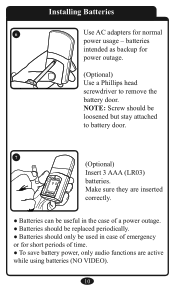
... of a power outage. ● Batteries should be replaced periodically. ● Batteries should be useful in the case of time. ● To save battery power, only audio functions are active while using batteries (NO VIDEO).
10 Make sure they are inserted correctly.
● Batteries can be loosened but stay attached to remove the battery door. Installing Batteries
6
Use AC adapters for...
Instruction Manual - Page 16

Connection Light
13
R
Make sure Nursery Unit is turned on. The live video feed will turn
9:22pm
from red to green.
13 The Connection Light at
the top of the unit, will then be shown.
Parent Unit Power On/Off
12
R
Press and hold Power On/Off button for the Nursery Unit.
Unit will cycle through intro and begin searching for 1 second.
Instruction Manual - Page 17

14
R
Press and hold Power On/Off button for 1 second to view the image from the Nursery Unit.
14
Pressing the Video button will allow the user to turn unit off.
15
R
To activate or deactivate the live video feed, press the Video button.
Instruction Manual - Page 18
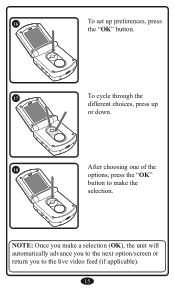
NOTE: Once you make the selection.
16
R
To set up preferences, press the "OK" button.
17
R
To cycle through the different choices, press up or down.
18
R
After choosing one of the options, press the "OK" button to make a selection (OK), the unit will automatically advance you to the next option/screen or return you to the live video feed (if applicable).
15
Instruction Manual - Page 19
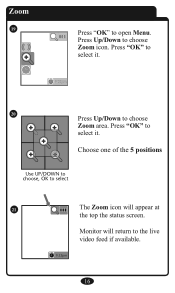
... the 5 positions
9:22pm
Use UP/DOWN to choose, OK to select
21
The Zoom icon will return to the live video feed if available.
9:22pm
16
Press "OK" to select it .
Monitor will appear at
the top the status screen. Press "OK" to choose Zoom icon. Press Up/Down to select it...
Instruction Manual - Page 20

Press Up/Down to live video
screen if available. Zoom icon will return to choose
Zoom out icon.
Press OK to
select it.
9:22pm
Use UP/DOWN to choose, OK to select
23
Monitor will not be visible
on the status screen.
9:22pm
17 Zoom Out
22
Press OK to open Menu.
Instruction Manual - Page 21
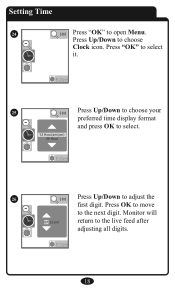
Monitor will
07 :32 pm
return to the next digit. Press OK to move
to the live feed after
adjusting all digits.
9:22pm
18 Press Up/Down to adjust the
first digit. Press "OK" to select it.
9:22pm
25
Press Up/Down to choose your
preferred time display format
and press OK to select.
12...
Instruction Manual - Page 22
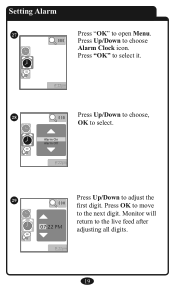
Setting Alarm
27
Press "OK" to the next digit. Press OK to move
to open Menu. Alarm On Alarm Off
9:22pm
29
Press Up/Down to select. Press "OK" to select it.
9:22pm
28
Press Up/Down to choose,
OK to adjust the
first digit.
Press Up/Down to the live feed after adjusting all digits.
9:22pm
19 Monitor will
07:22 PM
return to choose Alarm Clock icon.
Instruction Manual - Page 24
Press "OK" to select it.
9:22pm
33
Press Up/Down to choose
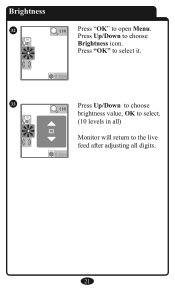
brightness value, OK to select.
(10 levels in all digits.
9:22pm
21 Brightness
32
Press "OK" to the live feed after adjusting all )
10
Monitor will return to open Menu. Press Up/Down to choose Brightness icon.
Instruction Manual - Page 25

Press "OK" to select it.
9:22pm
35
Press Up/Down to choose, OK to the live feed after selecting a language.
22 English Français Espanol
9:22pm
Monitor will return to select. Language
34
Press "OK" to choose Language icon. Press Up/Down to open Menu.
Instruction Manual - Page 28
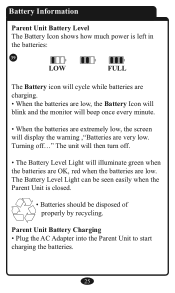
... Battery Level Light will illuminate green when the batteries are OK, red when the batteries are very low. The unit will display the warning ,"Batteries are low. The Battery Level Light can be disposed of properly by recycling. Parent Unit Battery Charging • Plug the AC Adapter into the Parent Unit to start charging the batteries.
25
Battery Information
Parent Unit Battery...
Instruction Manual - Page 31
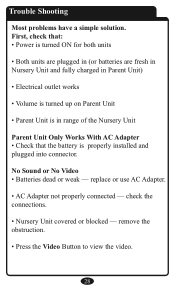
...that: • Power is turned ON for both units
• Both units are plugged in (or batteries are fresh in Nursery Unit and fully charged in Parent Unit)
• Electrical outlet works
•...AC Adapter • Check that the battery is properly installed and plugged into connector. remove the obstruction.
• Press the Video Button to view the video.
28 replace or use AC Adapter.
•...
Instruction Manual - Page 32
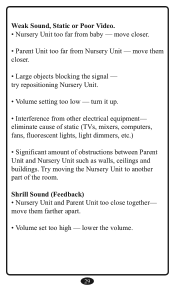
...; Interference from baby - Shrill Sound (Feedback) • Nursery Unit and Parent Unit too close together- try repositioning Nursery Unit.
• Volume setting too low - Try moving the Nursery Unit to another part of obstructions between Parent Unit and Nursery Unit such as walls, ceilings and buildings. Weak Sound, Static or Poor Video. • Nursery...
Instruction Manual - Page 33
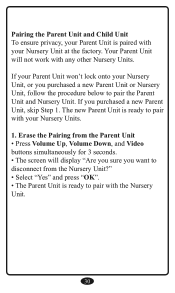
... your Nursery Unit, or you purchased a new Parent Unit, skip Step 1. Erase the Pairing from the Parent Unit • Press Volume Up, Volume Down, and Video buttons simultaneously for 3 seconds. • The screen will not work with the Nursery Unit.
30
Instruction Manual - Page 34
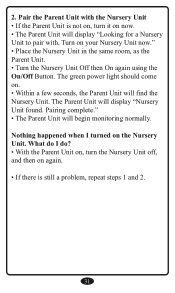
... on, turn it on the Nursery Unit. Turn on . • Within a few seconds, the Parent Unit will display "Nursery Unit found. Nothing happened when I do I turned on now. • The Parent Unit will begin monitoring normally. The green power light should come on your Nursery Unit now." • Place the Nursery Unit in the same...
Similar Questions

Graco Baby Monitor What Does Red Light Mean
(Posted by beanjo 9 years ago)

Graco Digital Baby Monitor What Does Red Light Mean
(Posted by senAmyS 10 years ago)

Graco Baby Monitor Cant Get Green Lights
(Posted by FeisCkb 10 years ago)

Why Graco 2m20vib Baby Monitor Beeps & Has Red Light Randomly?
(Posted by hillmjb 12 years ago)
Parent Monitor Not Working Red Light On
parent monitor just red, worked fine this am. been on charger all day. only 2 months old.
parent monitor just red, worked fine this am. been on charger all day. only 2 months old.
(Posted by roxannejohnson1978 13 years ago)