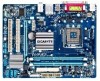
Gigabyte GA-G41MT-S2PT Support Question
Gigabyte GA-G41MT-S2PT Support Question
Find answers below for this question about Gigabyte GA-G41MT-S2PT.Need a Gigabyte GA-G41MT-S2PT manual? We have 1 online manual for this item!
Question posted by gbistrow on February 14th, 2013
Power Switch Pins
how do connect front panel pins (PW reset sw)
Current Answers
Related Gigabyte GA-G41MT-S2PT Manual Pages
Manual - Page 2
Motherboard GA-G41MT-S2PT
Jul. 22, 2011
Motherboard GA-G41MT-S2PT
Jul. 22, 2011
Manual - Page 4
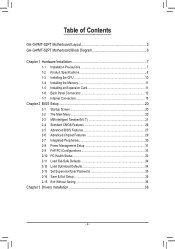
Table of Contents
GA-G41MT-S2PT Motherboard Layout 5 GA-G41MT-S2PT Motherboard Block Diagram 6
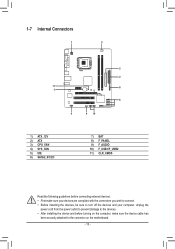
Chapter 1 Hardware Installation 7 1-1 Installation Precautions 7 1-2 Product Specifications 8 1-3 Installing the CPU 10 1-4 Installing the Memory 11 1-5 Installing an Expansion Card 11 1-6 Back Panel Connectors 12 1-7 Internal Connectors 13
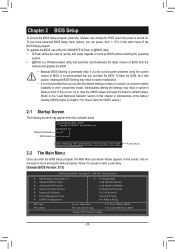
Chapter 2 BIOS Setup 20 2-1 Startup Screen 20 2-2 ...
Manual - Page 5
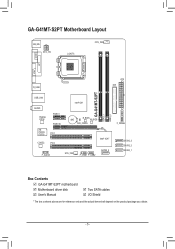
... PCIEX16 PCI1
CODEC
PCI2
Intel® G41
BAT
B_BIOS M_BIOS
CLR_CMOS
Intel® ICH7
F_AUDIO
SYS_FAN
F_USB1 F_USB2
SATA2_0
F_PANEL
SATA2_3 SATA2_2 SATA2_1
Box Contents GA-G41MT-S2PT motherboard Motherboard driver disk User's Manual
Two SATA cables I/O Shield
* The box contents above are for reference only and the actual items shall depend on the product...
Manual - Page 6
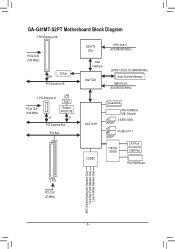
GA-G41MT-S2PT Motherboard Block Diagram
1 PCI Express x16
PCIe CLK (100 MHz)
D-Sub x16 PCI Express x16
LGA775 CPU
CPU CLK+/(333/266/200 MHz)
Host Interface
Intel&#...
Manual - Page 7
... pad or within an electrostatic shielding container. •• Before unplugging the power supply cable from the power outlet before installing or removing the motherboard or other hardware components.
•• When connecting hardware components to the internal connectors on the motherboard, make sure they are no leftover screws or metal components placed on the...
Manual - Page 8

... To configure 7.1-channel audio, you have to 8 USB 2.0/1.1 ports (4 ports on the back panel, 4 ports available through the audio driver.
LAN
ŠŠ 1 x Realtek RTL8111E chip (... Up to use an HD front panel audio module and
enable the multi-channel audio feature through
the internal USB headers) 1 x 24-pin ATX main power connector 1 x 4-pin ATX 12V power connector 1 x IDE connector 4 ...
Manual - Page 10
...the alignment keys on the motherboard CPU socket and the notches on the CPU
- 10 -
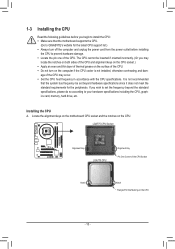
Installing the CPU A. LGA775 CPU Socket
Alignment Key LGA775 CPU
Alignment Key Pin One Corner of the CPU... and unplug the power cord from the power outlet before installing
the CPU to prevent hardware damage. •• Locate the pin one of the CPU Socket
Notch
Notch Triangle Pin One Marking on ...
Manual - Page 11
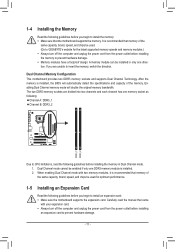
... A: DDR3_1 Channel B: DDR3_2
Due to CPU limitations, read the manual that the motherboard supports the memory.
A memory module can be installed in Dual Channel mode. 111...switch the direction. DDR3_1 DDR3_2 After the memory is installed. 222 When enabling Dual Channel mode with your expansion card. •• Always turn off the computer and unplug the power cord from the power...
Manual - Page 12
... keyboard/mouse, USB printer, USB flash drive and etc. Do not rock it straight out from the motherboard.
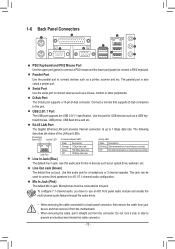
•• When removing the cable, pull it side to side to connect devices such as a printer, scanner and etc. 1-6 Back Panel Connectors
PS/2 Keyboard and PS/2 Mouse Port Use the upper port (green) to...
Manual - Page 13
Unplug the
power cord from the power outlet to prevent damage to the devices. •• After installing the device and before connecting external devices: •• First make sure the device cable has
been securely attached to turn ... compliant with the connectors you wish to connect. •• Before installing the devices, be sure to the connector on the motherboard.
- 13 -
Manual - Page 14
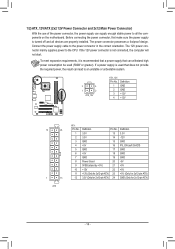
Connect the power supply cable to the CPU. The 12V power connector mainly supplies power to the power connector in the correct orientation.
The power connector possesses a foolproof design. If the 12V power connector is turned off and all the components on the motherboard. 1/2) ATX_12V/ATX (2x2 12V Power Connector and 2x12 Main Power Connector) With the use of the power connector...
Manual - Page 15

...) and a 3-pin system fan header (SYS_FAN). The motherboard supports CPU fan speed control, which requires the use of the IDE devices (for example, master or slave). (For information about configuring master/slave settings for the IDE devices, read the instructions from overheating. Do not place a jumper cap on the connector. When connecting a fan...
Manual - Page 16

...Pin No. 1 2 3 4 5 6 7
Definition GND TXP TXN GND RXN RXP GND
Please connect the L-shaped end of the SATA cable to your SATA hard drive.
7) BAT (Battery) The battery provides power to keep the values (such as BIOS configurations, date, and time information) in the power...if the battery is turned off your computer and unplug the power cord before replacing the battery. •• Replace the ...
Manual - Page 17

..., make sure the wire assignments and the pin assignments are matched correctly.
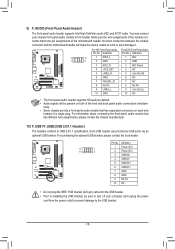
- 17 - 8) F_PANEL (Front Panel Header)
Connect the power switch, reset switch, speaker, chassis intrusion switch/sensor and system status indicator on the chassis front panel. Note the positive and negative pins before connecting the cables. G.QBOFM
Speaker
Power Switch Message/Power/
Sleep LED
20 19
SPEAK- The LED...
Manual - Page 18
... of the module connector match the pin assignments of a single plug. You may connect your computer and unplug the power
cord from the power outlet to prevent damage to this header. Incorrect connection between the module connector and the motherboard header will be sure to turn off your chassis front panel audio module to the USB bracket...
Manual - Page 19
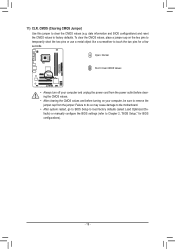
...the power cord from the jumper. Failure to do so may cause damage to the motherboard....pins for BIOS configurations).
- 19 - 11) CLR_CMOS (Clearing CMOS Jumper) Use this jumper to factory defaults.
Open: Normal Short: Clear CMOS Values
•• Always turn off your computer, be sure to Chapter 2, "BIOS Setup," for a few seconds. date information and BIOS configurations) and reset...
Manual - Page 20
... Motherboard Model BIOS Version
Award Modular BIOS v6.00PG Copyright (C) 1984-2011, Award Software, Inc. Inadequately altering the settings may appear when the computer boots.
G41MT-S2PT ... this occurs, try to clear the CMOS values and reset the board to default values. (Refer to the ... program, press the key during the POST when the power is a Windows-based utility that you not alter the...
Manual - Page 34
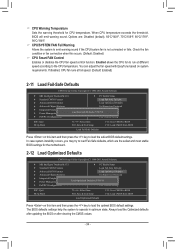
...Defaults
Advanced Chipset Features
Set Supervisor Password
Integrated Peripherals Power Management Setup
Set User Password Load Optimized Defa ul ts (Y/NS)?avNe & Exit Setup...warning sound if the CPU/system fan is not connected or fails. CPU Warning Temperature Sets the warning threshold for the motherboard.
2-12 Load Optimized Defaults
CMOS Setup Utility-...
Manual - Page 35

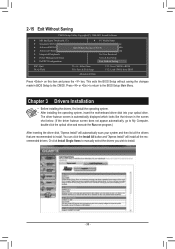
...aYd Optimized Defaults Set Supervisor Password
Integrated Peripherals
Set User Password
Power Management Setup
Save & Exit Setup
PnP/PCI Configurations
Exit Without Saving
ESC...BIOS Features Advanced Chipset Features Integrated Peripherals Power Management SetupEnter Password: PnP/PCI Configurations
PC Health...
Manual - Page 36
...the operating system. •• After installing the operating system, insert the motherboard driver disk into your system and then list all Data
F11: Save CMOS to...; Advanced Chipset Features
Set Supervisor Password
Integrated Peripherals
Set User Password
Power Management Setup
Save & Exit Setup
PnP/PCI Configurations
Exit Without Saving
ESC: ...
Similar Questions


How To Manually Overclock Gigabyte Motherboard Ga-970a-ud3
(Posted by mk45Snowfl 9 years ago)


How Do I Turn On My Pcie X16 Slot On My Ga-g41mt-s2pt (rev. 2.1) Gigabyte Mother
(Posted by koosieandre 10 years ago)

Does My Gigabyte Ga-g41mt-s2pt Motherboard Have Esata Host Port Multiplier?
(Posted by LeFiles 10 years ago)