Gateway MT6821 Support Question
Find answers below for this question about Gateway MT6821.Need a Gateway MT6821 manual? We have 7 online manuals for this item!
Question posted by gammawilli on July 26th, 2014
How To Remove The Keyboard On A Gateway Mt6821 Laptop
The person who posted this question about this Gateway product did not include a detailed explanation. Please use the "Request More Information" button to the right if more details would help you to answer this question.
Current Answers
There are currently no answers that have been posted for this question.
Be the first to post an answer! Remember that you can earn up to 1,100 points for every answer you submit. The better the quality of your answer, the better chance it has to be accepted.
Be the first to post an answer! Remember that you can earn up to 1,100 points for every answer you submit. The better the quality of your answer, the better chance it has to be accepted.
Related Gateway MT6821 Manual Pages
8511725 - Gateway Service Guide - Page 11
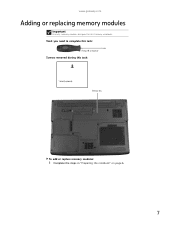

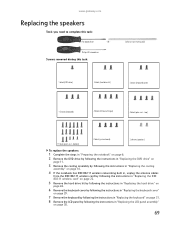
Tools you need to complete this task:
Phillips #0 screwdriver
Screws removed during this Gateway notebook. www.gateway.com
Adding or replacing memory modules
Important
Use only memory modules designed for this task:
1 black (keyboard)
Memory bay
To add or replace memory modules:
1 Complete the steps in "Preparing the notebook" on page 6.
7
8511725 - Gateway Service Guide - Page 15

Tip
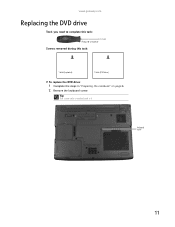
The screw hole is marked with a K.
Keyboard screw
11 www.gateway.com
Replacing the DVD drive
Tools you need to complete this task:
Phillips #0 screwdriver
Screws removed during this task:
1 black (keyboard)
1 black (DVD drive)
To replace the DVD drive:
1 Complete the steps in "Preparing the notebook" on page 6. 2 Remove the keyboard screw.
8511725 - Gateway Service Guide - Page 17
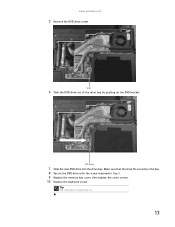

... the bay. 8 Secure the DVD drive with a K.
13 www.gateway.com
5 Remove the DVD drive screw.
Make sure that the drive fits securely in Step 5. 9 Replace the memory bay cover, then tighten the cover screws. 10 Replace the keyboard screw. Screw
6 Slide the DVD drive out of the drive bay by pushing on...
8511725 - Gateway Service Guide - Page 23

www.gateway.com
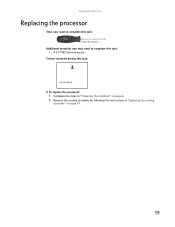
Replacing the processor
Tools you need to complete this task:
Phillips #0 screwdriver
Additional materials you may need to complete this task:
• X-23-7762 thermal grease
Screws removed during this task:
1 black (keyboard)
To replace the processor:
1 Complete the steps in "Preparing the notebook" on page 6. 2 Remove the cooling assembly by following...
8511725 - Gateway Service Guide - Page 33
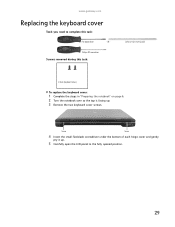

... under the bottom of each hinge cover and gently
pry it up . 3 Remove the two keyboard cover screws. www.gateway.com
Replacing the keyboard cover
Tools you need to complete this task:
Scribe or non-marring tool
2 black (keyboard cover)
To replace the keyboard cover:
1 Complete the steps in "Preparing the notebook" on page 6. 2 Turn the...
8511725 - Gateway Service Guide - Page 35
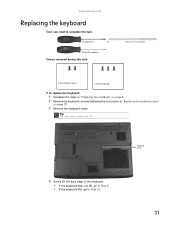

... non-marring tool
2 black (keyboard cover)
1-3 black (keyboard)
To replace the keyboard:
1 Complete the steps in "Preparing the notebook" on page 6. 2 Remove the keyboard cover by following the instructions in "Replacing the keyboard cover"
on page 29.
3 Remove the keyboard screw. OR -
Tip
The screw hole is marked with a K.
www.gateway.com
Replacing the keyboard
Tools you need to Step...
8511725 - Gateway Service Guide - Page 37
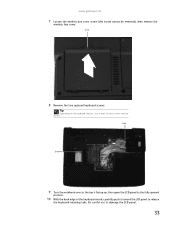

...LCD panel to release
the keyboard retaining tabs.
Screw
8 Remove the two optional keyboard screws. Screw
Screw
9... Turn the notebook over so the top is facing up, then open the LCD panel to damage the LCD panel.
33 Be careful not to the fully opened
position.
10 With the back edge of these screws may be removed), then remove the
wireless bay cover.
www.gateway...
8511725 - Gateway Service Guide - Page 39
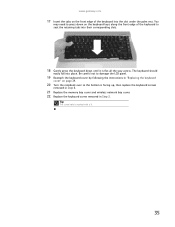

... cover and wireless network bay cover. 22 Replace the keyboard screw removed in "Replacing the keyboard
cover" on the keyboard keys along the front edge of the keyboard into their corresponding slots.
18 Gently press the keyboard down until it is flat all the way across. www.gateway.com
17 Insert the tabs on the front edge...
8511725 - Gateway Service Guide - Page 41
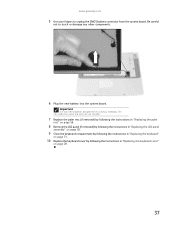

... removed) by following the instructions in "Replacing the LCD panel
assembly" on page 38.
9 Close the keyboard compartment by following the instructions in "Replacing the keyboard"
on page 31.
10 Replace the keyboard cover by following the instructions in "Replacing the keyboard cover"
on page 29.
37
Important
Use only CMOS batteries designed for this Gateway...
8511725 - Gateway Service Guide - Page 49


www.gateway.com
10 Unplug both cables from the front of the LCD panel assembly removed in Step 7. 16 Replace the four or six rubber inserts onto the front of the LCD panel together in several places until they click in "Replacing the keyboard cover"
on page 31.
19 Replace the keyboard cover by following...
8511725 - Gateway Service Guide - Page 55
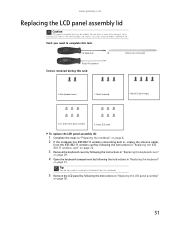

...IEEE 802.11 wireless card" on page 22.
3 Remove the keyboard cover by following the instructions in "Replacing the keyboard cover"
on page 29.
4 Open the keyboard compartment by model. Tip
You do not need to... an existing LCD front if the new lid does not match. OR - www.gateway.com
Replacing...
8511725 - Gateway Service Guide - Page 63

www.gateway.com
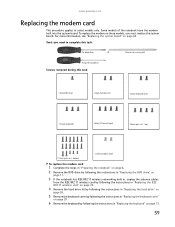
Replacing the modem card
This procedure applies to complete this task:
1 black (DVD drive)
2 black (hard drive kit)
2 black (keyboard cover)
1-3 black (keyboard)
4 black (LCD panel...26.
5 Remove the keyboard cover by following the instructions in "Replacing the keyboard cover"
on page 29.
6 Remove the keyboard by following the instructions in "Replacing the keyboard" on ...
8511725 - Gateway Service Guide - Page 69


... by following the instructions in "Replacing the hard drive" on
page 26.
8 Remove the keyboard cover by following the instructions in "Replacing the keyboard cover"
on page 29.
9 Remove the keyboard by following the instructions in "Replacing the keyboard" on page 31. 10 Remove the LCD panel by following the instructions in "Replacing the LCD panel assembly...
8511725 - Gateway Service Guide - Page 71

... rest -
Scribe or non-marring tool
Phillips #0 screwdriver
Screws removed during this task:
Flat-blade driver
- www.gateway.com
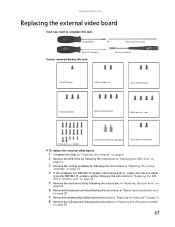
Replacing the external video board
Tools you need to complete this task:
5.0 mm hex nutdriver
1 black (DVD drive)
2 black (hard drive kit)
2 black (keyboard cover)
1-3 black (keyboard)
4 black (LCD panel hinges)
4 black (palm rest - OR...
8511725 - Gateway Service Guide - Page 73

... the keyboard cover"
on page 29.
7 Remove the keyboard by following the instructions in "Replacing the keyboard" on page 31.
8 Remove the LCD panel by following the instructions in "Replacing the LCD panel assembly"
on page 38.
69 OR - Phillips #0 screwdriver
Screws removed during this task:
Flat-blade driver
- top)
17 black (palm rest - www.gateway.com...
8512055 - Component Replacement Manual - Page 3

...components inside of their edges.
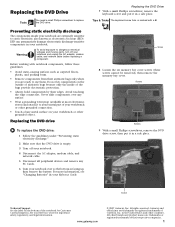
Replacing the DVD Drive
7 With a small Phillips screwdriver, remove the keyboard screw and put it in a safe place. Screw
8 Loosen the six memory bay...other grounded connection.
• Touch a bare metal surface on the bottom of Gateway, Inc. Gateway and eMachines are trademarks or registered trademarks of the bags provide electrostatic protection.
&#...
8512055 - Component Replacement Manual - Page 4

... 2007 Gateway, Inc. Gateway and eMachines are trademarks or registered trademarks of their respective companies. All other countries.
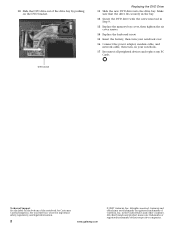
in Step 9.
13 Replace the memory bay cover, then tighten the six cover screws.
14 Replace the keyboard screw.... Secure the DVD drive with the screw removed in the United States and other brands and product names are trademarks or registered trademarks of...
8512055 - Component Replacement Manual - Page 6
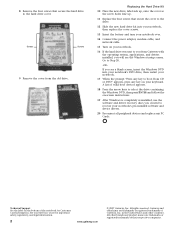

... the hard drive to the hard drive cover. Gateway and eMachines are trademarks or registered trademarks of valid boot devices appears.
18 Press the arrow keys to select the drive containing the Windows DVD, then press ENTER and follow the on your keyboard. 8 Remove the four screws that secure the cover to the...
8512055 - Component Replacement Manual - Page 7
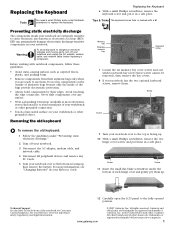

... a small Phillips screwdriver, remove the keyboard screw and put them .
Technical Support See the label on the outside of your workbench or other grounded connection.
• Touch a bare metal surface on your notebook. See your notebook are ready to the fully opened position. www.gateway.com
© 2007 Gateway, Inc. Gateway and eMachines are trademarks...
8512055 - Component Replacement Manual - Page 9
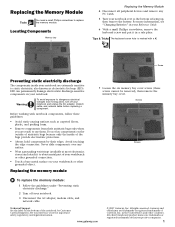

..., see "Changing Batteries" in your notebook over any PC Cards.
5 Turn your Reference Guide.
6 With a small Phillips screwdriver, remove the keyboard screw and put it to use them.
www.gateway.com
© 2007 Gateway, Inc. Gateway and eMachines are extremely sensitive to replace the memory module. See your notebook and unplug the AC adapter, modem...

