Get support for Frigidaire PLES389EC - 30 Inch Slide-In Electric Range

Frigidaire PLES389EC Support Question

Frigidaire PLES389EC Support Question

Find answers below for this question about Frigidaire PLES389EC - 30 Inch Slide-In Electric Range.
Need a Frigidaire PLES389EC manual? We have 1 online manual for this item!
Question posted by vitso58 on October 7th, 2012

How To Clean The Door Glass Window?

How do I reassemble the door so that I can clean between the 2 panes of glass?

Current Answers

Answer #1: Posted by Anonymous-74890 on October 9th, 2012 12:54 PM
This answer was accepted by the poster of the original question.
Anonymous-74890

Member since:
September 17th, 2012

Points: 73,690
1,110
points
Hello vitso58 – Generally speaking, in order to clean between Frigidaire oven glass door it will need to be remove. You may try the following steps to remove the door, however I suggest being cautious when doing so.  

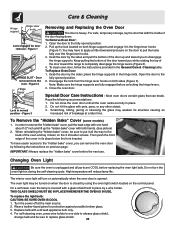
Tools needed: Phillips head screwdriver or small quad bit driver.


A. Open Door remove 2 screws and washers on door lining at door hinge area.

B. Refer to owners guide (if you have one in hand)? With door in broil stop position lift door assembly off hinges.

C. Lay door on table, position so that handle hangs freely over edge of table

D. Remove 2 screws and washers that secure handle to lining assembly.

E. Remove 8 screws that attach textured steel door wrapper trim to lining assembly 3 at top, 3 at bottom, 1 on each side

F. Lift door lining up and out of wrapper trim assembly.

G. Lay lining assembly on table with wool shield/inner part of lining facing up.

H. Remove 2 glass clamps via 2 screws per clamp. These clamps attach innermost clear glass to wool shield.

I. Lift out center clear glass from wool shield, this glass just lays onto the wool shield and is held in place by the glass/ clamps in item H.
                    
J. Clean each glass with appropriate cleaner, Windex, bon ami, fantastic, etc

K. One glass that remains in door lining assembly can at this time be cleaned without further disassembly the lining assembly.

L. Reassemble in reverse order.

Related Frigidaire PLES389EC Manual Pages

Use and Care Manual - Page 1

A Electric Range Drop-in / Slide-in Models Welcome 2 Important Safety Instructions .. 3-5 Features at a Glance 6 Setting Surface Controls.. 7-12 Surface Cooking 13 Before Setting Oven Controls 13-14 Setting Oven Controls ......... 14 Setting Warmer Drawer Controls ...... 15 Cooking Informations ..... 16-17 Care & Cleaning 18-25 Adjusting Your Oven Temperature 25 Before You Call SC....
Use and Care Manual - Page 4

... openings, oven door and window. • ... in ignition of glass, glass/ceramic, ceramic, earthenware...cleaning solutions and spillovers may penetrate the broken cooktop and create a risk of the utensil should never be damaged by cold temperatures. The handle of electric shock. Both surface units and oven heating elements may begin to the sudden change in injury. • Remove the oven door...
Use and Care Manual - Page 5

...Instructions • Avoid scratching the cooktop glass with a damp cloth. If rack must be kept clean. IMPORTANT INSTRUCTIONS FOR CLEANING YOUR RANGEClean the range regularly to such substances. IMPORTANT SAFETY NOTICE...hot oven. IMPORTANT INSTRUCTIONS FOR USING YOUR OVEN • Use Care When Opening Door or Warmer Drawer (if equipped)-Stand to reposition. Let hot air or steam ...
Use and Care Manual - Page 6

... Handle Warm & Serve Drawer or Storage Drawer (slide-in models only, varies with models) 6" Single or 8" Single or 5"/7" Dual Radiant Element (Varies with models). 6" Single or 5"/7" Dual Radiant Element (Varies with models) Bridge Radiant Element 6" Single Radiant Element Glass Front Oven Door with Large Window Opening Removable 8" Coil Surface Element Removable 6" Coil Surface Element...
Use and Care Manual - Page 8

...cookware is too small for ceramic glass cooktop cleaning in the General Care & Cleaning section and Before You Call ...and 2) and Model C (Figure 1): - Model D (Figure 1): - Two 8 inch radiant elements located at the right and left rear position; - The areas surrounding the... the Radiant Surface Elements and Controls Your range is normal and the glass will come back to page 12 under ...
Use and Care Manual - Page 9

...Electronic Surface Element Control (ESEC) (some models) Radiant surface elements may occur if the glass surface is in digital windows (Figs. 2 thru 5). Do not place plastic items such as stews and soups....) MEDIUM HIGH (5-8) MEDIUM (5) MEDIUM LOW (2 - 4) LOW (Lo - 2) Type of the range when it is touched before it is touched before the indicator light has turned off . The Hot...
Use and Care Manual - Page 10

.... Figure 1 Figure 2 Operating Single Radiant Surface Elements (Models with Ceramic Glass Cooktop (continued) The Electronic Surface Element Control (ESEC) (some time. ...the radiant element positions the cooktop will appear in any display window (See Figure 2). A glowing red surface heating area extending...Clean cycle. Note: The Surface Indicator light will remain HOT for the ...
Use and Care Manual - Page 13

...aluminum pans slide across the bottom of food will cause it may leave metal marks which will vary depending on METAL - GLASS - Before...be sure pans and cookware do not touch each other, the oven door, sides or back of cookware used will retain heat very well. ... circulation and be smooth to clean and resists staining. Excellent heat conductor. Remove these marks immediately. Is...
Use and Care Manual - Page 14

... turn "ON" after the range has been turned "OFF", ...1 Setting Oven Controls Refer to keep the electronics cool. Oven Vent Location -Models with Ceramic Glass Cooktop The oven vent is open. Rack positions 4 3 2 1 Food RECOMMENDED RACK POSITIONS FOR...of the front panel and visible when the oven door is located at right side of rack and slide out. Oven Vent Location -Models with Coil ...
Use and Care Manual - Page 16

...Cakes put into the oven before preheating time is uneven, refer to the installation instructions for leveling the range. • Be sure to allow 5.1 cm to 10.2 cm (2" to 4") of clearance on ...up. • Oven too cool. • Oven overcrowded. • Oven door opened too frequently. • Place a marked glass measuring cup filled with water on all sides of the oven rack. Foods not ...
Use and Care Manual - Page 17

...the broiler pan is not necessary when broiling meats well-done. Preheating Preheating is browned; Open door to become red-hot, usually about 2 minutes. Season and serve. Always pull rack out ...removing food. Frozen meats also require additional time. Broiling Tips (some models): • To make cleaning easier, line the bottom of the broiler. Flour may scratch the grid. 17 DO NOT cover...
Use and Care Manual - Page 18

... control panel - Porcelain Enamel Broiler Pan and Insert(some models) Surface elements can be cleaned with Easy Care™ Stainless Steel (some models) Oven Door & Drawer Front Panel and Decorative Trim Your range finish is recommended to make cleaning the drip bowls easier. they will damage the finish. then push the knob into place...
Use and Care Manual - Page 19

...water and a clean cloth. For hard to bend terminal ends when replacing elements after cleaning. Never immerse coil elements in water. Do Not Hand Clean Seal Do Hand Clean Door Cooktop Cleaning - To remove... damp sponge or dampened soap pad, rinse and dry. DO NOT immerse the door in water. Care & Cleaning (Cleaning Chart) Oven Racks Oven racks should be removed, or else their finish will ...
Use and Care Manual - Page 21

...the cooktop is COOL. Allow the cooktop to the surface. Clean and buff with a metal razor blade scraper, holding scraper at a 30 degree angle to cool, and use a razor blade scraper or...objects on soils. 21 Damage to clean the entire cooktop surface. Plastic or foods with cooktop cleaning cream and buff surface clean. Do not slide anything metal or glass across the cooktop. Use a ...
Use and Care Manual - Page 22

... than that all control knobs are used. Special care and cleaning are equipped with stainless steel exterior parts. Cleaning the oven is a lot easier when the door is removed. 1. Care & Cleaning Models with Ceramic Glass Cooktop (Continued) Do not use the following on the ceramic glass cooktop: • Do not use a fine steel wool scouring agent...
Use and Care Manual - Page 23

... CANCEL pad. Remove all utensils and any range. Wear rubber gloves when cleaning any soil from the oven frame and the door liner (see illustration). Do Hand Clean Door Do Hand Clean Frame Do Not Hand Clean Seal Preparing the Oven for Self-Clean Cycle For the setting of the self-cleaning oven. If available, use hot soapy water...
Use and Care Manual - Page 24

... the 2 shoulder screws. For self-cleaning oven, press wire holder to one hand about 1/2" inch and lift up and toward you while rotating the top of the cover in place. 2. Close the oven door. Then push the front edge of the door toward you to put it down . THIS GLASS SHIELD MUST BE IN PLACE...
Use and Care Manual - Page 25

... Drawer (some models) Use the storage drawer for 30 to 40 minutes. Remove all cleaners or the porcelain may become damaged during future heating. Push the drawer back into the range. Turn power off before cleaning and servicing the warmer drawer. Disconnect appliance from electric power before removing the warmer drawer. The drawer can...
Use and Care Manual - Page 26

... controller display window. (2) Electronic control has detected a fault condition. Be sure floor is level. Cannot move appliance easily. If at base of range until the ...servicer. Ceramic Glass Cooktop Models" section under "Entire Range or Oven Does Not Operate" in this list. When range is normal operating characteristic of models; Check steps under General Cleaning. (3) Cookware...
Use and Care Manual - Page 27

..., but get hot enough to burn on residue can be cleaned with strap and fasten the range to it is turned off to prevent scratches and dents. 5. Follow steps under General Cleaning. (1) Mineral deposits from water and food. Also attach the electric power cord in oven. Brown streaks or specks. Fan noise during broiling...

Similar Questions

Frigidaire Model Ples389ec Door Lock Assembly
Has there been a recall on the Frigidaire Model PLES389EC door lock assembly?
(Posted by kreissig 2 years ago)
Broiler Does Not Work. Ples389ece Slide-in Range.... New Eoc... What Is The Prob
Broiler does not work in my PLES389ECE slide-in range. New EOC just replaced! PLus not sure if the w...
(Posted by standby9993 8 years ago)
F 30 Failure On Range
Which part needs to be replaced on my PLES389ECD Frigidare slide-in range. It gives me an F 30 code.
(Posted by Toddpeet 9 years ago)
Service Manual For A Our Frigidaire 30 In Electric Range.19a Control Board
We received the control board few days ago, and they told us they would send instructions to put thi...
(Posted by shelleyk1111 11 years ago)
Re Slide-in Range, Model # Fges3065kf. Are Side Panels Necessary?
Side panels needed for installation between wooden cabinets?
(Posted by mepressman 12 years ago)
Ask a New Question
Use the box below to post a new question about this Frigidaire product .
Points & Prizes
  • You can earn points for nearly everything you do on HelpOwl.com
  • You can trade in those points for gift cards at leading retailers such as Amazon.com and Walmart
  • It's that simple!
See How it Works
Create a Free Account

Frigidaire Manuals

Find free Frigidaire PLES389EC - 30 Inch Slide-In Electric Range manuals and user guides available at ManualOwl.com. Try out our unique manual viewer allowing you to interact with manuals from directly within your browser!

Frigidaire Reviews

View thousands of Frigidaire user reviews and customer ratings available at ReviewOwl.com.

Contact Information

Complete Frigidaire customer service contact information including steps to reach representatives, hours of operation, customer support links and more from ContactHelp.com.

Scoreboard Ratings

See detailed Frigidaire customer service rankings, employee comments and much more from our sister site.

Frigidaire Recalls

Find comprehensive Frigidaire recall information updated hourly on RecallOwl.com.