
Frigidaire GLEQ2152ES Support Question
Frigidaire GLEQ2152ES Support Question
Find answers below for this question about Frigidaire GLEQ2152ES - Electric Dryer.Need a Frigidaire GLEQ2152ES manual? We have 4 online manuals for this item!
Question posted by meagVilma on September 7th, 2014
Frigidaire Dryer Gleq2152eso Will Not Heat
The person who posted this question about this Frigidaire product did not include a detailed explanation. Please use the "Request More Information" button to the right if more details would help you to answer this question.
Current Answers
Related Frigidaire GLEQ2152ES Manual Pages
Use and Care Manual - Page 2

... Serial Numbers
book contains valuable information about features for the recycling of this or any electrical switch; We have every feature included. Follow the gas supplier's instructions. • If...• Service
Keep it shall be treated as instructed in your
Purchase Date dryer. Your dryer may not be handed over to the applicable collection point for several other flammable...
Use and Care Manual - Page 3

... with 3-prong grounding plug
CORRECT Use this way ONLY
Important Safety Instructions Con't
Avoid fire hazard or electrical shock. Some rubber materials, when heated, can become airtight chambers. • Keep laundry products out of the dryer. Regularly inspect the outdoor exhaust opening and remove any accumulation of lint around the outdoor exhaust opening and...
Use and Care Manual - Page 4

...electricity, which may permanently set some stains. Check that attract lint. See Operating Instructions for easy removal.
2. Do not use any service or cleaning. Fill dryer drum 1/3 to persons, read and follow fabric care labels and laundry...overload dryer.
• When drying large items, dry only 2 or 3 at a time. Place small items in accordance with controls. - Dryer heat may...
Use and Care Manual - Page 5

... Instructions and those listed below.
• Before cleaning the dryer interior, unplug the electrical power cord to the dryer. When items are dry, remove the rack and replace the lint screen. The screen is equipped with a reversible door. Use only the Air Fluff/No Heat option for directions on the lint screen from noncolorfast...
Use and Care Manual - Page 6
... • Leaving items in washer or dryer to
electricity.
• Or, add a fabric softener sheet and
reduce static electricity.
• Lint screen not clean
tumble without heat.
• Remove items when they are... place. Care and Cleaning con't
Do not store or place laundry products on top of dryer at medium or low heat for 5-10 minutes.
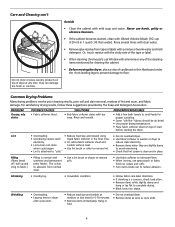
• Remove items immediately. Common Drying...
Use and Care Manual - Page 7

... circuit breaker or replace fuse. Call authorized service person for service, review this dryer. If 1of the 2 fuses is not open . Dryer does not have no more than drying on a separate circuit.
Dryer should heat when utility service is clogged with lint. Electric dryer is open (gas models). Make sure all lint has been removed from...
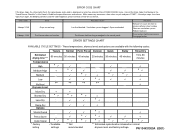
Technical Data Sheet - Page 1

...E4A: the first digit would be 4 and the second digit would extend dry times such as: no heating)
Temperature reading of control thermistor has not changed in a certain amount of time. To exit this code...Check for a number higher than nine. Dryer Tech Data Sheet
This information is obtained by using chart below. CAUTION: DISCONNECT ELECTRICAL CURRENT BEFORE SERVICING Please Return This Sheet...
Technical Data Sheet - Page 2
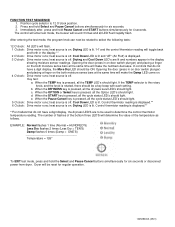
...Select and Pause Cancel buttons simultaneously for six seconds or disconnect power from dryer. heat source is pressed, all the cycle status LED's should light. In ...Cool Down LED is pressed, all LED'S will be ON. FUNCTION TEST SEQUENCE 1. Dryer will rapidly flash. Drying LED is off . heat source is lit. Control thermistor reading is on . The control will enter test ...
Installation Instructions - Page 2

... building. · Clear the room, building or area of all occupants. · Immediately call the fire department.
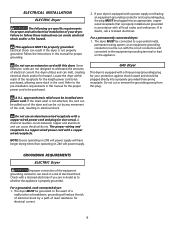
ELECTRICAL REQUIREMENTS
ELECTRIC Dryer
CIRCUIT - Installation and service must be located so the power supply cord is accessible when the dryer is equipped with a 120 volt 3-wire power cord. Carpenter's level. 4. minimum time delay fuses or circuit...
Installation Instructions - Page 3

...flexible metal duct.
All male duct pipe fittings MUST be exhausted into the laundry area. Failure to exhaust the dryer. Connect an inclined or digital manometer between the vent hood and the ...allow combustible materials (for proper and safe operation of 12 inches (30.5 cm) clearance between the
dryer and the point the exhaust connects to prevent drafts and the entrance of 4" (10.2 cm) ...
Installation Instructions - Page 4

... expose the exhaust
system to the right side of the cabinet or the bottom of the dryer. On gas dryers, exhausting can be constructed of stainless steel or plasticcoated brass.
4. EXHAUST DUCT LOCATING DIMENSIONS
.... • Running the exhaust system through your parts distributor. However, on electric dryers, exhausting can be disconnected from the factory are required to be used .
...
Installation Instructions - Page 5
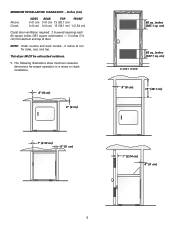
... 60 square inches (387 square centimeters) - 3 inches (7.6 cm) from bottom and top of door.
cm)
CLOSET DOOR
0" (0 cm)
15" (38.1 cm)
1" (2.54 cm) 0" (0 cm)
5 This dryer MUST be exhausted outdoors.
5. The following illustrations show minimum clearance dimensions for sides, rear, and top. cm)
60 sq. inches (387.1 sq.
inches (387.1 sq...
Installation Instructions - Page 6

... (70.49cm) 28.5 to clear door handle (72.39cm)
2.375" (6.03cm)
(34.29cm) 13.5" To rear & base exhausts
27.0"
(68.58cm)
Stacked Dryer Installation Dimensions
(68.58cm) 27.0"
Electrical supply on rear of unit
28.25" to front of cabinet(71.76cm)
28.75" to clear knobs (73.03cm) 29.5" to clear...
Installation Instructions - Page 7
...the opposite side of the cabinet. This provision is accomplished by transferring hinges to the floor. This dryer MUST be 4 inches (10.16 cm) in the open screw holes on the right side of ...-Part 32-80) or when such standard is designed under ANSI Z 21.5.1 or ANSI/UL2158 -
If dryer is exhausted through the floor and area beneath the mobile home is preferred.
2. UNPACKING
1. Rotate the door...
Installation Instructions - Page 9
... an aluminum wired receptacle with a three-prong (grounding) plug for the length power cord to follow these instructions can be pulled out of electrical shock. GAS Dryer
This dryer is a copper wired power cord with the circuit conductors and connected to whether the appliance is not attached, the cord can be cut or...
Installation Instructions - Page 10
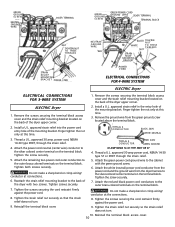
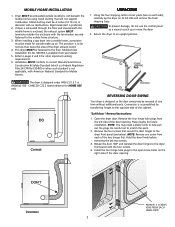
... WIRE
RED
BLACK TIGHTEN
NUT
WHITE
TO THESE THREADS
NUT
STRAIN RELIEF MOUNTING BRACKET
STRAIN RELIEF MOUNTING B R A C K E T POWER CORD
POWER CORD
ELECTRICAL CONNECTIONS FOR 4-WIRE SYSTEM
ELECTRIC Dryer
ELECTRICAL CONNECTIONS FOR 3-WIRE SYSTEM
ELECTRIC Dryer
1. Remove the screws securing the terminal block access cover and the strain relief mounting bracket located on the back of the...
Installation Instructions - Page 11

... materials inaccessible to flow through a cycle check for a connection. Remove the shipping cap from combustible materials, gasoline, and other literature included with this dryer are needed for the Frigidaire Company Authorized Parts Distributor nearest you purchased your Use and Care Guide before the burner will shut the burner off at the circuit...
Operating Instructions - Page 1
...load will be dried at the end of load, weight and fabric type. The dryer senses the moisture level of fire, electric shock or injury to be displayed for best drying results. Auto Dry cycles save ... and drying temperature for a cycle, it tumbles through heated air. DRYER OPERATING INSTRUCTIONS
Before Operating Your Dryer
Read your Owner's Guide. A signal will automatically be dried.
Operating Instructions - Page 2
...heat is lighted. or to delete an option. Occasionally a load may seem too damp or overdried at the end of the cycle.
Follow the same steps to dust draperies. The dry load will not light. Dryer...minutes are available with every cycle.
The settings can be remembered each cycle. See the "Dryer Settings Chart" for most cotton fabrics. Press PAUSE/CANCEL once to pause the cycle and ...
Operating Instructions - Page 3
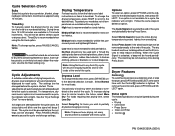
... continues and the code reappears, please contact service for the possible cause and solution. Dryer overloaded.
These temperatures, dryness levels and options are available with the following cycles:
Estimated drying time *** Temperatures
High Medium-High
Medium Low
No Heat Dryness Level
Towels 60 minutes
*
**
Normal Perm Press Delicate Quick 50 minutes 40...
Similar Questions

Why Is My Dryer Not Heating Molel. Gleq2152eso
(Posted by jefhd 9 years ago)

Where Is Heating Element On Frigidaire Dryer Model Gleq2152eso
(Posted by tomwiorzoroa 10 years ago)

Why Does My Frigidaire Gallery Series Dryer Not Heat
(Posted by azaofam 10 years ago)
My Dryer Wont Heat Up.
(Posted by Melodygc1 11 years ago)
Gas Dryer Not Heating
my gas dryer turns but is not heating i read it may be a fuse may i have the part number
my gas dryer turns but is not heating i read it may be a fuse may i have the part number
(Posted by katherin2003 12 years ago)