Frigidaire FRA144HT2 Support Question
Frigidaire FRA144HT2 Support Question
Find answers below for this question about Frigidaire FRA144HT2.Need a Frigidaire FRA144HT2 manual? We have 6 online manuals for this item!
Current Answers
Answer #1: Posted by flanker3 on June 30th, 2012 7:14 PM
flanker3

Member since:
June 29th, 2012 Points: 9,480

Member since:
June 29th, 2012 Points: 9,480
Disconnect power to the washer. Turn off the water-supply valves, then disconnect the water supply hoses from the washer unit by unscrewing them with channel-lock pliers. Move the washer away from the wall.
Pull out the detergent drawer until it hits the stop tab. Push down on the release tab with your finger, then pull the drawer the rest of the way out and set it aside.
Remove the two screws that hold the top panel to the back panel of the washer. Slide the top panel toward the back, then lift it off the washer unit. Set the top cover aside.
Remove the two screws holding the washer console to the side panels of the washer unit. Remove the three screws behind the detergent door panel.
Lift the three tabs which hold the console on. Roll the console forward and lift up.
Unplug the wire harness by depressing the connector tab with your fingers, then pull the connector off. Remove the console, then set it aside.
Open the loading door. Locate the hook and spring on the wire loop holding the bellows over the door opening. Grasp the hook with needle-nose pliers, then pull it out and over the lip of the door. Continue to pull the wire loop off from around the door opening until it comes free. Set the wire loop aside. Pull the bellows off the lip around the front door.
Remove the two screws holding the door safety switch to the front panel.
Remove the four screws across the bottom edge of the front panel that connect to the washer base. Remove the four screws across the top edge of the front panel connected to the washer unit.
Lift up on the front panel and then move it out to disengage four pins that hold it in place. Lift the front panel off, then set it aside.
Answer #2: Posted by flanker3 on June 30th, 2012 7:14 PM
flanker3
Member since:
June 29th, 2012 Points: 9,480
Member since:
June 29th, 2012 Points: 9,480
Disconnect power to the washer. Turn off the water-supply valves, then disconnect the water supply hoses from the washer unit by unscrewing them with channel-lock pliers. Move the washer away from the wall.
Pull out the detergent drawer until it hits the stop tab. Push down on the release tab with your finger, then pull the drawer the rest of the way out and set it aside.
Remove the two screws that hold the top panel to the back panel of the washer. Slide the top panel toward the back, then lift it off the washer unit. Set the top cover aside.
Remove the two screws holding the washer console to the side panels of the washer unit. Remove the three screws behind the detergent door panel.
Lift the three tabs which hold the console on. Roll the console forward and lift up.
Unplug the wire harness by depressing the connector tab with your fingers, then pull the connector off. Remove the console, then set it aside.
Open the loading door. Locate the hook and spring on the wire loop holding the bellows over the door opening. Grasp the hook with needle-nose pliers, then pull it out and over the lip of the door. Continue to pull the wire loop off from around the door opening until it comes free. Set the wire loop aside. Pull the bellows off the lip around the front door.
Remove the two screws holding the door safety switch to the front panel.
Remove the four screws across the bottom edge of the front panel that connect to the washer base. Remove the four screws across the top edge of the front panel connected to the washer unit.
Lift up on the front panel and then move it out to disengage four pins that hold it in place. Lift the front panel off, then set it aside.
Related Frigidaire FRA144HT2 Manual Pages
Complete Owner's Guide (English) - Page 1

All about the
Use &Care
of your
Room Air Conditioner
TABLE OF CONTENTS
Important Safety Instructions 2 Product Registration 3 Normal Sounds 3 Air Conditioner Features 4 Operating Instructions 4-9
Care and Cleaning 9 Energy Saving Ideas 9 Before You Call 10 Major Appliance Warranty 11
www.frigidaire.com USA 1-800-944-9044
www....
Complete Owner's Guide (English) - Page 2
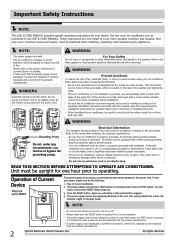
... WARNING
Electrical Information
The complete electrical rating of Current Device' for details. Be sure the air conditioner is damaged, it CANNOT be replaced with a screen panel included, remove the screen completely before installation. READ THIS SECTION BEFORE ATTEMPTING TO OPERATE AIR CONDITIONER.
The power supply cord is now supplying electricity to the unit. (On some products...
Complete Owner's Guide (English) - Page 4
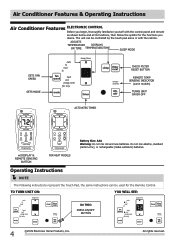
...old and new batteries. The unit can be controlled by the touch pad alone or with the control panel and remote
as shown below and all its functions, then follow the symbol for the Remote Control. TO..., thoroughly familiarize yourself with the remote. All rights reserved. Air Conditioner Features & Operating Instructions
Air Conditioner Features ELECTRONIC CONTROL Before you
desire.
Complete Owner's Guide (English) - Page 9
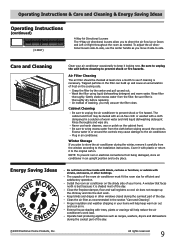
...needed. Operating Instructions & Care and Cleaning & Energy Saving Ideas
Operating Instructions
(continued)
(4-WAY)
4-Way Air Directional Louvers The 4-Way air directional louvers allow you plan to store the air conditioner during the winter, remove it carefully from being damaged, store air conditioner in an upright position and a dry place. Care and Cleaning Energy Saving Ideas
Clean...
Complete Owner's Guide (English) - Page 10
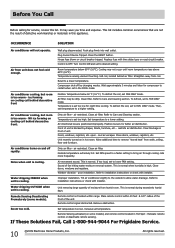
... Care and Cleaning section. Refer to FAN ONLY mode.
Air directional louvers positioned improperly. restricts air distribution. open - Allow additional time to remove "stored heat" from coil.
Clean air filter. Noise when unit is too warm - If too loud, set to allow water drainage. Tilt air conditioner slightly to the outside to lower FAN setting.
Room...
Complete Owner's Guide (English) - Page 11

...with respect to be required. Service calls to repair or replace appliance light bulbs, air filters, water filters, other consumables, or knobs, handles, or other than authorized ...not cover the following: 1. Service under this warranty. Food loss due to another party or removed outside the USA or Canada.
3. This warranty only applies in a commercial setting.
7. LIMITATION...
Installation Instructions (All Languages) - Page 1
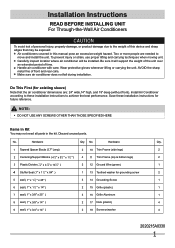
... pose an excessive weight hazard. Hardware
Qty. Install Air Conditioner according to move and install the unit. Do This... First (for existing sleeve)
Note that may not need all parts in this device and sharp edges that the air conditioner dimensions are needed to these installation instructions for grounding screw
2
5 seal ( 1" x 1 1 2 " x 25" )
3 14 ...
Installation Instructions (All Languages) - Page 2
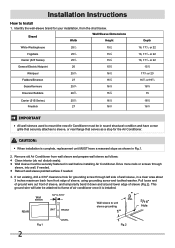
...painted surface if needed . If not existing, drill a 3/16" clearance hole for the Air Conditioner.
Remove old Air Conditioner from the chart below. Wall sleeve
1/4" to 5/16"
REAR
UNIT FRONT
Wall sleeve ... screw and toothed washer. This ground wire will later be attached to mount the new Air Conditioner must be in sound structural condition and have a rearward slope as shown in Fig.1.
...
Installation Instructions (All Languages) - Page 3
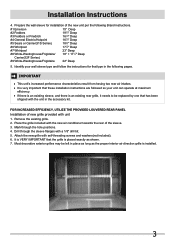
...White-Westinghouse/Frigidaire
22Ǝ Deep
5. FOR INCREASED EFFICIENCY, UTILIZE THE PROVIDED LOUVERED REAR PANEL
Installation of new grille provided with self-threading screws and washers(not included). 6. Mark through.... 4. Installation Instructions
4. Remove the existing grille. 2. Prepare the wall sleeve for that has been shipped with the new air conditioner towards the rear of the...
Installation Instructions (All Languages) - Page 4
...with provided louvered rear panel. Seal & Frame the unit as shown.
5. If you have difficulty with the tapered end facing the opening.
6. Remove existing rear grille as...x 3 1 2" x 11 2" centering/support blocks one on Page 13.
4 Before sliding all-the-way back, remove 2nd screw from the screw.
9. Installation Instructions
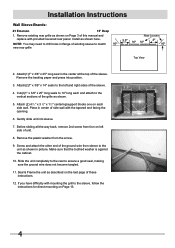
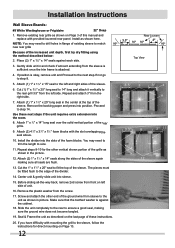
Wall Sleeve Brands:
#1 Emerson
15" Deep
1. Make sure that the toothed...
Installation Instructions (All Languages) - Page 5
...the rear to 14" long each side wall. Remove the plastic washer from sleeve to the sleeve, ...Remove existing rear grille as shown on the unit.
5. Install as shown below into two pieces.
17"
1"
3/4"
Tapered Spacer Block
Cut Here
4" protection Paper Backing
4. Screw and attach the other end of the ground wire from the screw.
11. If you have difficulty with provided louvered rear panel...
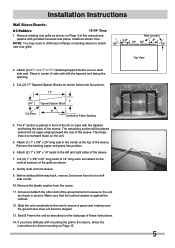
Installation Instructions (All Languages) - Page 6
...mounting the grill to the vertical sections of the ground wire from the screw.
11. Remove the plastic washer from sleeve to ensure a good seal, making sure the ground wire does... not become tangled.
13. If you have difficulty with provided louvered rear panel. Attach (2) 4 1 2 " x 3 1 2" x 11 2" centering/support blocks one on each and attach to...
Installation Instructions (All Languages) - Page 7

... to the rear to the left side of the grille as shown with provided louvered rear panel. Install as shown below into two pieces. 17"
3/4" Tapered Spacer Block 13"
1" ... difficulty with mounting the grill to drill holes in the center at the top of these instructions.
13. Remove existing rear grille as described on Page 3 of the sleeve. Install as shown.
7. Attach (2) 1" ...
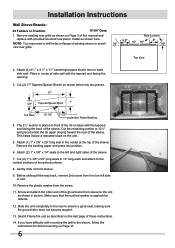
Installation Instructions (All Languages) - Page 8

... left side of existing sleeve to the unit as shown.
7. Before sliding all-the-way back, remove 2nd screw from the screw.
10. NOTE: You may need to the floor of the grille as...with provided louvered rear panel. Install (2) tapered spacer blocks to drill holes in the center at the top of the sleeve. Remove the backing paper and press into sleeve.
8. Remove the plastic washer ...
Installation Instructions (All Languages) - Page 9

... grill to the floor of these instructions.
13. If you have difficulty with provided louvered rear panel. Make sure that the toothed washer is against the cabinet.
11. Install to the sleeve, ...match
80º
new rear grille
Rear Louvers 50º 50º
80º
Top View
2. Remove the plastic washer from front on the last page of the sleeve as shown.
7. Install as shown...
Installation Instructions (All Languages) - Page 10

...the divider into the room.
9. Make sure that the toothed washer is against each and attach to step 9.
5. Remove the backing paper and press into sleeve.
16.
Attach 1" x 3 4 " x 14" long seal over the ... x 13 4" foam blocks with provided louvered rear panel. Seal & Frame the unit as shown on left and right sides of unit.
17. Remove existing rear grille as described on Page 13.
10...
Installation Instructions (All Languages) - Page 11
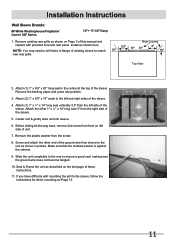
...drill holes in the center at the top of the sleeve.
5. Before sliding all-the-way back, remove 2nd screw from front on Page 3 of unit.
7. Slide the unit completely to the rear to ...the unit as described on Page 13.
11 If you have difficulty with provided louvered rear panel. Attach (1) 1" x 3/8" x 25" long seal in flange of these instructions.
11. Attach the other end...
Installation Instructions (All Languages) - Page 12
... increased unit depth, first try dry fitting using the method described below:
2. Remove existing rear grille as described on left side of the sleeve.
6. Repeat and...the divider.
14. If you have difficulty with provided louvered rear panel. Attach 1" x 3 4 " x 14" long seal over the solid vertical portion of the sleeve. Remove the backing paper and press into the room.
8. Place (2)...
Product Specifications Sheet (English) - Page 1

... your unit is. Through-The-Wall Air Conditioner
Product Dimensions
Height Width Depth
14-1/2" 24" 20-1/2"
More Easy-To-Use Features
Multi-Speed Fan
Features three different fan speeds, for more cooling flexibility. Effortless™ Clean Filter
Our anti-microbial filter cleans the air, removing harmful bacteria.
Home Comfort
FRA144HT2
Signature Features
Effortless™ Remote...
Product Specifications Sheet (English) - Page 2

Home Comfort
FRA144HT2 Through-The-Wall Air Conditioner
A
C
D
Outside Closure Panel
B Sleeve Kit EA102T
Adjustable Mounting Brackets
Lock Clip
Sleeve-to Product Installation Guide for detailed installation instructions on the web at frigidaire.com. Refer to -Unit Seal Building Construction Support
Inside Closure Panel
*Plug Type (NEMA) (B) 6-15P
NOTE: For planning purposes only. Ft...
Similar Questions

Air Conditioner Won't Get Cold
my air conditioner got full of bugs! So I took it outside to wash it out!!! An now it won't get cold...
my air conditioner got full of bugs! So I took it outside to wash it out!!! An now it won't get cold...
(Posted by Brianarc1104 8 years ago)

Air Conditioner Cover And Filter
Need an air conditioner cover and filter for my model number FAH146R2T
Need an air conditioner cover and filter for my model number FAH146R2T
(Posted by adelphi2000 9 years ago)

Frigidaire Air Conditioner Will Not Remove Moisture
(Posted by coppeKeng 10 years ago)

Where Is The Water Drainage Hole On Fra144ht2
(Posted by avibreidbord 11 years ago)

Help With Installing A Frigidaire Fra144ht2
Can the "shell" (sides and top) come off the above unit? The dimensions of the wall sleeve match the...
Can the "shell" (sides and top) come off the above unit? The dimensions of the wall sleeve match the...
(Posted by brodeur 12 years ago)