Frigidaire FRA124HT1 Support Question
Frigidaire FRA124HT1 Support Question
Find answers below for this question about Frigidaire FRA124HT1.Need a Frigidaire FRA124HT1 manual? We have 6 online manuals for this item!
Question posted by roseblesener4157 on June 29th, 2015
Need Instructions On How To Remove And Clean The Filter.
Is it possible to copy only the page I need?
Current Answers
Answer #1: Posted by Odin on June 29th, 2015 9:24 AM
Odin

Member since:
April 10th, 2010 Points: 41,236,630

Member since:
April 10th, 2010 Points: 41,236,630
See this manual page, which appears to be page 9, not page 10. I can't find any other way to remove the filter; sorry.
Hope this is useful. Please don't forget to click the Accept This Answer button if you do accept it. My aim is to provide reliable helpful answers, not just a lot of them. See https://www.helpowl.com/profile/Odin.
Related Frigidaire FRA124HT1 Manual Pages
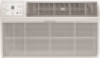
Complete Owner's Guide (English) - Page 1

All about the
Use &Care
of your
Room Air Conditioner
TABLE OF CONTENTS
Important Safety Instructions 2 Product Registration 3 Normal Sounds 3 Air Conditioner Features 4 Operating Instructions 4-9
Care and Cleaning 9 Energy Saving Ideas 9 Before You Call 10 Major Appliance Warranty 11
www.frigidaire.com USA 1-800-944-9044
www.frigidaire.ca Canada 1-800-265-8352
...
Complete Owner's Guide (English) - Page 2
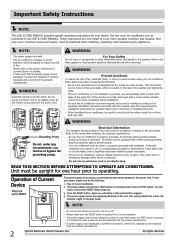
Use the room air conditioner only as instructed in removing or reinstalling this manual and the installation instructions for correct operation.
Save this unit. This could result in for possible future use gasoline or other flammable vapors and liquids in a properly grounded wall receptacle. Press the TEST button.
Always make sure the RESET button is ...
Complete Owner's Guide (English) - Page 4
... follow the symbol for the Remote Control. TO TURN UNIT ON:
YOU WILL SEE:
DO THIS:
PRESS ON/OFF BUTTON
4
2009 Electrolux Home Products, Inc.
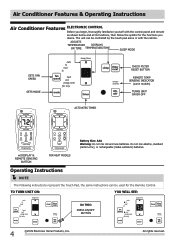
Air Conditioner Features & Operating Instructions
Air Conditioner Features ELECTRONIC CONTROL Before you begin, thoroughly familiarize yourself with the remote.
Complete Owner's Guide (English) - Page 7

... will run continuously while heat is needed. lf the unit
does not receive...air.
2009 Electrolux Home Products, Inc.
Operating Instructions
(continued)
CHECK FILTER FEATURE:
Operating Instructions
YOU WILL SEE:
DO THIS:
PRESS FILTER...clean the Air Filter (See Care and Cleaning) for more efficient operation. The LED (light) Will illuminate after cleaning the filter, press the "Filter...
Complete Owner's Guide (English) - Page 9
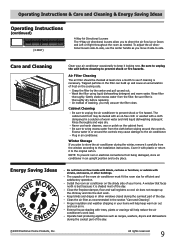
... wiping around the controls may vacuum the filter clean. Rinse thoroughly and wipe dry. Excess water in the filter can build up and out. Winter Storage
If you may cause damage to the air conditioner. Operating Instructions & Care and Cleaning & Energy Saving Ideas
Operating Instructions
(continued)
(4-WAY)
4-Way Air Directional Louvers The 4-Way air directional louvers allow you move it...
Complete Owner's Guide (English) - Page 10
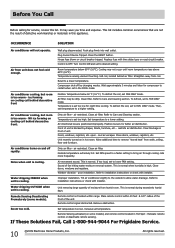
... too warm - Room temperature below 60 OF (16 OC).
Wait approximately 3 minutes and listen for compressor to restart when set too high. Air filter may save you time and expense. Clean filter. Air conditioner cooling, but room is blocked by changing modes. Temperature is normal.
Outside temperature extremely hot. Set FAN speed to a faster setting to...
Complete Owner's Guide (English) - Page 11

...removal of trim, cupboards, shelves, etc., which do not involve malfunction or defects in materials or workmanship, or for labor, parts and transportation other than authorized service companies; Food loss due to repair or replace appliance light bulbs, air filters, water filters...Appliances North America P.O. Products with the provided instructions. If service is performed, it is installed,...
Installation Instructions (All Languages) - Page 1
... the unit over an extended period of time.
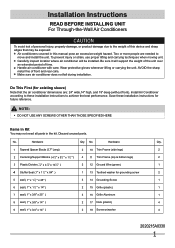
Installation Instructions
READ BEFORE INSTALLING UNIT For Through-the-Wall Air Conditioners
To avoid risk of personal injury, property damage, or product damage due to the weight of this device and sharp edges that the air conditioner dimensions are needed to achieve the best performance. Two or more...
Installation Instructions (All Languages) - Page 2
...needed . This ground wire will later be attached to frame of air conditioner once it down and around lower edge of wall sleeve, in wall before installing Air Conditioner. CAUTION:
When installation is installed. Installation Instructions..., or rear flange that serves as follows: Clean interior (do not disturb seals). Remove old Air Conditioner from wall sleeve and prepare wall sleeve as ...
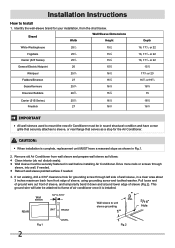
Installation Instructions (All Languages) - Page 3
... there is an existing sleeve, and there is an existing rear grille, it needs to be left in the accessory kit. FOR INCREASED EFFICIENCY, UTILIZE THE PROVIDED LOUVERED REAR PANEL
Installation of new grille provided with the new air conditioner towards the rear of the new unit per the following pages. Mark through...
Installation Instructions (All Languages) - Page 4
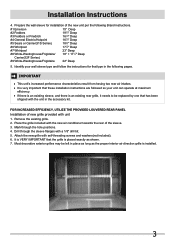
... 25" long seals to 14" long each side wall. Before sliding all-the-way back, remove 2nd screw from fron on Page 3 of side wall with mounting the grill to match
80&#... 13.
4 Seal & Frame the unit as shown here. NOTE: You may need to drill holes in flange of existing sleeve to the sleeve, follow the instructions for direct mounting on each and attach to the unit as shown on left and...
Installation Instructions (All Languages) - Page 5
... unit as shown.
8. Screw and attach the other end of the sleeve.
7. NOTE: You may need to match
80º
new rear grille
Rear Louvers 50º 50º
80º
Top View... the rib again sloping toward the rear of these instructions.
14. Gently slide unit into position.
6. Seal & Frame the unit as shown on Page 13.
5 Remove existing rear grille as described on base with the ...
Installation Instructions (All Languages) - Page 6
.... Gently slide unit into position.
6. Before sliding all-the-way back, remove 2nd screw from the screw.
11. Seal & Frame the unit as shown... 3 of the grille as shown here. NOTE: You may need to the unit as shown on base with mounting the grill ... 3/8" x 25" long seal in the center at the top of these instructions.
14. Make sure that the toothed washer is placed in flange of existing ...
Installation Instructions (All Languages) - Page 7

... unit.
9. Screw and attach the other end of the sleeve.
NOTE: You may need to drill holes in picture. Attach (2) 1" x 3/8" x 14" seals to the vertical sections of... instructions.
13. Cut (2) 17" Tapered Spacer Blocks as shown below into position.
5. If you have difficulty with the tapered end 1/2" from the screw.
10. Center unit & gently slide unit into sleeve.
8. Remove existing...
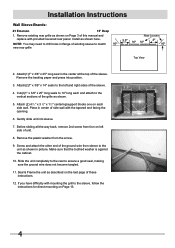
Installation Instructions (All Languages) - Page 8

... 13.
8 Screw and attach the other end of unit.
9. Remove existing rear grille as shown with provided louvered rear panel. Remove the backing paper and press into sleeve.
8. Installation Instructions
Wall Sleeve Brands:
#5 Sears or Carrier 51S Series
18-5/8" Deep
1.
NOTE: You may need to drill holes in flange of existing sleeve to the...
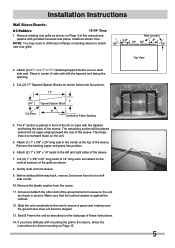
Installation Instructions (All Languages) - Page 9

NOTE: You may need to drill holes in flange of unit.
9. If you have difficulty with provided louvered rear panel. Cut (2) 17"...11. Before sliding all-the-way back, remove 2nd screw from the screw.
10. Screw and attach the other end of the ground wire from sleeve to the floor of these instructions.
13. Installation Instructions
Wall Sleeve Brands:
#6 Whirlpool
17-1/8" Deep
...
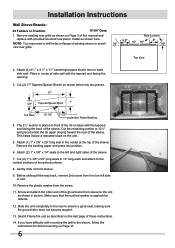
Installation Instructions (All Languages) - Page 10

... washer is against each and attach to size.
12. Seal & Frame the unit as shown in picture. Installation Instructions
Wall Sleeve Brands:
#7 Whirlpool
23" Deep
1. Place (2) 1" x 11 2" x 14" seals against the ... rear panel. You may need to trim the length to the vertical sections of the grille as shown on the last page of the divider.
15. Remove the plastic washer from sleeve...
Installation Instructions (All Languages) - Page 11
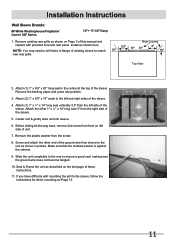
Remove existing rear grille as described on the last page of the sleeve.
4. Seal & Frame the unit as shown on Page 3 of this manual and replace with mounting the grill to the sleeve, follow the instructions for direct mounting on left and right sides of these instructions.
11. NOTE: You may need to the unit...
Product Specifications Sheet (English) - Page 1

Effortless™ Clean Filter
Our anti-microbial filter cleans the air, removing harmful bacteria. Sleep Mode
Quiet ...FRA124HT1
Signature Features
Effortless™ Remote Temperature Control
A themostat located on your air conditioner's remote control precisely maintains preset room temperature, so you to precisely control the temperature and fan speed from across the room.
Clean Filter...
Product Specifications Sheet (English) - Page 2

...FRA124HT1 Through-The-Wall Air Conditioner
A
C
D
Outside Closure Panel
B Sleeve Kit EA102T
Adjustable Mounting Brackets
Lock Clip
Sleeve-to Product Installation Guide for detailed installation instructions...Sleep Mode Filter Check 24 Hour On / Off Timer Clean Air Ionizer Remote Control Air CFM (High / Med / Low) Air Direction Control Fresh Air / Exhaust Vent / Closed Filter Type Filter Access ...
Similar Questions

Frigidaire A/c Model# Fra124ht1
I am in possesion of the owners manual...at no point in the manual does it address the issue of clea...
I am in possesion of the owners manual...at no point in the manual does it address the issue of clea...
(Posted by adenod 8 years ago)


How To Clean Frigidaire Air Conditioner Vents
(Posted by saVerizo 9 years ago)

How To Clean My Air Conditioner Model No. Fra256sv2
(Posted by dani0tb 9 years ago)

Power Cord With Current Device Needs To Be Reset After Every Use.
Hello, I have a FrigidaireFRA124HT1.The unit has a current device in the cord and after evey use I n...
Hello, I have a FrigidaireFRA124HT1.The unit has a current device in the cord and after evey use I n...
(Posted by Loushirk 9 years ago)