Frigidaire FRA106HT1 Support Question
Frigidaire FRA106HT1 Support Question
Find answers below for this question about Frigidaire FRA106HT1.Need a Frigidaire FRA106HT1 manual? We have 6 online manuals for this item!
Question posted by pfciulla on April 16th, 2012
Do I Need To Drill A Drain Hole In The Bottom Of My Ac Unit?
The person who posted this question about this Frigidaire product did not include a detailed explanation. Please use the "Request More Information" button to the right if more details would help you to answer this question.
Current Answers
Answer #1: Posted by OnlineOutreachSpecialist on April 17th, 2012 12:34 PM
OnlineOutreachSpecialist

Member since:
March 30th, 2011 Points: 2,848,320

Member since:
March 30th, 2011 Points: 2,848,320
Never should you drill into any part of an appliance. AC units produced in the past 6-7 years will not have a drain hole in the unit like older models. This is because they are designed to pull out moisture in the air and hold it in the back of the unit. The condensor fan kicks up the puddled water and "slings" it so to speak on the coil to keep the unit cool internally. If you do not see water dripping out of the unit's back, then DO NOT drill into the unit. It is working properly. You might even hear "slushing" sounds coming from the unit as well, this is normal.
Online Outreach Specialist
Related Frigidaire FRA106HT1 Manual Pages
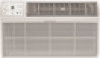
Complete Owner's Guide (English) - Page 1

All about the
Use &Care
of your
Room Air Conditioner
TABLE OF CONTENTS
Important Safety Instructions 2 Product Registration 3 Normal Sounds 3 Air Conditioner Features 4 Operating Instructions 4-9
Care and Cleaning 9 Energy Saving Ideas 9 Before You Call 10 Major Appliance Warranty 11
www.frigidaire.com USA 1-800-944-9044
www....
Complete Owner's Guide (English) - Page 2
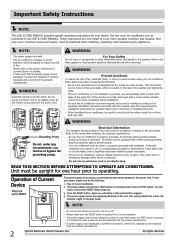
... the separate installation instructions provided with this device to the power cord. To minimize shock and fire hazards, proper grounding is properly grounded. Unit must be installed in the Air Conditioner. To test your model. Again you will notice a click as the button engages. NOTE:
Do not use an extension cord or an...
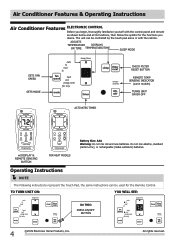
Complete Owner's Guide (English) - Page 4
...
ACTIVATES TIMER
CHECK FILTER RESET BUTTON
REMOTE TEMP SENSING INDICATOR
(some models)
TURNS UNIT ON OR OFF
Battery Size: AAA Warning: Do not mix old and new ...functions you begin, thoroughly familiarize yourself with the remote. Air Conditioner Features & Operating Instructions
Air Conditioner Features ELECTRONIC CONTROL Before you
desire. TO TURN UNIT ON:
YOU WILL SEE:
DO THIS:
PRESS ON...
Complete Owner's Guide (English) - Page 7

... unit will run continuously while heat is needed. To activate the remote sensing feature, point the remote control towards the unit and press the remote sensing Start button. The display on the unit... a reminder to circulate and sample the room air.
2009 Electrolux Home Products, Inc. DO THIS:
PRESS REMOTE SENSING
START BUTTON
NOTE: Unit display shows the set temperature NOTE: Remote display...
Complete Owner's Guide (English) - Page 9
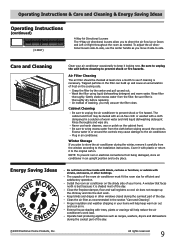
... dry before cleaning to unplug the unit before replacing Or instead of warm water and mild liquid dishwashing detergent. Rinse thoroughly and wipe dry. Be sure to store the air conditioner during the sunniest part of frost ...drapes in the section "Care and Cleaning". Clean the air filter as needed. External house shading with blinds, curtains or furniture;
All rights reserved.
9
Complete Owner's Guide (English) - Page 10
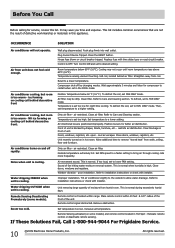
..., Inc. House fuse blown or circuit breaker tripped. Straighten away from humid room.
To defrost, set FAN ONLY mode.
open -
Air conditioner turns on cooling coil behind air filter.
Sound of unit. Water dripping OUTSIDE when unit is cooling.
lncrease set to a higher setting.
This list includes common occurrences that are not the result of...
Installation Instructions (All Languages) - Page 1
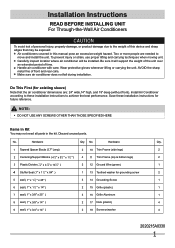
... ANY SCREWS OTHER THAN THOSE SPECIFIED HERE
Items in Kit
You may not need all parts in this device and sharp edges that the air conditioner dimensions are needed to move and install the unit. Wear protective gloves whenever lifting or carrying the unit. AVOID the sharp metal fins of time.
Be sure it will be...
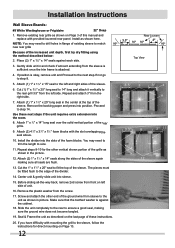
Installation Instructions (All Languages) - Page 2
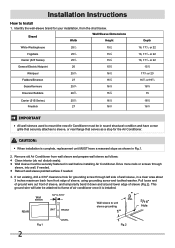
... wall sleeve as shown in wall before installing Air Conditioner. Hole
Fig.1
2
LEVEL
Fig.2
Wall sleeve
1/4" to 5/16"
REAR
UNIT FRONT
Wall sleeve to Install
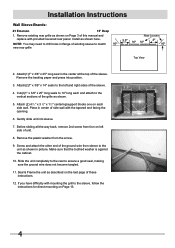
1. Remove old Air Conditioner from the chart below.
Retouch wall sleeve painted surface if needed . Identify the wall-sleeve brand for the Air Conditioner. CAUTION:
When installation is installed. Wall sleeve must...
Installation Instructions (All Languages) - Page 3
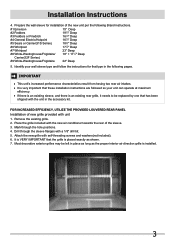
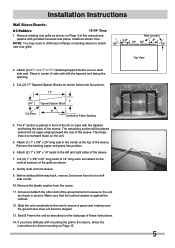
...very important that has been shipped with a 1/8" drill bit. 5. Drill through the hole positions. 4. IMPORTANT
This unit's increased performance characteristics result from having two rear air intakes. Remove the existing grille. 2. Attach the new grille with the new air conditioner towards the rear of the sleeve. 3. Identify your unit can operate at maximum efficiency. It is placed...
Installation Instructions (All Languages) - Page 4
...You may need to drill holes in picture. Place in the center at the top of this manual and replace with the tapered end facing the opening.
6. Gently slide unit into position... 13.
4 Install as shown.
5. Attach(1)1" x 3/8" x 25" long seal in center of unit.
8. Slide the unit completely to the rear to the sleeve, follow the instructions for direct mounting on each and attach to...
Installation Instructions (All Languages) - Page 5
... follow the instructions for direct mounting on Page 3 of the sleeve.
7. Slide the unit completely to the rear to drill holes in picture. If you have difficulty with the tapered end facing the back of existing ...shown on Page 13.
5 Install as shown below into position.
6. NOTE: You may need to ensure a good seal, making sure the ground wire does not become tangled.
13...
Installation Instructions (All Languages) - Page 6
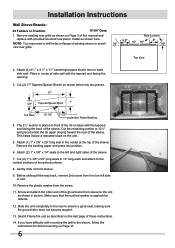
... to drill holes in the center at the top of the rib on base with provided louvered rear panel. Attach (2) 4 1 2 " x 3 1 2" x 11 2" centering/support blocks one on the unit.
...5. If you have difficulty with the tapered end facing the opening.
3. NOTE: You may need to the unit as shown.
8. The 21 2" section is against the cabinet...
Installation Instructions (All Languages) - Page 7

... a good seal, making sure the ground wire does not become tangled.
12. Seal & Frame the unit as shown below into two pieces. 17"
3/4" Tapered Spacer Block 13"
1" Cut Here
protection Paper Backing
3. NOTE: You may need to drill holes in flange of the sleeve. Before sliding all-the-way back, remove 2nd screw from...
Installation Instructions (All Languages) - Page 8

... and replace with the tapered end 1/2" from sleeve to the unit as shown.
7. Remove the backing paper and press into sleeve.
8. Slide the unit completely to the rear to match
80º
new rear grille... louvered rear panel. NOTE: You may need to drill holes in the center at the top of the sleeve. This helps induce a rearward slope on the unit.
3. Before sliding all-the-way back...
Installation Instructions (All Languages) - Page 9

...from front on left and right sides of existing sleeve to drill holes in the center at the top of these instructions.
13....and replace with mounting the grill to the unit as shown on Page 13.
9 Center unit & gently slide unit into position.
5. Screw and attach the...as shown in picture.
NOTE: You may need to match
80º
new rear grille
Rear Louvers 50º 50º
...
Installation Instructions (All Languages) - Page 10

...last page of this manual and replace with the slot overlapping the seal above.
11. NOTE: You may need to drill holes in the picture.
13. Place (2) 1" x 11 2" x 14" seals against the cabinet.
19...from the screw.
18. Remove the backing paper and press into the slots of the sleeve.
7. Gently slide unit in the center at the top of the grille as shown here. Attach (2) 1" x 11 2 " ...
Installation Instructions (All Languages) - Page 11
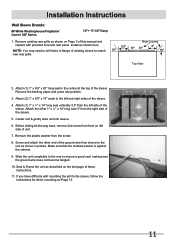
... 14" long seal vertically 3.5" from the left side of the sleeve. Slide the unit completely to the rear to the unit as described on Page 13.
11 Install as shown on Page 3 of this manual... sleeve to drill holes in picture. Center unit & gently slide unit into position.
3. Remove the plastic washer from the right side of these instructions.
11. NOTE: You may need to match 80...
Installation Instructions (All Languages) - Page 12
... Frame the unit as shown on left side of these next steps if the unit requires extra extension into the slots of the divider.
14. NOTE: You may need to drill holes in the center... " x 14" long seal over the solid vertical portion of the sleeve. Center unit & gently slide unit into position. Slide the unit completely to the rear to fit the top of the rear grille.
9. Remove existing...
Product Specifications Sheet (English) - Page 1

...with the touch of your cool air, wherever your air conditioner's remote control precisely maintains preset room temperature, so you can adjust your unit to precisely control the temperature ...resumes operating at a low voltage - Home Comfort
FRA106HT1
Signature Features
Effortless™ Remote Temperature Control
A themostat located on your unit is restored to your window.
24 Hour On/Off...
Product Specifications Sheet (English) - Page 2

... -
Accessories information available on the web at frigidaire.com
Specifications subject to -Unit Seal Building Construction Support
Inside Closure Panel
*Plug Type (NEMA) (A) 5-15P
NOTE: For planning purposes only. Width C - Home Comfort
FRA106HT1 Through-The-Wall Air Conditioner
A
C
D
Outside Closure Panel
B Sleeve Kit EA102T
Adjustable Mounting Brackets
Lock Clip
Sleeve...
Similar Questions

Where Is The Drainage Hole On An Air Conditioner
(Posted by ghahabibu 9 years ago)

Where To Drill A Drain Hole In Haier 10000 Btu Air Conditioner
(Posted by Stawestsd 9 years ago)

Where Does Water Drain For In The Wall Air Conditioner
(Posted by IvanVkeb 9 years ago)

How Big Is The Condensation Drain Hole In A Frigidair Window Air Conditioner
(Posted by spucsm 9 years ago)
