Get support for Frigidaire FMV157GS - Microwave

Frigidaire FMV157GS Support Question

Frigidaire FMV157GS Support Question

Find answers below for this question about Frigidaire FMV157GS - Microwave.
Need a Frigidaire FMV157GS manual? We have 1 online manual for this item!
Question posted by ebreuer on November 22nd, 2011

Door Ofline

It seems we need to jiggle the door to get the microwave on, is this an easy fix?  

Current Answers

Answer #1: Posted by OnlineOutreachSpecialist on November 25th, 2011 8:23 AM
This answer was accepted by the poster of the original question.
OnlineOutreachSpecialist

Member since:
March 30th, 2011

Points: 2,848,320
1,100
points
You should be able to see or feel if the screws in the door hinge area are loose. Some can easily be adjusted, some cannot. If you cannot reach the screws or any adjusting parts on the hinge area, you would require a technical visit, however with microwaves, repairs end up costing more than the value of the unit at times, so weigh your options.


Online Outreach Specialist

Related Frigidaire FMV157GS Manual Pages

Installation Instructions - Page 1

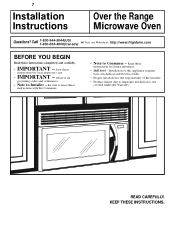
... installation is the responsibility of the installer. • Product failure due to improper installation is not covered under the Warranty. 7 Installation Instructions Over the Range Microwave Oven Questions? READ CAREFULLY. Save these instructions completely and carefully. • IMPORTANT -
Installation Instructions - Page 2

Shipment/Installation 6 Parts Included 6 Tools You Will Need 7 Mounting Space 7 Step-by-step installation guide Placement of Mounting Plate 8-10 ...Attach Mounting Plate to Wall 12 Preparation of Top Cabinet 13 Checking for Proper Damper Operation 13 Mount the Microwave Oven ..........13, 14 Adjust the Exhaust Adaptor 14 Connecting Ductwork 14 B Outside Back Exhaust 15-18 Preparing Rear...
Installation Instructions - Page 3

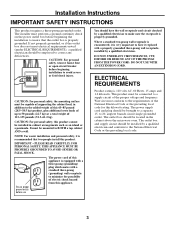
...electric shock hazard from this 63-85 pound (28.5-38.5 kg) product, plus additional oven loads of this product cannot be mounted to the National Electrical Code or the prevailing .... CAUTION: For personal safety, the mounting surface must be installed in the cabinet above the microwave oven. NOTE: For easier installation and personal safety, it is recommended that the outlet box is ...
Installation Instructions - Page 7

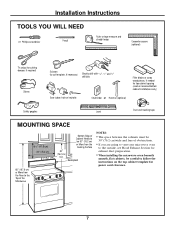
... • If you are going to vent your microwave oven to the outside, see Hood Exhaust Section for exhaust duct preparation. • When installing the microwave oven beneath smooth, flat cabinets, be careful to follow...8260;2" (41.9 cm) 30" (76.2 cm) 2" (5.1 cm) Bottom Edge of Cabinet Needs to cut template, if necessary) Electric drill with 3⁄16", 1⁄2" and 5⁄8" drill bits Filler ...
Installation Instructions - Page 8

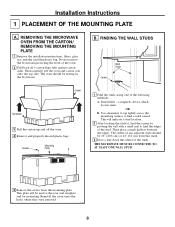
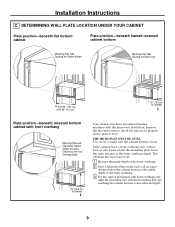
... the center by probing the wall with a small nail to find the edges of the studs. Installation Instructions 1 PLACEMENT OF THE MOUNTING PLATE A. REMOVING THE MICROWAVE OVEN FROM THE CARTON/ REMOVING THE MOUNTING PLATE 1 Remove the installation instructions, filters, glass tray and the small hardware bag. FINDING THE WALL STUDS Wall Studs...
Installation Instructions - Page 9

... Mounting Plate with Tabs Below Cabinet Bottom the Same Distance as the front overhang depth. THE MICROWAVE MUST BE LEVEL. If the cabinets have a front overhang only, with no back or side... this horizontal line, not touching the cabinet bottom as described in Step D. 9 This will keep the microwave level. 1 Measure the inside depth of the front overhang. 2 Draw a horizontal line on the back...
Installation Instructions - Page 10

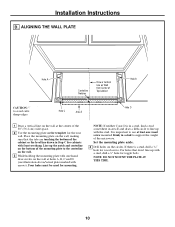
....2 cm) wide space. 2 Use the mounting plate as the template for wood screws. Place the mounting plate on the wall at the center of the microwave. Set the mounting plate aside. 4 Drill holes on the wall at holes A, B, C and D (see illustration above/actual plate marked with the stud. NOTE: DO NOT...
Installation Instructions - Page 11

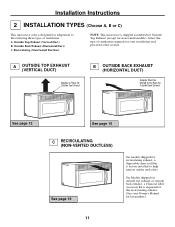
... Exhaust (except for recirculating exhaust, a disposable charcoal filter is factory installed to the following three types of ventilation: A. Installation Instructions 2 INSTALLATION TYPES (Choose A, B or C) This microwave oven is designed for kit number.) 11 Select the type of ventilation required for your Owner's Manual for adaptation to help remove smoke and odors. Outside...
Installation Instructions - Page 12

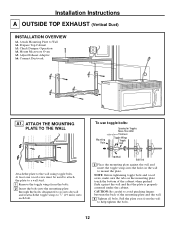
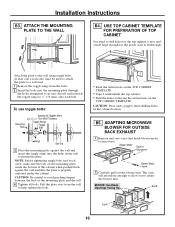
... bolts: Mounting Plate Spacing for Toggles More Than Wall Thickness Toggle Wings Toggle Bolt Attach the plate to Wall A2. Check Damper Operation A4. Mount Microwave Oven A5. Wall Bolt End 3 Place the mounting plate against the wall and that the plate is properly centered under the cabinet. Prepare Top Cabinet A3...
Installation Instructions - Page 13

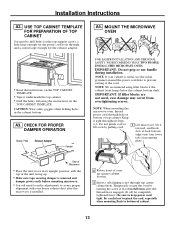
...grommet around the power cord hole to bottom of the cord. NOTE: When mounting the microwave oven, thread power cord through , and a cutout large enough for the power cord to keep... Temporarily secure the oven by pulling cord. 1 Lift microwave, tilt it tight throughout Steps 1-3. A3. NOTE: If your house exhaust duct after the threads have engaged. (It will need to drill holes ...
Installation Instructions - Page 14

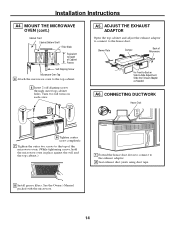
...outer two screws to the top of Cabinet Recess Self-Aligning Screw Microwave Oven Top 4 Attach the microwave oven to the exhaust adaptor. 2 Seal exhaust duct joints using duct tape. 8 Install...Microwave For Front-to-Back or Side-to the house duct. ADJUST THE EXHAUST ADAPTOR Open the top cabinet and adjust the exhaust adaptor to connect to -Side Adjustment, Slide the Exhaust Adaptor as Needed...
Installation Instructions - Page 15

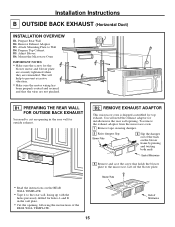
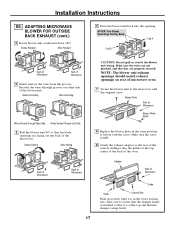
... Wall B2. Blower Plate • Read the instructions on the blower frame by pressing and twisting both ends. To remove the exhaust adaptor from the microwave oven: 1 Remove tape securing damper. 2 Raise damper flap. This will need to Wall B4. Installation Instructions B OUTSIDE BACK EXHAUST (Horizontal Duct) INSTALLATION OVERVIEW B1.
Installation Instructions - Page 16

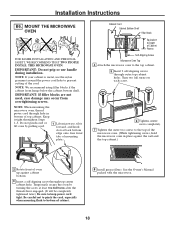
...B End A 16 Installation Instructions B3. USE TOP CABINET TEMPLATE FOR PREPARATION OF TOP CABINET You need to drill holes for the top support screws and a hole large enough for Toggles More Than Wall...Wall Bolt End 3 Place the mounting plate against the wall and that holds blower motor to microwave. NOTE: Before tightening toggle bolts and wood screw, make sure the tabs on the TOP ...
Installation Instructions - Page 17

... Guide Locking Tabs Push in securely until it is tight. 9 Attach the exhaust adaptor to the rear of the oven by sliding it is at the top center of the back of microwave oven. 7 Secure the blower unit to assure that the damper hinge is installed so that it into the opening. Before...
Installation Instructions - Page 18

... the threads have engaged. (It will be completely tightened later.) Be sure to the top of the microwave oven. (While tightening screws, hold the microwave oven in place against the wall and the top cabinet.) 2 Rotate front of oven up against cabinet bottom. 3 Insert a self-aligning screw through hole in bottom of the cord. MOUNT...
Installation Instructions - Page 19

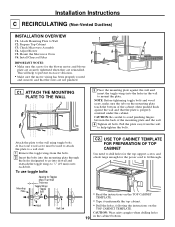
Mount the Microwave Oven C6. Install Charcoal Filter IMPORTANT NOTES: • Make sure the screws for the blower motor and blower plate ... bottom of the mounting plate and the wall. 4 Tighten all bolts. USE TOP CABINET TEMPLATE FOR PREPARATION OF TOP CABINET You need to drill holes for the top support screws and a hole large enough for Toggles More Than Wall Thickness Toggle Wings Toggle Bolt...
Installation Instructions - Page 20

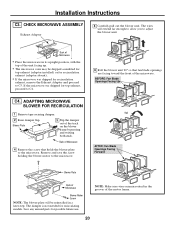
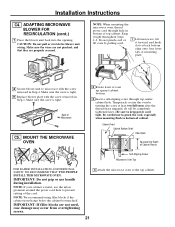
.... • The microwave oven may be reinstalled in the grooves of the microwave. If the microwave was shipped for top exhaust, proceed to C5. Back of Microwave 4 Remove the screw... • If the microwave was shipped for recirculation exhaust, remove the Exhaust Adaptor and proceed to C4. The damper is not needed for possible future use. ADAPTING MICROWAVE BLOWER FOR RECIRCULATION 1 ...
Installation Instructions - Page 21

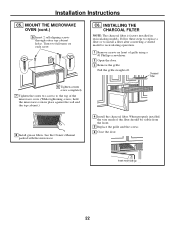
... is tight. 9 Replace blower plate with the screw removed in Step 1. Make sure the screw is metal, use handle during installation. NOTE: When mounting the microwave oven, thread power cord through top center cabinet hole. Cabinet Front Cabinet Bottom Shelf Filler Block Equivalent to prevent cutting of Cabinet Recess Self-Aligning Screw...
Installation Instructions - Page 22

... be visible from the front. 5 Replace the grille and the screws. 6 Close the door. Follow these steps to replace a filter or to install a filter after converting a vented model to the top of the microwave oven. (While tightening screws, hold the microwave oven in recirculating models. Pull the grille straight off. INSTALLING THE CHARCOAL FILTER NOTE...
Installation Instructions - Page 23

...2. Install turntable and ring in cavity. 4. KEEP INSTALLATION INSTRUCTIONS FOR THE LOCAL INSPECTOR'S USE. ININSSTTARLULCATTIIOONNS 5. to instructions. Remove all packing material from the microwave oven. 3. Make sure the microwave oven has been installed according to 20-amp electrical outlet. Plug power cord into a dedicated 15- Ensure proper ground exists before use 23 Installation...

Similar Questions

Unit Runs And Heats When The Door Is Closed.
No response from buttons to cancel or change settings. Light and turntable operate only if I push up...
(Posted by davelendon 9 years ago)
Microwave Runs With Door Open
My microwave runs when the door is opened. The door sensing switch and/or the primary interlock swit...
(Posted by sfiore 10 years ago)
Microwave Oven Not Working Unless I Hold & Push Up The Door. What's Wrong?
Model FMV156DSB. I had both switches checked & are OK. Now it does not work any more even when ...
(Posted by xjtran87 11 years ago)
Ask a New Question
Use the box below to post a new question about this Frigidaire product .
Points & Prizes
  • You can earn points for nearly everything you do on HelpOwl.com
  • You can trade in those points for gift cards at leading retailers such as Amazon.com and Walmart
  • It's that simple!
See How it Works
Create a Free Account

Frigidaire Manuals

Find free Frigidaire FMV157GS - Microwave manuals and user guides available at ManualOwl.com. Try out our unique manual viewer allowing you to interact with manuals from directly within your browser!

Frigidaire Reviews

View thousands of Frigidaire user reviews and customer ratings available at ReviewOwl.com.

Contact Information

Complete Frigidaire customer service contact information including steps to reach representatives, hours of operation, customer support links and more from ContactHelp.com.

Scoreboard Ratings

See detailed Frigidaire customer service rankings, employee comments and much more from our sister site.

Frigidaire Recalls

Find comprehensive Frigidaire recall information updated hourly on RecallOwl.com.