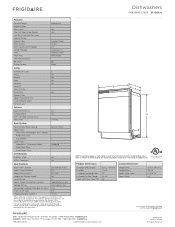
Get support for Frigidaire FMB330RGB - on 18 Inch Dishwasher

Frigidaire FMB330RGB Support Question

Frigidaire FMB330RGB Support Question

Find answers below for this question about Frigidaire FMB330RGB - on 18 Inch Dishwasher.
Need a Frigidaire FMB330RGB manual? We have 6 online manuals for this item!
Question posted by sharvey80 on December 26th, 2011

Water Is Filling

the water isn't filling in the dishwasher, but when I put in water it will drain. What do I need to do?

Current Answers

Answer #1: Posted by OnlineOutreachSpecialist on December 27th, 2011 6:27 AM
This answer was accepted by the poster of the original question.
OnlineOutreachSpecialist

Member since:
March 30th, 2011

Points: 2,848,320
1,110
points
Try to check the water inlet valve first, if you feel you are  handy and can be safe enough with the following components.


Most cleaning problems are caused by the dishwasher not getting enough wash water, so the water-inlet valve is often to blame. This valve is usually at the bottom left or right of the dishwasher, behind the lower access panel. It's the device with the main water line from the house, a rubber tube to the dishwasher, and two wires attached to it. When a water-inlet valve is defective, you may hear the sound that's usually referred to as "water hammer." If the water-inlet valve is defective, you need to completely replace it. Dishwasher Water Inlet Valve Replacement

Be sure to read and understand any instructions that come with the new water inlet valve.

Tools required:

Adjustable wrench

Multi-Screwdriver

Pliers

Step 1. Disconnect the dishwasher from its power source.

Note: Dishwashers are usually wired directly to the home’s electrical system. To disconnect the power, switch off the circuit breaker or remove the fuse for the electrical circuit the dishwasher is attached to. Try to turn the unit on after disconnecting the power to be sure you were successful.

CAUTION: If you’re not sure you’ve shut off the power properly, DO NOT CONTINUE. Call a qualified appliance repair technician to complete the repair.

Step 2. Turn off the water supply to the dishwasher. This is usually underneath the kitchen sink or in the basement or crawlspace near the location of the dishwasher. Pliers may be helpful here.

Note: If there are no shut-off valves, you must shut the water off at the main water supply valve for your home.

Step 3. Remove the lower panel(s) of the dishwasher. These are usually held by 2 to 4 screws at the upper and lower corners of the panel(s).

The inlet valve is usually near the front of the dishwasher. Attached to the valve you’ll see: 2 or 4 wires, the water supply line from the house and the water feed line that goes to the dishwasher.

Step 4. Remove the household water supply line from the valve. The line is usually secured with a brass compression nut. The water supply line is usually copper or braided stainless steel.

CAUTION: Water supply line may be hot.

Step 5. Remove the fitting from the valve the water supply line was attached to. This fitting may be very difficult to remove. It may help to put the valve into a vice in order to remove the fitting. If you cannot remove it, replace it. The fitting is not an appliance part but a plumbing part that is available at most hardware stores.

Step 6. Remove the screws holding the valve to the dishwasher frame.

Step 7. Label the wires to the valve so you’ll be sure to reattach them correctly.

Step 8. Remove the wires from the valve.

Step 9. Remove the clamp on the black rubber water discharge tube and pull the tube off of the valve.

Step 10. Reinstall the old fitting (or a replacement fitting if necessary) onto the new valve the water supply line was attached to. Use Teflon tape or pipe joint compound as a thread sealant. Make this fitting tight to prevent leaks. Make sure that the fitting points in the same direction as the old one so that the water supply line will meet up with it properly.

Step 11. Install the new valve in the reverse order of the removal instructions.

Note: The water supply line is under high pressure. Be sure to tighten the fittings properly.

Step 12. Turn on the water to the machine, and check for and correct any leaks.

Step 13. Reinstall the access panel(s). Restore the power to the dishwasher and test.

Note: You may have to let the dishwasher run a few minutes before it reaches the next water fill cycle.


Online Outreach Specialist

Related Frigidaire FMB330RGB Manual Pages

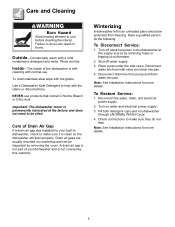
Complete Owner's Guide (English) - Page 1

...9397 (Canada) Visit our Web Site at www.frigidaire.com Solutions to Common Dishwashing Problems...12-13 Troubleshooting 13 Consumer Services Warranty & Service 14 Versión ...Products North America, P.O. Box 212378, Augusta, GA 30917. Dishwasher Use & Care Manual 18" Built-In and Portable Product Registration Card Please fill in completely, sign and return promptly! READ AND SAVE THESE INSTRUCTIONS...
Complete Owner's Guide (English) - Page 2

... fire hazard. • If the dishwasher drains into a food disposer, make sure disposer is designed to dishwasher before using your dishwasher. • Use your dishwasher, follow basic precautions including the following:...each for recommendations, if not marked. HYDROGEN GAS IS EXPLOSIVE. If hot water system has not been used for use combustible materials, gasoline or other appliance...
Complete Owner's Guide (English) - Page 3

.... The number of your dishes and tableware. Next, the dishwasher fills with water to a level even with clean water during a cycle. Each cycle starts with a pre-drain. Dishwasher Features Your dishwasher, illustrated below, cleans by spraying a mixture of hot, clean water, and detergent against the soiled surfaces of water fills depends upon the cycle being used. 0 Upper Rack Control...
Complete Owner's Guide (English) - Page 4

... detergent (See Dishwasher Dispenser & Detergents). 4. Add rinse aid, if needed (See Rinse Aid). 5. Light Wash For lightly soiled or pre-rinsed • Turn dial to latch. be Hold washed later. Select wash cycle (See Cycle Chart). 6. Cycles Description Cycle Chart To Select Cycle Water Time* Washes/ (approx.) (approx.) Rinses Heavy Wash For heavily...
Complete Owner's Guide (English) - Page 5

...not advance until proper temperature is selected, the dishwasher heats the water in your dish load that the water spray from vent during the drying portion of...item is dishwasher safe, read the manufacturer's care instructions. • If the dishwasher drains into the dishwasher. Operating Instructions continued Dish Preparation It is not necessary to rinse dishes before dishwasher is ...
Complete Owner's Guide (English) - Page 7

... parts of the tub. completely full) Main Wash Cup- Other detergents will not dissolve properly. • Do not fill both washcups, unless you the water hardness in the uncovered cup falls into the dishwasher when the door is closed . Pre Wash Cup Top Cover Large Wash Cup (Heavy Loads) Cover Latch The use...
Complete Owner's Guide (English) - Page 8

... thermometer in rinse aid until liquid touches the indicated fill level. Water Temperature Hot water is below 120°F (49°C), have items in combination with a damp cloth. Important: Before starting a cycle, run hot water to check the temperature. • If temperature is needed for best dishwashing and drying results. You may choose not to 140...
Complete Owner's Guide (English) - Page 9

... make sure they do not leak. Ci 9 Drain air gaps are usually mounted on water and electrical power supply. 3. Turn on countertop and can result in an unheated place should be protected from freezing. Fill both detergent cups and run dishwasher through a NORMAL WASH Cycle. 4. Important: The dishwasher motor is self- Place a pan under the...
Complete Owner's Guide (English) - Page 10

...spray arm lifting off the shaft. Using the dishwasher without a properly installed filter is equipped with a brush may cause water lines to rupture. Cleaning the Spray Arm ...water. Failure to do so could result in place and turn the retaining nut clockwise and pull up on the shaft, take the retaining nut and turn it counter clockwise till it will reduce the cleaning efficiency and may need...
Complete Owner's Guide (English) - Page 11

... volts, 60 Hz, AC only, 15 amps is available at faucet until it is your safety, the dishwasher must be installed on coupler to compartment. Empty remaining water from coupler and return it to release water pressure. 4. Unscrew existing sink faucet aerator. 3. It must be plugged into a mating 3-prong grounding type receptacle, installed...
Complete Owner's Guide (English) - Page 12

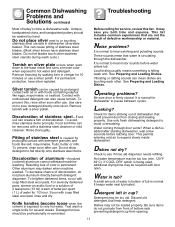
... on dishes are also a factor. Common Dishwashing Problems and Solutions Dishes not clean-Check pages 4 to 8 for information on soft leaded glass or expensive crystal. Dishes not drying can stain plasticware. It is caused by using too much detergent in water supply. Place washable items in water. If water is getting a full fill of detergent.
Complete Owner's Guide (English) - Page 13

... pour detergent directly onto silver. Check to hot water and detergent. Water in cup? A small amount of water in bottom of tub is caused by soaking item in dishwasher silverware basket. This can cause pitting of stainless steel-Food soil can also cause tarnish. Contact with soap filled steel wool pads. Pitting of stainless steel...
Installation Instructions (English) - Page 2

...flat head wood screws, 5/8" long to secure dishwasher to catch water when flushing the line … Gloves For...168; Screw type hose clamps ¨ Strain relief for extending drain line, if applicable 2 Wood Screws 2 Color Matched Toekick ... Power Cord, if applicable) Hot Water line Air Gap Screw Type Hose Clamps Strain Relief Coupler TOOLS YOU WILL NEED: … Phillips head screwdriver ...
Installation Instructions (English) - Page 3

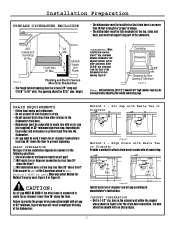
... require an air gap? … Will waste tee or disposer connection be less than 18" above the floor? … Will installation have a drain loop less than 18" above floor? Installation Preparation PREPARE DISHWASHER ENCLOSURE • The dishwasher must be installed so that drain hose is no sharp edges. 3 The opening must not support any part of...
Installation Instructions (English) - Page 5

... drain hose. Do not open the door, hold the top of the dishwasher securely with one hand and hold the top of the dishwasher ...WATER LINE • The line may enter from rear wall. • Adjust water heater for 120°F to 150°F temperature. • Flush water line to install the dishwasher. Valve Hole Hot 4" From Cabinet Cabinet Face 18" From Wall 3" From Floor Figure F Water...
Installation Instructions (English) - Page 6

... screws. Remove 4 Toekick Screws Figure J 6 Extend leveling legs out from the dishwasher base, 1/4" less than installation height. Fill Hose 90° Elbow Figure L Thread Seal Tape Water Valve Bracket • Do not over tighten 90° elbow, water valve bracket could bend or water valve fitting could break. • Position the end of the elbow...
Installation Instructions (English) - Page 7

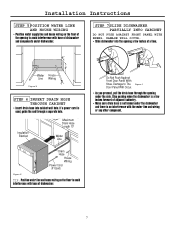
... is no interference with base of dishwasher. DAMAGE WILL OCCUR. • Slide dishwasher into the opening under the dishwasher and there is used, guide the end through the opening a few inches forward of adjacent cabinetry. • Make sure drain hose is a few inches at a time. 4" 6" Water House Line Wiring Figure M STEP 6 INSERT DRAIN HOSE THROUGH CABINET • Insert...
Installation Instructions (English) - Page 9

..., then ferrule over end of the cabinet frame. Installation Instructions STEP 10 SECURE DISHWASHER TO CABINET The dishwasher must be secured to the countertop. • Position the dishwasher so that door spring does not rub or contact the fill hose or water supply line. Test by opening and there is no interference with the front...
Installation Instructions (English) - Page 12

.... Restore power after corrections are made. If not, check that water enters the dishwasher. Allow the toekick to OFF position. If a leak is corrected. … Check for kinking. … Run the dishwasher through another fill and drain cycle. A leak around the door. Reposition the dishwasher if necessary. See Step 13. The slots should align with toekick...
Product Specifications Sheet (English) - Page 2

... electric and plumbing codes. A - Dishwashers FMB330RG C /S/ B 18" Built-In Features Control Design Digital Display...Dishwashers Frigidaire Baseline Stainless Steel Direct 2 / 1 UltraQuiet™ 2 Stainless Steel Removable 56 Static Cycles Number of ASSE 1006 Specifications Product Dimensions Cutout Dimensions Water Inlet Location Left Bottom Front Water Usage (Gallons) 7.2 Water...

Similar Questions

Dishwasher Not Draining.
I have tested the main motor and the drain motot and they both work as they should, but it will not ...
(Posted by jess931 9 years ago)
Water Pump In Dishwasher
why wont my dishwaasher pump water into the unit
(Posted by motorhome12 12 years ago)
Dishwasher Not Draining
Our Dishwasher is not draining after completing the wash cycle. Nothing appears to be clogged.
(Posted by sutter 13 years ago)
Ask a New Question
Use the box below to post a new question about this Frigidaire product .
Points & Prizes
  • You can earn points for nearly everything you do on HelpOwl.com
  • You can trade in those points for gift cards at leading retailers such as Amazon.com and Walmart
  • It's that simple!
See How it Works
Create a Free Account

Frigidaire Manuals

Find free Frigidaire FMB330RGB - on 18 Inch Dishwasher manuals and user guides available at ManualOwl.com. Try out our unique manual viewer allowing you to interact with manuals from directly within your browser!

Frigidaire Reviews

View thousands of Frigidaire user reviews and customer ratings available at ReviewOwl.com.

Contact Information

Complete Frigidaire customer service contact information including steps to reach representatives, hours of operation, customer support links and more from ContactHelp.com.

Scoreboard Ratings

See detailed Frigidaire customer service rankings, employee comments and much more from our sister site.

Frigidaire Recalls

Find comprehensive Frigidaire recall information updated hourly on RecallOwl.com.