Frigidaire FEX831FS Support Question
Frigidaire FEX831FS Support Question
Find answers below for this question about Frigidaire FEX831FS - 27" Electric Laundry Center.Need a Frigidaire FEX831FS manual? We have 4 online manuals for this item!
Question posted by myzuko00 on June 27th, 2010
Drain Hose Replacement
trying to figure out how to replace drain hose. Need schedmatics or some other kind of repair manual with instructions.
Current Answers
Related Frigidaire FEX831FS Manual Pages
Installation Instructions (All Languages) - Page 2
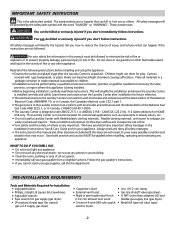
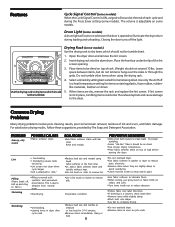
.... Read all safety messages. • The instructions in this manual and other literature included with this manual must be followed to minimize the risk of fire...Laundry Center is not recommended for future reference. • The electrical service to the Laundry Center must conform with local codes and ordinances and the latest edition of injury, and tell you don't follow instructions...
Installation Instructions (All Languages) - Page 3

...marked for washers and dryers, and DO NOT operate a washer and ...drain hose, have a qualified technician install a longer hose, PIN 134049201, available from plug. POWER SUPPLY CORD -The gas laundry center ...drain systems in the floor, install a siphon break kit, available from the neutral, (2) use with a time delay fuse or circuit breaker.
ELECTRICAL REQUIREMENTS
ELECTRIC Laundry Center...
Installation Instructions (All Languages) - Page 4
... approved vent hood to collapse, be exhausted into the laundry area. All male duct pipe fittings MUST be exhausted...drying times. A clothes dryer produces combustible lint.
Failure to follow these instructions can result in a garage, it with a rigid or flexible metal...of any concealed space of plastic duct or metal foil duct, replace it must be expelled into a chimney, a wall, a ...
Installation Instructions (All Languages) - Page 5

...the dryer.
6.The dryer and its individual manual shutoff valve during any pressure testing of ... tubing MUST be constructed of 1/2 inch (1.27 cm) pipe.
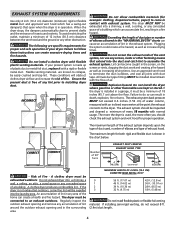
3.If codes allow, flexible...same closet as the Gas laundry center.
3.Your laundry center needs the spacearound it will be... C M)
WASHER
60 SQ. CM)
5 Straight back 2. LOCATION OF YOUR LAUNDRY CENTER
DO NOT INSTALL YOUR LAUNDRY CENTER: 1.In...
Installation Instructions (All Languages) - Page 6
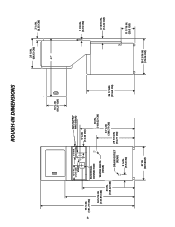
6
ROUGH-IN DIMENSIONS
16 ¼ IN. (41.27 CM)
12 ½ IN.
(31.75 CM)
VENT
9 3/8 IN. (23.81 CM)
75 ½ IN. (191.77 CM)
ELECTRICAL CONNECTION
54 5/16 IN. (137.95 CM)
43 IN. (109.22 CM)
WATER INLETS (REAR)
DRAIN OUTLET (REAR)
GAS SUPPLY PIPE (REAR)
5 ¼ IN. (13.33 CM...
Installation Instructions (All Languages) - Page 7
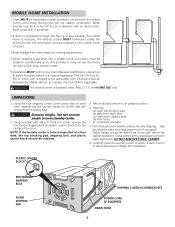
... from dryer door. (c) foam dryer support pads. (d) inlet hoses. (e ) enclosure package.
5. Plastic clamps secure the drain hose to the right side of the washer, remove the wire shipping clips securing the drain hose and power cord (if equipped). These clamps form a standpipe to an upright position.
4. WARNING The laundry center is to be transported at a later date, the...
Installation Instructions (All Languages) - Page 8
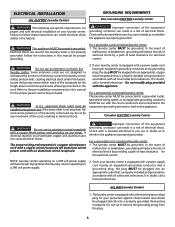
...circuit conductors and connected to withstand the amounts of electrical current this manual for proper and safe electrical installation of the equipment
grounding conductor can cause electrical shorts.
Follow the instructions in a risk of
malfunction or breakdown, grounding will have longer drying times than laundry centers operating on the appliance.
If in doubt, call a licensed...
Installation Instructions (All Languages) - Page 9

.... Tighten the screw securely.
7. Attach the red and black wires from the green ground screw located above the termial block. ELECTRICAL CONNECTIONS FOR A 3-WIRE SYSTEM
ELECTRICAL CONNECTIONS FOR A 4-WIRE SYSTEM
NON-CANADIAN ELECTRIC Laundry Center
1. Remove the screw securing the terminal block access cover to the rear panel and remove cover.
2. approved power cord through...
Installation Instructions (All Languages) - Page 10

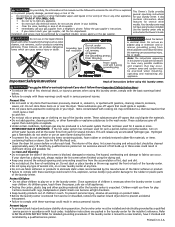
...) I.D. WATER WILL SYPHON FROM THE WASHER IF THE ABOVE INSTRUCTIONS ARE NOT FOLLOWED. NEVER TEST FOR GAS LEAKS WITH AN OPEN FLAME.
8. Use a 1/2 inch (1.27 cm) to the dryer cabinet. Run some water from gas pipe at the rear of the laundry center should exist). Carefully connect the inlet hoses to the HOT water faucet, tighten...
Installation Instructions (All Languages) - Page 11

... needed for the gas line to light.
15.
WARNING The instructions in a garbage container or make sure the dryer area is unpacked. Good safe practice and caution MUST be bled of combustion and ventilation air. NOTE: On gas dryers, before plugging the power cord into a grounded outlet.
12. Place these instructions in your laundry center...
Complete Owner's Guide (English) - Page 2
... serious injury, fire or death. Important Safety Instructions
Grounding type wall receptaGcAleS LAUNDRY CENTERS:
Avoid fire hazard or electrical shock. Failure to dry items containing plastic, ...laundry center. • Do not spray any accumulated hydrogen gas. Children might use them the proper, safe use heat to follow these items on or in your dryer has a drying rack, always replace...
Complete Owner's Guide (English) - Page 3

.... Add a measured amount of detergent to persons, read and follow fabric care and laundry product labels. The amount required depends on wash load.
3
Add it to the laundry center, the electrical power cord of a gas laundry center must be washed together. Important Safety Instructions Con't
• To prevent personal injury or damage to wash water after a few...
Complete Owner's Guide (English) - Page 4

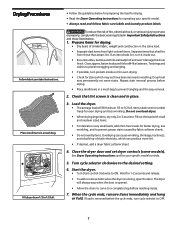
...top of agitator vanes. Add laundry load to type, size, and...cap. 3. See Operating Instructions for your safety, the lid locks when the tub is spinning. Do not force open . • To stop the washer, push in the cycle...your specific model controls.
9.
Replace dispenser by fabric care label. Start the washer. To avoid serious personal injury, do not operate washer if safety lid lock is ...
Complete Owner's Guide (English) - Page 7
... ends, turn it inside .
7. Items need room to 1/2 full. See Dryer Operating Instructions card for 1-2 seconds and release.
•...model. • Always read and follow fabric care labels and laundry product labels. If load is clean and in washing. Prepare items...8226; Read the Dryer Operating Instructions for drying.
• Dry items of static electricity, which may permanently set ...
Complete Owner's Guide (English) - Page 8
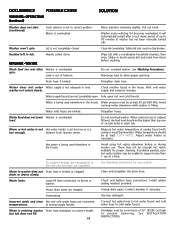
..., residues of the lint screen opening.
3.
Wrinkling
•Overloading. •Leaving items in washer or dryer to complete drying.
•Do not overload dryer. •Remove items as soon...drying rack into shape. •Lay flat to reduce
static electricity. •Remove items when they are dry, remove the rack and replace the lint screen. Pilling
•Pilling is a concern, check...
Complete Owner's Guide (English) - Page 9

... dryer lint screen after every load. To remove this by pulling straight up in Important Safety Instructions, page 2, and those listed below.
• Before cleaning the washer or dryer interior, unplug the electrical power cord to avoid electrical shock hazards.
• Do not use harsh, gritty or abrasive cleansers. Do not operate the dryer...
Complete Owner's Guide (English) - Page 10
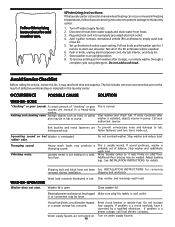
... supply faucets are not the result of balance.
fasten fasteners and turn items inside out.
Laundry center is normal. Stop washer and redistribute wash load. See INSTALLATION INSTRUCTIONS for cold weather care. Close washer lid
Electrical power cord may not be needed.
Do not increase fuse capacity. If problem is overloaded. Add 1 gallon nontoxic recreational vehicle...
Complete Owner's Guide (English) - Page 11
...up to 30 minutes (if washer has not been manually turned off). Load is a
hot enough. See Washing Procedures. Straighten drain hose.
Wait until water supply ...Instructions for proper cleaning. Unclog drain pipes. Connect hot water hose to hot water faucet and cold water hose to allow proper spinning.
Shake or brush excess dirt and sand from laundry center.
Do not overload washer...
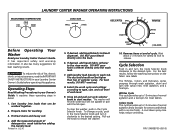
Operating Instructions (Operating Instructions) - Page 1
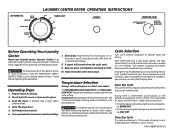
...cycle provides up to 100 minutes of drying time at the temperature selection of fire, electric shock, or injury to tumble for items of your choice.
Prepare items for regular ...Always follow directions on LESS DRY. Cool Down setting tumbles the load without heat.
LAUNDRY CENTER DRYER OPERATING INSTRUCTIONS
AUTOMATIC
COOL DOWN
LESS DRY
MORE DRY
COOL DOWN
10
20
100
TIMED DRY
...
Operating Instructions (Operating Instructions) - Page 3
...drain and spin with water but will fill with spray rinse, rinse agitation, and a final spin. P/N 134808700 (0610) It has important safety and warranty information. It also has many suggestions for washing.
3. To reduce the risk of fire, electric... knob. LAUNDRY CENTER WASHER OPERATING INSTRUCTIONS
HOT COLD
COLD COLD
WARM COLD
Before Operating Your Washer
Read your Laundry Center Owner's ...
Similar Questions

Frigidair Stackable Washer Won't Drain Fex831fs0
(Posted by vaushaun 10 years ago)

Frigidaire Laundry Center Glet1031cs0 Dryer Spins But Won't Heat
(Posted by krld2diegof 10 years ago)
How To Replace Frigidaire Fex831fso Washer Drive Belt
(Posted by kabandul 10 years ago)

What Does E45 Mean? Water Won't Drain. Hose Is Not Kinked
What does E45 mean?Water won't drain. Hose is not kinked
What does E45 mean?Water won't drain. Hose is not kinked
(Posted by khansen 11 years ago)

Replacement Hose
How do I replace the drain hose for my washer?
How do I replace the drain hose for my washer?
(Posted by victoriesarise 12 years ago)