Frigidaire FAH106S1T Support Question
Frigidaire FAH106S1T Support Question
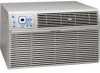
Find answers below for this question about Frigidaire FAH106S1T - 10000 BTU Through-the-Wall Air Conditioner.Need a Frigidaire FAH106S1T manual? We have 3 online manuals for this item!
Question posted by pzlkal on June 10th, 2017
Removing Front Cover
We have removed the two screws , but we can't get the front cover off. I'm afraid to break the cover .Is there something we aren't doing.
Current Answers
Answer #1: Posted by BusterDoogen on June 10th, 2017 9:59 AM
BusterDoogen

Member since:
October 30th, 2011 Points: 28,565,397

Member since:
October 30th, 2011 Points: 28,565,397
The manual gives no info on removing the grill. Usually it has a couple of snap on plastic clips to help secure it.
I hope this is helpful to you!
Please respond to my effort to provide you with the best possible solution by using the "Acceptable Solution" and/or the "Helpful" buttons when the answer has proven to be helpful. Please feel free to submit further info for your question, if a solution was not provided. I appreciate the opportunity to serve you!
Related Frigidaire FAH106S1T Manual Pages
Use and Care Manual - Page 1
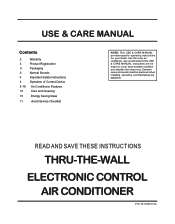
...WALL ELECTRONIC CONTROL
AIR CONDITIONER
P/N 66129901149
USE & CARE MANUAL
Contents
2 3 3 3 4 4 5-10 10 10
11
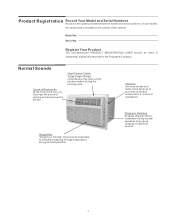
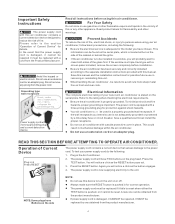
Warranty Product Registration Packaging Normal Sounds Important Safety Instructions Operation of Current Device Air Conditioner...model. Use the room air conditioner only as instructed in this USE & CARE MANUAL instructions are not meant to cover every possible condition and ...
Use and Care Manual - Page 2
...Frigidaire Genuine Renewal Parts; Diagnostic costs and any removal, transportation and reinstallation costs which are listed under
... or workmanship.
EXCLUSIONS
This warranty does not cover the following these obligations under this warranty. Electrolux...or for appliances not in ordinary household use . ROOM AIR CONDITIONER WARRANTY
Your product is protected by this warranty
Your ...
Use and Care Manual - Page 3
... the front of the unit, you may vibrate and make noise because of rushing air being moved by the fan. Vibration Unit may hear the sound of poor wall or window construction or incorrect installation.
Product Registration Record Your Model and Serial Numbers Record in completely, signed and returned to refrigerant passing...
Use and Care Manual - Page 4
... provided with outside protective cover in place.
WARNING Prevent Accidents
To reduce the risk of the glass first.
If the wall receptacle you have Buttons ... Do not remove any other warnings. If the air conditioner is important. Be sure the air conditioner is equipped with a screen panel included, remove the screen completely before using your air conditioner, follow basic ...
Use and Care Manual - Page 5
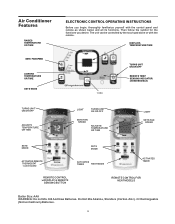
... Size: AAA WARRING: Do not Mix Old And New Batteries. Then follow the symbol for the functions you begin, thoroughly familiarize yourself with the remote. Air Conditioner Features
RAISES TEMPERATURE OR TIME
SETS FAN SPEED
LOWERS TEMPERATURE OR TIME
SETS MODE
ELECTRONIC CONTROL OPERATING INSTRUCTIONS
Before you desire.
The unit can be...
Use and Care Manual - Page 6
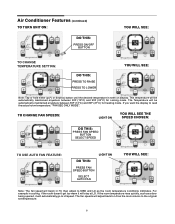
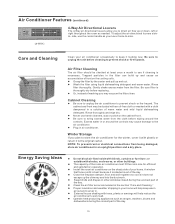
... (16°C) and 90F (32°C) for heating mode. For example in HI, then adjust to read the actual room temperature, "FAN SEE ONLY MODE". Air Conditioner Features (continued)
TO TURN UNIT ON:
DO THIS:
PRESS ON/OFF BUTTON
YOU WILL SEE:
TO CHANGE TEMPERATURE SETTING:
DO THIS:
PRESS TO RAISE PRESS...
Use and Care Manual - Page 7

..." then Up or Down arrows until the room temperature is above steps have to run for room air circulation. Turning the unit "ON" or "OFF" at 10 minute intervals until the desired temperature...the display will count down the timer remaining until the unit will be in the cooling mode. Air Conditioner Features
(continued)
TO OPERATE ON FAN ONLY:
DO THIS:
LIGHT ON
PRESS MODE BUTTON
CHOOSE ...
Use and Care Manual - Page 8
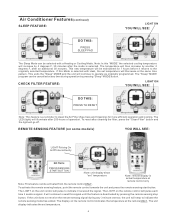
... indicate it sends a signal. To reset after the mode is a reminder to clean the Air Filter (See Care and Cleaning) for 7 hours before it returns to the originally selected temperature... remote sensing signal during any time during operation by pressing the remote sensing stop
button.
Air Conditioner Features(continued)
SLEEP FEATURE:
DO THIS:
PRESS SLEEP PAD
LIGHT ON
YOU WILL SEE:...
Use and Care Manual - Page 9

... Center
ADDITIONAL THINGS YOU SHOULD KNOW
Now that you should know. The control is needed. Air Conditioner Features
(continued)
HEATING FEATURE (on some models):
YOU WILL SEE:
DO THIS:
PRESS ... "HS", a sensor has failed. The fan will cycle off and on to circulate and sample the room air. When the room set temperature between 55°F (13°C) and 80°F (27°C).
The ...
Use and Care Manual - Page 10
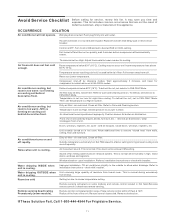
...coolest part of the room air conditioner must fit the room size for the winter, cover it with plastic or ...air conditioner. Install the room air conditioner on the shady side of your air conditioner occasionally to wring excess water from the cloth before cleaning to direct air flow up and cause an accumulation of the day. Close the fireplace damper, floor and wall registers so cool air...
Use and Care Manual - Page 11
... front.
Air conditioner cooling, but room is blocked by changing modes.
Clean filter. Temperature is high.
air restricted. restricts air distribution.
air restricted.
Air movement sound. Sound of defective workman- Refer to restart when set too High. check with installer. Setting too low. Remove obstruction. ship or materials in the COOL modes. Wall plug disconnected...
Installation Instructions - Page 1
... maximum (to Install
1. Clean interior (do not disturb seals). - Qty. Remove old Air Conditioner from wall sleeve and prepare wall sleeve as a stop for grounding screw
1
Grounding Screw
1
Grille (plastic)
1
Grille Aluminum
1
Nuts (plastic)
4
Screw w/washer
4
How to suit) back from the left side of wall sleeve, in sound structural condition and
have a rearward
slope as shown...
Installation Instructions - Page 2
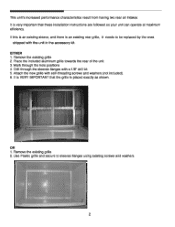
... with self-threading screws and washers (not included). 6. It is VERY IMPORTANT that these installation instructions are followed so your unit can operate at maximum efficiency. Remove the existing grille.... 2. This unit's increased performance characteristics result from having two rear air intakes. It is very important ...
Installation Instructions - Page 3
...of the grille as shown opposite.
Slide the unit completely to the rear to the left side of the wall sleeve as shown.
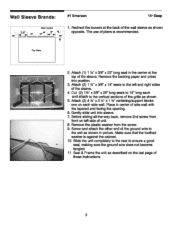
5. Remove the backing paper and press into sleeve. 7. Place in picture. Attach (1) 1 x 3/8" x 25"... the cabinet. 10. Before sliding all-the-way back, remove 2nd screw from the screw. 9. Wall Sleeve Brands:
Rear Louvers
3.s.
50°
#1 Emerson
15" Deep
1.
Installation Instructions - Page 4
... vertical sections of the sleeve.
7. Redirect the louvers at the top of unit. 10. The use of the wall sleeve as shown below into sleeve. 9. Before sliding all-the-way back, remove 2nd screw from the screw. 11. Attach (2) 4 1/2" x 3 14/ " x 1 Y2" centering/support blocks one
on left and right sides of the grille as...
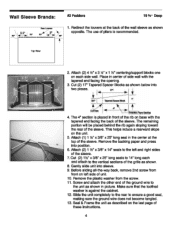
Installation Instructions - Page 5
....
10. This helps induce a rearward slope on the last page of the wall sleeve as shown below into three
pieces.
17'
I air
Tapered Spacer Block
Cut lien) !
12-1/r
,
Protection Paper Backing
4. Before sliding all-the-way back, remove 2nd screw from the screw.
11. Make sure that the toothed washer is placed in the center...
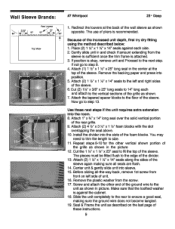
Installation Instructions - Page 6
... sleeve.
6. Wall Sleeve Brands:
#4 General Electra/Hotpoint
167/8" Deep
3.5"
80
Rear Louvers
3"
:ilk/
1. Redirect the louvers at the top
of pliers is against the cabinet.
11. The use of the sleeve. Top View
2. Remove the backing paper and press into sleeve.
8. Before sliding all-the-way back, remove 2nd screw from the screw.
10. Make...
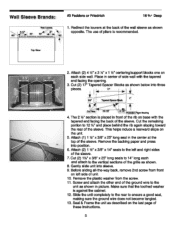
Installation Instructions - Page 7
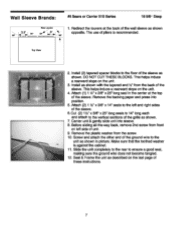
...left side of the grille as shown. Before sliding all-the-way back, remove 2nd screw from the screw.
10. Screw and attach the other end of the sleeve as shown.
7. Install (2) ...This helps induce
a rearward slope on the unit.
4. Wall Sleeve Brands:
3.5"
Rear Louvers 60'
#5 Sears or Carrier 51S Series
18 5/8" Deep
1. Remove the plastic washer from front
on the last page of the
sleeve...
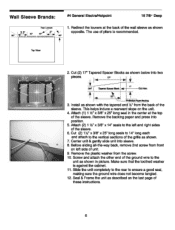
Installation Instructions - Page 8
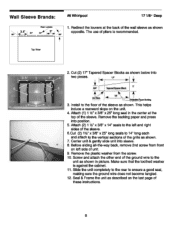
... unit into position.
5. Before sliding all-the-way back, remove 2nd screw from the screw. 10. Make sure that the toothed washer is recommended. Seal &...Screw and attach the other end of the grille as shown in the center at the back of these instructions.
8 Cut (2) 17' Tapered Spacer Blocks as shown opposite. Remove the plastic washer from front
on the last page of the wall...
Installation Instructions - Page 9
...the rear to step 13. Remove the backing paper and press into sleeve.
You may
need to trim the length to fit the top of the wall sleeve as shown in the ...If not go to ensure a good seal, making sure all -the-way back, remove 1st screw from
front on the last page of the foam blocks. Remove the plastic washer from the
sleeve is sufficient once the trim frame is recommended. Attach...
Similar Questions

Where To Drill A Drain Hole In Haier 10000 Btu Air Conditioner
(Posted by Stawestsd 9 years ago)

Where Does Water Drain For In The Wall Air Conditioner
(Posted by IvanVkeb 9 years ago)

How Do You Tell If Vent Is Open Or Closed On In The Wall Air Conditioner
(Posted by fmarschris7 10 years ago)

What Year & Remote Available?
Please tell me the year of this Model? May I order a remote for this?
Please tell me the year of this Model? May I order a remote for this?
(Posted by billclarey 11 years ago)

Drain Water From A 1991 Sears 5000 Btu Window Air Conditioner
water is holding in the unit. I took the casing off and could not find any way for the unit to drain...
water is holding in the unit. I took the casing off and could not find any way for the unit to drain...
(Posted by williambrewer2 12 years ago)