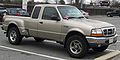
2002 Ford Ranger Support Question
2002 Ford Ranger Support Question
Find answers below for this question about 2002 Ford Ranger.Need a 2002 Ford Ranger manual? We have 4 online manuals for this item!
Question posted by Anonymous-147145 on December 10th, 2014
Removing Drivers Side Valve Cover
does the throttle body have to be removed so the valve cover can be removed
Current Answers
Answer #1: Posted by TommyKervz on December 12th, 2014 2:08 AM
TommyKervz

Member since:
January 10th, 2013 Points: 17,776,813

Member since:
January 10th, 2013 Points: 17,776,813
follow the instructions on the video below
Related Manual Pages
Driving Your SUV or Truck 1st Printing - Page 8

...Reverse) with the transfer case in N (Neutral) position. Operation On The Road
Parking Before leaving the driver's seat, you should make sure that the gearshift is in the N (Neutral) position, the engine ... a manual transmission. Always set the parking brake fully and turn off the ignition and remove the key. Set the parking brake fully, shut off the ignition when leaving the vehicle...
Driving Your SUV or Truck 1st Printing - Page 15
...reduce vehicle performance and operational capabilities and adversely affect driver and passenger safety. For this reason, Ford strongly.... Frequent inspection of gravity can make modifications such as adding or removing parts (such as a result of a loss of control. Failure...load or device (such as ladder racks or pickup box cover). Ford recommends that raise the center of vehicle chassis and...
Warranty Guide 5th Printing - Page 11
... pages 11-24. including the body, chassis, or components - For damage caused by the Emissions Warranties, with no warranty our policy is covered under the terms of the Bumper...balancer, valve covers, oil pan and pump, water pump, fuel system (excluding fuel lines and fuel tank), high pressure lines, gaskets and seals, glow plugs, turbocharger, powertrain control module, electronic driver unit,...
Warranty Guide 5th Printing - Page 18

...8226; Throttle Body Assembly (MFI) • Turbocharger Assembly • Vehicle Communication Link (VCL) Module (1) Flex Fuel vehicle only Important Information About List of Parts Also covered by ...Control Valve (1) • Idle Air Bypass Valve • Ignition Coil and/or Control Module • Intake Manifold • Intercooler Assembly - For more details about the specific parts covered by...
Warranty Guide 5th Printing - Page 22
...Spark Control Components • Spark Plugs and Ignition Wires • Synchronizer Assembly • Throttle Body Assembly (MFI) • Turbocharger Assembly • Vehicle Communication Link (VCL) Module ... Valve (2) • Idle Air Bypass Valve • Ignition Coil and/or Control Module • Intake Manifold (1) • Intercooler Assembly - The parts on the following list are covered ...
Owner Guide 4th Printing - Page 15
...on warning chime Sounds when the headlamps or parking lamps are on, the key is removed from the ignition and the driver's door is running or hot, this may result in serious burns.
15 At normal ... the engine immediately and let the engine cool. Refer to Engine coolant in the ignition and the driver's door is overheating. If it enters the red section, the engine is opened .
Key-in-...
Owner Guide 4th Printing - Page 84
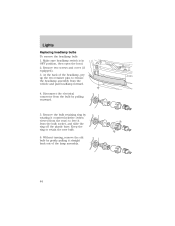
... bulb retaining ring by pulling rearward.
5. Disconnect the electrical connector from the bulb socket, and slide the ring off the plastic base. Remove two screws and cover (if equipped). 3. At the back of the lamp assembly.
84 Keep the ring to free it straight back out of the headlamp, pry up the...
Owner Guide 4th Printing - Page 85
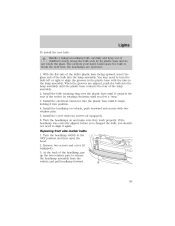
...may need to align it again. Install the electrical connector into position. 4. Remove two screws and cover (if equipped). 3. Grasp the bulb only by rotating clockwise until you .... At the back of the socket by its plastic base and do not touch the glass. Install the cover with two retainer pins. 5. Install the headlamp on and make sure they work properly. Lights
To install the...
Owner Guide 4th Printing - Page 88
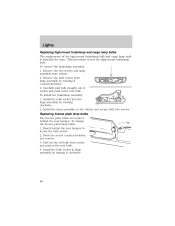
... The license plate bulbs are located behind the rear bumper to locate the bulb socket. 2. Remove the two screws and lamp assembly from lamp assembly by rotating it clockwise.
88 To install...the same. This procedure covers the high-mount brakelamp bulb. Install the lamp assembly on the vehicle and secure with two screws. Twist the socket counterclockwise and remove. 3. Lights
Replacing ...
Owner Guide 4th Printing - Page 90
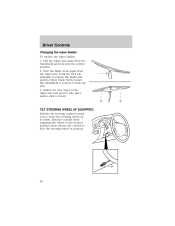
... windshield to lock the steering wheel in position.
90 Hold the control while adjusting the wheel to the desired position, then release the control to remove it into the service position. 2. Pull the wiper arm away from the wiper arm. Turn the blade at an angle from the windshield and lock...
Owner Guide 4th Printing - Page 100

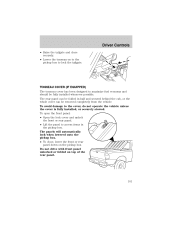
... with a tailgate lock designed to prevent theft of the tailgate. • Open the rear tonneau cover. • Lower the tailgate. • Move the lock lever to unlock it. Make sure the locking clip screws are loose before removing the extender. 1.
Extend the bed extender. 2. Pull the round knobs on each side of...
Owner Guide 4th Printing - Page 101
...to the cover, do not operate the vehicle unless the cover is fully installed, or securely stowed. Driver Controls
•...; Raise the tailgate and close , lower the front or rear panel down on the pickup box. TONNEAU COVER (IF EQUIPPED) The tonneau cover... Open the lock cover and unlock the front or rear panel. • Lift...
Owner Guide 4th Printing - Page 103
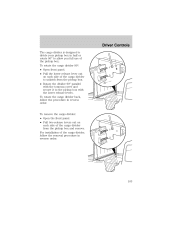
... the cargo divider back, follow the removal procedure in reverse order. For installation of the cargo divider, follow the procedure in reverse order.
103 Driver Controls
The cargo divider is designed to... divide your pickup box in half or rotate 90° to the pickup box with the tonneau cover and secure it to...
Owner Guide 4th Printing - Page 104
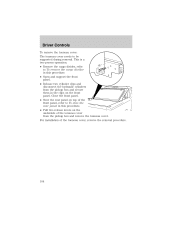
... stow the rear panel in the clips on top of the tonneau cover, reverse the removal procedure.
104 Close the front panel. • Stow the rear panel on the front panel. Driver Controls
To remove the tonneau cover: The tonneau cover needs to To remove the cargo divider in this procedure. • Pull two release levers on...
Owner Guide 4th Printing - Page 117
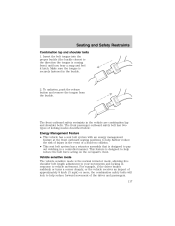
...response to help reduce forward movement of a head-on the occupant's chest. For example, if the driver brakes suddenly or turns a corner sharply, or the vehicle receives an impact of approximately 8 km/h... manner. This feature is coming from the buckle. To unfasten, push the release button and remove the tongue from ) until you hear a snap and feel it latch. Vehicle sensitive mode ...
Owner Guide 4th Printing - Page 118
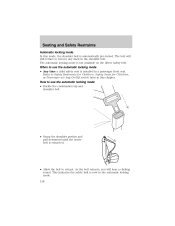
As the belt retracts, you will still retract to remove any slack in this mode, the shoulder belt is automatically pre-locked. The belt will ... belt. Refer to use the automatic locking mode • Any time a child safety seat is not available on the driver safety belt. This indicates the safety belt is extracted.
• Allow the belt to use the automatic locking mode •...
Owner Guide 4th Printing - Page 198
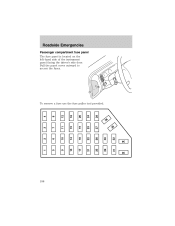
Pull the panel cover outward to access the fuses. To remove a fuse use the fuse puller tool provided.
12
16
20
24
28
4
8
36 35
11
15
19
23
27
3
7
10
14
18
22
26
30
...
1
5
9
198
34 33 Roadside Emergencies
Passenger compartment fuse panel The fuse panel is located on the left-hand side of the instrument panel facing the driver's side door.
Owner Guide 4th Printing - Page 212
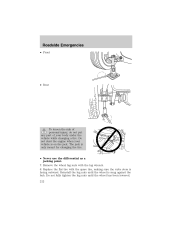
... as a jacking point. 7. Remove the wheel lug nuts with the spare tire, making sure the valve stem is snug against the hub.... Do not fully tighten the lug nuts until the wheel is facing outward. Replace the flat tire with the lug wrench. 8. Reinstall the lug nuts until the wheel has been lowered. 212 Do not start the engine when your body...
Owner Guide 4th Printing - Page 230
...Chemical-strength cleaners, or cleaning chemicals, in the driver's door jam) to your dealer to ensure you get the correct color. • Remove particles such as bird droppings, tree sap, insect... to hot or warm wheel rims or covers. • Some automatic car washes may cause damage to the finish on a sticker in combination with brush agitation to remove brake dust and dirt, could penetrate the...
Owner Guide 4th Printing - Page 233
... the material, spot-clean the area first with Motorcraft Spot and Stain Remover (ZC-14). • Never saturate the seat covers with cleaning solution. • Do not use cleaning solvents, bleach or... dye on the vehicle's seatbelts, as insect repellent and suntan lotion in this area helps protect the driver from...
Similar Questions


1989 Ford Ranger 2.9l Engine Wont Start
my 1989 ford ranger 2.9l engine is not getting fuel. I have excellent fuel pressure at rail fitting....
my 1989 ford ranger 2.9l engine is not getting fuel. I have excellent fuel pressure at rail fitting....
(Posted by Jetbtrtop1 10 years ago)

How To Remove And Replace A 1999 Ford Ranger Spare Tire Lock And Key
(Posted by maegross 10 years ago)

Removing The Front Differential
how do I GET the long bolt to go past the lower control arm/the bolt goes in atwo sided bracket and ...
how do I GET the long bolt to go past the lower control arm/the bolt goes in atwo sided bracket and ...
(Posted by mountaindad947 11 years ago)