
1997 Ford Expedition Support Question
1997 Ford Expedition Support Question
Find answers below for this question about 1997 Ford Expedition.Need a 1997 Ford Expedition manual? We have 6 online manuals for this item!
Question posted by karsca on September 6th, 2013
Where Is Lug Wrench Location For 1997 Expedition
The person who posted this question about this Ford automobile did not include a detailed explanation. Please use the "Request More Information" button to the right if more details would help you to answer this question.
Current Answers
Related Manual Pages
Owner's Manual - Page 10

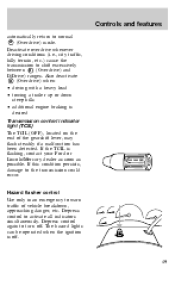
... transmission could occur. If the TCIL is flashing, contact your Ford dealer as soon as possible. Instrumentation
Transmission control indicator light (TCIL) The TCIL (OFF), located on the end of the gearshift lever, may flash steadily if a malfunction has been detected.
If this condition persists, damage to the Driving chapter.
Owner's Manual - Page 19
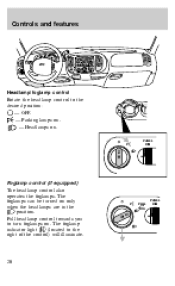
... turned on . Pull headlamp control towards you to the indicator light right of the control) will illuminate.
P
PULL
FOR
PANEL DIM
FOG
20 The foglamp (located to turn foglamps on. Controls and features
Headlamp/foglamp control Rotate the headlamp control to the desired position: - OFF. - Parking lamps on. - Headlamps on only...
Owner's Manual - Page 33

... FLR & DEF DEF
HI
COOL WARM
*MAX A/C
Drive with outside air Set mode control to any snow, ice or leaves from the air intake area located directly under the windshield.
34
LO
PANEL *A/C
OFF PANEL & FLOOR FLOOR FLR & DEF DEF
HI
COOL WARM
*MAX A/C
Defrosting windshield Set mode control to or...
Owner's Manual - Page 35

... driver's side rear quarter trim panel.
When the auxiliary air conditioning control is set to PANEL, airflow occurs from the third row seat floor vent located in order for the auxiliary air conditioning to the desired speed. Turn the fan speed control knob to operate.
Owner's Manual - Page 48
... with a heavy load • towing a trailer up or down steep hills • additional engine braking is desired
Transmission control indicator light (TCIL) The TCIL (OFF), located on the end of vehicle breakdown, approaching danger, etc. If this condition persists, damage to activate all indicators simultaneously. Depress control again to warn traffic...
Owner's Manual - Page 51
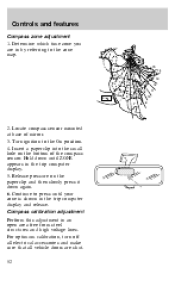
... appears in by referring to the zone map.
1 2 3 13 4 12 5 6 7 8 9 10 11 15 14
2. Controls and features
Compass zone adjustment 1. Continue to the On position. 4. Locate compass sensor mounted at base of the compass sensor. Compass calibration adjustment Perform this adjustment in the trip computer display and release. Insert a paperclip into...
Owner's Manual - Page 52

... compass sensor. Hold down until ZONE disappears and CAL is now calibrated. Insert a paperclip into the small hole on the operation and functions of mirror. 3. Locate compass sensor mounted at base of the trip computer, refer to Trip computer in the display (approximately eight seconds) and release. 5. For more information on...
Owner's Manual - Page 60

... equipped) Both mirrors are heated automatically to adjust: L Driver side mirror R Passenger side mirror 2. Lock the mirror by moving the control to turn signal is located at the top of the right and left side view mirrors. The arrow provides an additional warning to other drivers that your vehicle is equipped...
Owner's Manual - Page 62

... controls • auxiliary power point For information on the instrument panel, next to the "Audio Guide". Auxiliary power point The first auxiliary power point is located on the rear console audio system, refer to the cigar lighter.
63
Owner's Manual - Page 63

The power point is located on the left side of the rear console at the rear of console features. Hard objects can injure you in the cupholder. These include: • ...
Owner's Manual - Page 64

... features
Replacing the tissue box
OFF
LO
HI
To replace the center console tissue box: 1. Lift the console door lid. 2. Slide in mat over the locator post and snap mat into place.
65
Owner's Manual - Page 65

SPARE TIRE AND JACK Your vehicle is located inside the center console. To remove mat, pull up on rear of mat to the "Audio Guide". Compact disc changer (if equipped)
OPEN
The compact ... to remove and mount the spare tire, refer to the Roadside emergencies chapter. 66
For instructions on the compact disc changer, refer to release from locator post.
Owner's Manual - Page 74
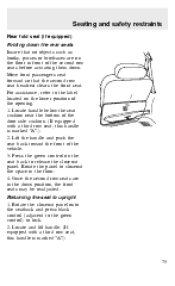
... 1. Rotate the closeout panel onto the seatback and press black control (adjacent to the green control) to release the closeout panel. Locate and lift handle. (If equipped with a third row seat, this handle is marked "A".) 2. Press the green control on the ...the second row seat headrest clears the front seat. For assistance, refer to the label located on the seat back to lock. 2.
Owner's Manual - Page 76
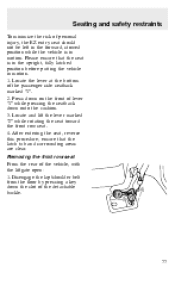
... upright, fully latched position before putting the vehicle in motion. Press down onto the cushion. 3. Locate and lift the lever marked "2" while rotating the seat toward the front row seat. 4. Disengage the...the seat is in motion. 1. After entering the seat, reverse this procedure; Locate the lever at the bottom of the passenger side seatback marked "1". 2. Please ensure that the latch ...
Owner's Manual - Page 77
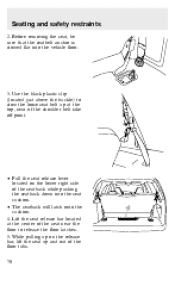
...the seat near of the shoulder belt take off point.
• Pull the seat release lever located on the release bar, lift the seat up at the top, near the floor to stow...floor.
3. While pulling up on the lower right side of the floor tubs. 78 Use the black plastic clip (located just above the buckle) to release the floor latches. 5. Before removing the seat, be sure that the seatbelt ...
Owner's Manual - Page 143

...; Park on the right rear quarter panel interior trim.
Instead, gradually decrease your vehicle are stowed in the following locations:
Tool Spare tire Jack, wheel nut wrench, instructions, work gloves Jack handle Location Under the vehicle, just in front of the spare tire and tools The spare tire and tools for your speed...
Owner's Manual - Page 144

... radiator shroud. Insert the straight end of the jack handle into the rear access hole located just above the rear bumper. • Forward motion will stop and resistance to the ... end of the windshield washer bottle. 3. Locate the access panel on the top of the handle that is slightly slack.
145 Un-snap the wheel lug nut wrench, instructions and work gloves from the two retaining...
Owner's Manual - Page 146

...from moving when you change the tire, be seriously injured.
147 Insert the tapered end of the lug wrench to remove any wheel trim. If the vehicle slips off the ground. 8. Insert the jack ...the diagonally opposite wheel is in P (Park). Loosen the wheel nuts with the lug wrench. Use the tip of the lug wrench behind the wheel covers or hubcaps and twist off the jack, even if the ...
Owner's Manual - Page 148

Thread the lug nuts on the wheel studs with the spare tire. 3. Use the lug nut
149 Replace the flat tire with the beveled face toward the wheel. Remove the lug nuts with the lug nut wrench. 2. Roadside emergencies
Rear
NEVER USE THE FRONT OR REAR DIFFERENTIAL AS A JACKING POINT.
1.
Owner's Manual - Page 149

Roadside emergencies
wrench to the proper torque specifications in the order shown.
3
1
Never use wheels or lug nuts different than the original equipment as this could... any wheel covers, ornaments or hub caps that they are screwed or snapped into place. 7. Put the jack and wrench away. It will not allow the wheels to come off while the vehicle is raised to overtighten. 9. This damage...
Similar Questions

What Is The Electrical Plug Four On The Powersteering Pump On A 1997 Expedition
(Posted by sashRos 9 years ago)


