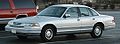
1997 Ford Crown Victoria Support Question
1997 Ford Crown Victoria Support Question
Find answers below for this question about 1997 Ford Crown Victoria.Need a 1997 Ford Crown Victoria manual? We have 4 online manuals for this item!
Question posted by deecallow86 on September 3rd, 2013
My 97 Crown Vic Has A Brake System I've Never Seen Before. How Do I Change Them?
The person who posted this question about this Ford automobile did not include a detailed explanation. Please use the "Request More Information" button to the right if more details would help you to answer this question.
Current Answers
Answer #1: Posted by RudRaid on September 3rd, 2013 6:10 AM
RudRaid

Member since:
February 19th, 2013 Points: 23,610

Member since:
February 19th, 2013 Points: 23,610
give more info if this isnt what you was looking for.
CALIPER/BRAKE PAD REMOVAL
- Check fluid level in brake master cylinder reservoir. Remove brake fluiduntil brake master cylinder reservoir is half-full. Discard removed fluid.
- Raise and support vehicle.
- Remove wheel and tire. Use care to avoid damage to wheel cylinder bleeder screw or rotor shield. NOTE:It is not necessary to disconnect hydraulic connections.
- Remove two caliper guide pin bolts.
- Lift disc brake caliper away from front disc brake rotor using a rotating motion.
- Support the disc brake caliper assembly in a manner that will not stretch or damage the front brake hose, such as hanging from an S-hook or mechanics wire.
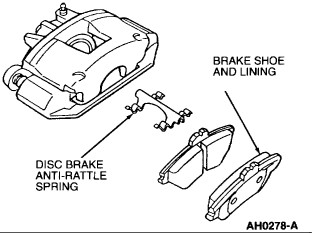
- Remove brake shoe and lining assemblies from disc brake caliper anchor plate by sliding brake shoe and lining to off of front disc brake caliper anchor plate.
- Inspect both disc brake rotor braking surfaces. Minor scoring or buildup of brake shoe and lining material does not require machining or replacement of the front disc brake rotor.
- Hand-sand glaze off both front disc brake rotor braking surfaces using garnet paper 100A (medium grit) or aluminum oxide 150-J (medium grit).
ROTOR REMOVAL
- If rotor is not going to be machined off of the vehicle, mark the front disc brake rotor and one lug nut with touch-up paint to aid assembly.
- Remove two caliper anchor plate bolts and discard.
- Remove caliper anchor plate. NOTE:If excessive force must be used during front disc brake rotor removal, the front disc brake rotor should be checked for lateral runout prior to installation.
- Remove front disc brake rotor assembly from wheel hub.
- If additional force is required to remove front disc brake rotor;
- apply Rust Penetrant and Inhibitor F2AZ-19A501-A or equivalent meeting Ford specification ESR-M99C56-A on disc brake rotor/hub mating surfaces.
- First, strike front disc brake rotor between studs with a plastic hammer.
- If this does not work, attach 2/3-Jaw Puller D80L-1013-A or equivalent and remove front disc brake rotor.
ROTOR INSTALLATION NOTE: Remove protective coating from new front disc brake rotor with Metal Brake Parts Cleaner (Non-Chlorinated). If original front disc brake rotor is being installed, make sure rotor braking and mounting surfaces are clean. Hand-sand braking surfaces as necessary as described. Apply a small amount of Silicone Brake Caliper Grease and Dielectric Compound to hub mounting surface and pilot diameter of front disc brake rotor to ease future removal.
- Clean rust, scale or dirt off of the hub mounting surface of the front disc brake rotor as well as the hub mounting surface. The contamination will not allow front disc brake rotor to sit flat to the hub surface.
- If the front disc brake rotor is being replaced, remove the protective coating from the new front disc brake rotor with Metal Brake Parts Cleaner (Non-Chlorinated) F5AZ-2G410-AA or equivalent.
- Lubricate the hub mounting surface with Silicone Brake CaliperGrease and Dielectric Compound and install the front disc brake rotor on the wheel hub.
- Install disc brake caliper anchor plate assembly onto front disc brake rotor and align index marks.
- Install two new caliper anchor plate mounting bolts and tighten to 170-230 Nm (125-169 ft. lbs.) .
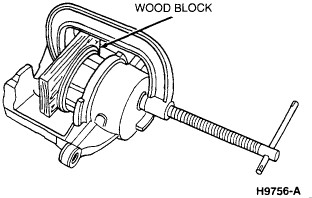
- Use a 10 cm (4 inch) C-clamp and wood block 70 mm x 25 mm (2 3/4 inch x 1 inch) and approximately 19 mm (3/4 inch)thick to seat caliper piston in its bore. This must be done to provide clearance for disc brake caliper assembly to fit over front disc brake rotor and pads during installation.
- Install disc brake pads to front disc brake caliper anchor plate.
- Make sure disc brake pad anti-rattle spring and disc brake pad anti-rattle clip is seated in caliper inspection opening. Disc brake pad anti-rattle clip must be installed from the lining side.
- Inspect disc brake caliper locating pin and locating pin boots. If disc brake caliper locating pin is binding, remove and clean. Lubricate with Silicone Brake CaliperGrease and Dielectric Compound. If boots are torn, replace.
- Install front disc brake caliper onto rotor and pads.
- Install caliper guide pin bolts. Tighten lower bolt first to 28-36 Nm (21-26 ft. lbs.) . Tighten upper bolt to 28-36 Nm (21-26 ft. lbs.).
- Inspect disc brake caliper/front disc brake caliper anchor plate assembly to make sure brake shoes and linings are properly installed. CAUTION:Failure to tighten lug nuts in a star pattern may result in high rotor runout which will speed up the development of brake roughness, shudder and vibration.
- Install wheel and tire assembly, using Rotunda Accutorq Lug Nut Sockets or equivalent on 1/2 inch drive air impact wrench or torque wrench to tighten lug nuts to 115-142 Nm (85-104 ft. lbs.).
- Check rotor lateral runout. Refer to Testing and Inspection . See: Testing and Inspection\Runout\Front Runout must not exceed 0.05 mm (0.002 in) . If runout is exceeded, remove front disc brake rotor and reindex one position on wheel hub and reinstall. Repeat until runout is within specification. If runout cannot be corrected, machine rotor. Refer to Refinishing . See: Refinishing
- Lower vehicle.
- Pump brake pedal several times to position brake shoes and linings. Refill brake master cylinder with high performance Dot-3 Motor Vehicle Brake Fluidas necessary.
- Road test vehicle.
Supporting Images
You can click the images below to enlarge
Related Manual Pages
Owner's Manual - Page 5

... to yourself, your passengers or other people. This guide describes equipment and gives specifications for equipment that is never compromised.
You may discontinue models or change specifications or design without any notice and without incurring obligation. Ford may not have bought all WARNINGS carefully. Please read all of your new vehicle...
Owner's Manual - Page 8
This information is subject to fit your own driving needs, including reimbursement benefits for ESP coverage. Each plan can be tailored to change. NOTE: Repairs performed outside the United States and Canada are several Ford ESP plans available in various time-and-mileage combinations. See your dealer for ...
Owner's Manual - Page 9

...1,000 miles (1,600 km) that you should take these steps:
The break-in period for new brake linings lasts for 100 miles (160 km) of city driving or 1,000 miles (1,600 km) of... Engine oil recommendations in " oils.
Your vehicle is equipped with a cut-out mode to stop. - Begin braking well in period, you need to pay careful attention to how you can anticipate when to promote durability.
6 ...
Owner's Manual - Page 13
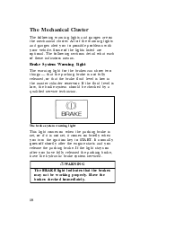
... and you to START. If the light stays on briefly when you have fully released the parking brake, have the hydraulic brake system serviced. The brake system warning light
This light comes on when the parking brake is set, or if it is low in the master cylinder reservoir. It normally goes off shortly...
Owner's Manual - Page 166

... as a standard rear axle. This noise is created by rapidly applying and releasing the brakes to the driver. Traction-Lok Axle (If equipped)
This axle provides added traction on...for a few seconds during acceleration. Under normal conditions the Traction-Lok axle functions as when changing a tire. During the Traction AssistTM function, which most often occurs during low speed acceleration ...
Owner's Manual - Page 167

... conditions warrant.
At 25 mph (40 km/h) the function begins to help steer your vehicle changes at a constant vehicle speed, have the power steering system checked. If the power steering system breaks down to prevent the rear brakes from the engine to taper off ), you can damage the power steering pump.
166...
Owner's Manual - Page 191

If you do not see or smell fuel, do not apply the brake heavily. This spare tire is smaller than conventional spare tires on a Traction-Lok rear ... not be noticeable to start your vehicle again.
Park on a level spot, turn off the ignition, set the parking brake, and turn it to a safe place on the hazard flashers. Hold the steering wheel firmly and slowly move to the...
Owner's Manual - Page 194

...the ground, the transmission alone will not move or roll. Set the parking brake and block the wheel that you change a tire, be seriously injured.
RWARNING On vehicles equipped with Air Suspension, ...OFF the Air Suspension switch prior to jacking. To prevent the vehicle from moving when you are changing. The air suspension switch - located in P (Park). When one of the back wheels is ...
Owner's Manual - Page 218

... this by washing with running water for 15 minutes. Get medical attention immediately. Brake Fluid
Under normal circumstances, your vehicle and the brake lining wears. Get medical attention if irritation persists. Check the brake fluid at each scheduled engine oil change or at the fluid level in laboratory mice. Also, see label on your...
Owner's Manual - Page 301

......headlamps ...high beams ...high-mount brakelamp . . illuminated mirrors ...instrument panel, dimming interior lamps ...replacing bulbs ...Lane change indicator (see Turn signal) ...Lights, warning and indicator air bag...air suspension ...anti-lock brakes (ABS)...brake ...charging system ...check engine ...door ajar...engine oil pressure ...hazard warning light ...high beam ...low fuel ...low...
Warranty Guide 1st Printing - Page 8
... cover surface rust and deterioration of parts due to normal wear and tear. Damage Caused by failure to maintain the vehicle; Here are : • oil changes • oils, lubricants other fluids • oil/air filters • brake linings/pads • tire rotation • cleaning/polishing • wiper blades • clutch linings 8
Scheduled Maintenance Guide 1st Printing - Page 8
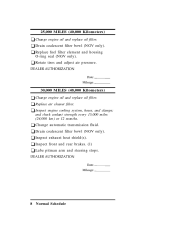
... engine oil and replace oil filter. u Drain coalescent filter bowl (NGV only). u Change automatic transmission fluid. u Inspect front and rear brakes. (1) u Lube pitman arm and steering stops.
8 Normal Schedule u Replace air cleaner filter. u Drain coalescent filter bowl (NGV only).
u Inspect engine cooling system, hoses, and clamps; u ...
Scheduled Maintenance Guide 1st Printing - Page 11
...filter bowl (NGV only). u Rotate tires and adjust air pressure.
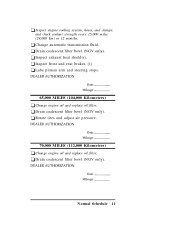
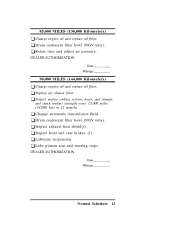
70,000 MILES (112,000 Kilometers)
u Change engine oil and replace oil filter. u Drain coalescent filter bowl (NGV only).
u Inspect exhaust heat shield(s). and... or 12 months. u Inspect front and rear brakes. (1) u Lube pitman arm and steering stops.
65,000 MILES (104,000 Kilometers)
u Change engine oil and replace oil filter.
Scheduled Maintenance Guide 1st Printing - Page 13
... km) or 12 months. u Inspect engine cooling system, hoses, and clamps;
u Change automatic transmission fluid. u Drain coalescent filter bowl (NGV only).
u Inspect front and rear brakes. (1) u Lubricate suspension. u Rotate tires and adjust air pressure.
90,000 MILES (144,000 Kilometers)
u Change engine oil and replace oil filter. Normal Schedule 13 u Inspect exhaust heat...
Scheduled Maintenance Guide 1st Printing - Page 16

... km) or 12 months.
u Inspect exhaust heat shield(s). u Inspect engine cooling system, hoses, and clamps; u Drain coalescent filter bowl (NGV only). u Change automatic transmission fluid. u Inspect front and rear brakes. (1) u Lube pitman arm and steering stops.
(1) If your driving habits include continuous stop-and-go driving or driving in hilly areas, more...
Scheduled Maintenance Guide 1st Printing - Page 21
... coolant strength every 15,000 miles (25,000 km) or 12 months. u Drain coalescent filter bowl (NGV only). u Inspect front and rear brakes. (1)
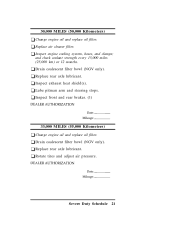
33,000 MILES (55,000 Kilometers)
u Change engine oil and replace oil filter. u Replace rear axle lubricant. u Lube pitman arm and steering stops.
u Replace air cleaner filter. u Inspect exhaust...
Scheduled Maintenance Guide 1st Printing - Page 25
...lubricant. u Inspect front and rear brakes. (1) u Lube pitman arm and steering stops. 60,000 MILES (100,000 Kilometers)
u Change engine oil and replace oil filter... tires and adjust air pressure.
63,000 MILES (105,000 Kilometers)
u Change engine oil and replace oil filter. u Inspect exhaust heat shield(s). u Change automatic transmission fluid. u Replace air cleaner filter. u Replace PCV valve....
Scheduled Maintenance Guide 1st Printing - Page 29
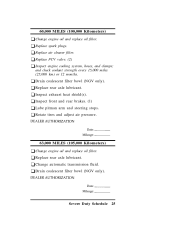
u Replace air cleaner filter.
u Inspect exhaust heat shield(s). u Inspect front and rear brakes. (1) u Lube pitman arm and steering stops.
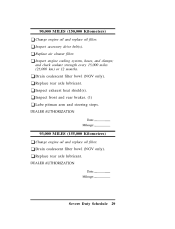
93,000 MILES (155,000 Kilometers)
u Change engine oil and replace oil filter. Severe Duty Schedule 29
u Replace rear axle lubricant. u Replace rear axle lubricant. u Drain coalescent filter bowl (NGV only). u Inspect ...
Scheduled Maintenance Guide 1st Printing - Page 33
... rear axle lubricant. Severe Duty Schedule 33 u Inspect exhaust heat shield(s).
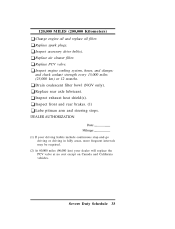
120,000 MILES (200,000 Kilometers)
u Change engine oil and replace oil filter. u Inspect accessory drive belt(s).
u Replace spark plugs. u Inspect front and rear brakes. (1) u Lube pitman arm and steering stops.
(1) If your driving habits include continuous stop-and-go driving...
Scheduled Maintenance Guide 1st Printing - Page 35
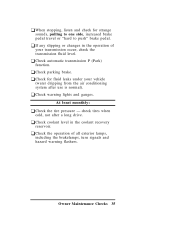
u If any slipping or changes in the coolant recovery u Check the operation of u Check automatic transmission P (Park) u Check parking brake.
u Check coolant level in ... use is normal). u Check for strange
sounds, pulling to one side, increased brake pedal travel or "hard to push" brake pedal.
function.
reservoir.
At least monthly:
(water dripping from the air conditioning ...
Similar Questions

What Fuse Is For The Radio In A 97 Crown Vic
(Posted by doccyndib 9 years ago)

What Kind Of Fuses To Get For Stereo In 97 Crown Vic
(Posted by gilLa 9 years ago)

What Is The Chime That I Am Hearing On The Passenger Side Of A 97 Crown Vic
after the fuel pump goes out
after the fuel pump goes out
(Posted by bjkada 9 years ago)