Fisher and Paykel DE70FA1 Support Question
Fisher and Paykel DE70FA1 Support Question
Find answers below for this question about Fisher and Paykel DE70FA1.Need a Fisher and Paykel DE70FA1 manual? We have 2 online manuals for this item!
Question posted by Tbeeble on August 8th, 2017
Reinstall Large Perforated Disk In Rear Of Dryer Drum
I removed the three hex screws that hold the large, reflective, perforated disk to the back of the dryer drum. I removed a large amount of accumulated lint that was between the disk and the circumference of the white-spoked rear plate of the drum. Now I can't reassemble it. I can line up the holes in the perforated disk to the spoked section of the drum, but it looks like it also has to screw the drum into the driving mechanism. How do I align all of these parts and set the hex screw
Current Answers
Related Fisher and Paykel DE70FA1 Manual Pages
DE08/09 DE70 Electric Dryer Install (English) - Page 1

...dryer to the outdoors is strongly recommended to Installer -
IMPORTANT - Note to prevent large amounts of moisture
and lint from vehicles.
IMPORTANT - A WARNING - Step 3
FOAM SHIPPING
PADS
PULL HERE TO SEPARATE FROM
REAR LEG
Remove...Remove and save literature and parts package
from dryer drum
Step 2
PULL HERE TO SEPARATE FROM
FRONT LEG
Lay carton corner posts or two 2"x4"
DRYER...
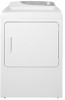
DE08/09 DE70 Electric Dryer Install (English) - Page 2
... (NOT PROVIDED)
GROUND TO GREEN GROUND SCREW ON CABINET REAR
3 #10 AWG MINIMUM COPPER
CONDUCTORS 30A 240V POWER SUPPLY CORD KIT MARKED FOR USE WITH DRYERS & PROVIDED WITH CLOSED LOOP TERMINALS (NOT SUPPLIED)
GROUND TO
GROUNDED METAL COLD WATER PIPE OR OTHER ESTABLISHED GROUND
1. CAUTION: DO NOT REMOVE INNER NUTS ON TERMINAL BLOCK TO...
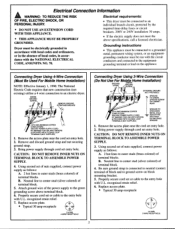
DE08/09 DE70 Electric Dryer Install (English) - Page 3
... be treated as shown. Detach and remove the desired knockout.
6. More than two...Rear Exhaust Location
This dryer comes ready for inspection and cleaning of the exhaust system, especially at the bottom of Joints
• All joints should be treated as one 90°.
Reconnect and secure the cut portion of back drafts and maintenance required to exhaust.
7. The accumulated lint...
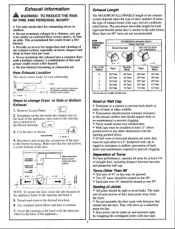
DE08/09 DE70 Electric Dryer Install (English) - Page 4
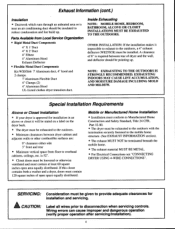
... approved for installation and servicing.
EXHAUSTING INDOORS MAY CAUSE LINT ACCUMULATION, AND MOISTURE DAMAGE INCLUDING MOLD AND MILDEW.
A clearance of dryer and the wall, and deflector should be louvered or ... will be stated on a label on the dryer back.
• The dryer must be exhausted to the outdoors.
• Minimum clearances between rear of 8" is near an air conditioning duct ...
Dryers DE70FA* & DG70FA* User Guide (English, Spanish) - Page 4
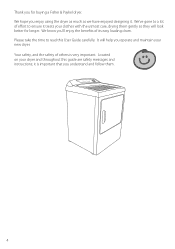
... is very important. Your safety, and the safety of its easy loading drum. It will help you enjoy using the dryer as much as we have enjoyed designing it treats your new dryer. Please take the time to ensure it . We hope you operate and maintain your clothes with the utmost care, drying...
Dryers DE70FA* & DG70FA* User Guide (English, Spanish) - Page 8
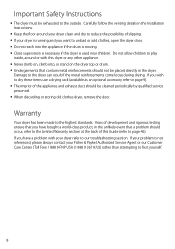
...64257;ed service personnel. ƒ When discarding or storing old clothes dryer, remove the door. Carefully follow the venting details in the dryer. If you have bought a world-class product, in the unlikely event... be exhausted to unload or add clothes, open the dryer door. ƒ Do not reach into , or stand on the dryer top or drum. ƒ Undergarments that you want to the outside....
Dryers DE70FA* & DG70FA* User Guide (English, Spanish) - Page 9
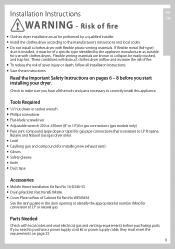
... Part No WE1M396 ƒ Cover Plate to Rear of a specific type identified by a qualified installer. ƒ Install the clothes dryer according to identify the appropriate kit number (Mxx) for use with clothes dryers. Flexible venting materials are known to collapse, ... (pipe dope or tape) for gas pipe connections that is installed, it must be easily crushed, and trap lint.
Dryers DE70FA* & DG70FA* User Guide (English, Spanish) - Page 10
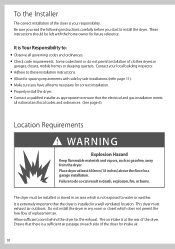
... above the floor for a garage installation. To the Installer
The correct installation of the dryer is your local building inspector. ƒ Adhere to these installation instructions. ƒ Allow ...all items necessary for the exhaust. The dryer must exhaust air outdoors. Place dryer at the rear of clothes dryers in a well ventilated location. This dryer must be left with side by side ...
Dryers DE70FA* & DG70FA* User Guide (English, Spanish) - Page 13
... that will accumulate lint. Do not use with a swing out damper to the outdoors. Never install a screen over the exhaust outlet.
305mm (12")
13
Thick wall flexible metal ducting may result in the United States, the required exhaust duct diameter is located and reduce the risk of wild life. The dryer must...
Dryers DE70FA* & DG70FA* User Guide (English, Spanish) - Page 14
...; The exhaust hood damper opens and closes freely and with the dryer running on the exhaust hood moves sufficiently and opens and shuts freely. Slope the duct gently downwards to the hood, to remove accumulated lint. Avoid sag or loops in the exhaust ducting does not exceed 250Pa (1 inch of water column...
Dryers DE70FA* & DG70FA* User Guide (English, Spanish) - Page 15
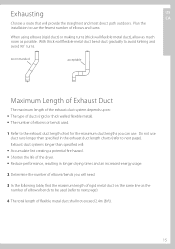
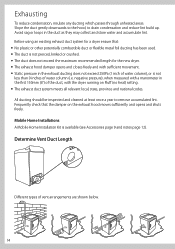
... length of rigid metal duct on the same line as possible. Exhausting
US
CA
Choose a route that will :
ƒ Accumulate lint creating a potential fire hazard. ƒ Shorten the life of the dryer. ƒ Reduce performance, resulting in the exhaust duct length charts (refer to next page). Plan the
installation to use . Do...
Dryers DE70FA* & DG70FA* User Guide (English, Spanish) - Page 17
... previously to
Portion "A"
the blower housing.
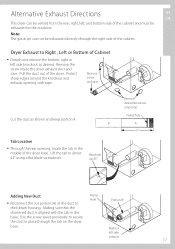
Remove the screw inside the dryer exhaust duct and save
Cut the duct as desired. Right or
left side knockout as shown and keep portion A. Note: The gas dryer can be vented from the rear, right, left, and bottom side of the cabinet and must be exhausted directly through...
Dryers DE70FA* & DG70FA* User Guide (English, Spanish) - Page 18

...around joint.
ƒ Insert duct assembly, elbow first, through the rear opening and connect it to the dryer internal duct. Exhaust can be added to Right or Left Side of Cabinet
...
ƒ Apply duct tape as shown on the joint between the dryer internal duct and the elbow. Adding Cover Plate to Rear of Cabinet
ƒ Insert the elbow through the side opening with 100mm (4") ...
Dryers DE70FA* & DG70FA* User Guide (English, Spanish) - Page 19
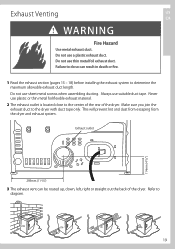
...section (pages 13 - 18) before installing the exhaust system to the center of the rear of the dryer. Never use plastic or thin metal foil flexible exhaust material.
2 The exhaust...lint and dust from escaping from the dryer and exhaust system. Exhaust Venting
US
CA
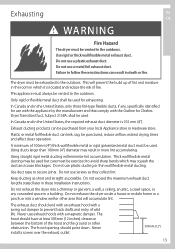
WARNING
Fire Hazard
Use metal exhaust duct. Do not use sheet metal screws when assembling ducting. Refer to the dryer...
Dryers DE70FA* & DG70FA* User Guide (English, Spanish) - Page 20

... away from Dryer Legs
Tilt the dryer sideways and remove the foam shipping pads by side installation, this will ensure the appliance arrives in a suitable location for installation. Consider installing the dryer before the washing machine in a side by pulling at the customer's premises. Installation
Parts and literature are packaged inside the dryer drum. WARNING
Excess...
Dryers DE70FA* & DG70FA* User Guide (English, Spanish) - Page 22
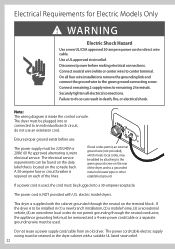
... . If the dryer is required on the terminal block. The dryer must be plugged...dryers.
This dryer is located on the rear of the lines. Do not reuse a power supply cord/cable from an old dryer. Failure to do not permit grounding through the neutral on each of the dryer, and to the green ground screw...the appliance grounding link must be removed and a 4-wire power cord/...
Dryers DE70FA* & DG70FA* User Guide (English, Spanish) - Page 24
... relief.
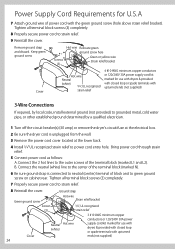
9 Reinstall the cover. Keep green ground screw
Screws (3)
Hot wire Relocate green
ground screw here
L1 N
Green or yellow wire
L2
Strain relief bracket
Cover
Hot wire Neutral
(white) /", UL recognized
strain relief
4 #10 AWG minimum copper conductors or 120/240V 30A power supply cord kit marked for use with dryers & provided with...
Dryers DE70FA* & DG70FA* User Guide (English, Spanish) - Page 27
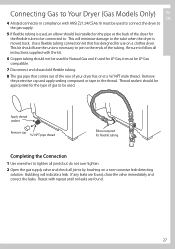
... that has designed for LP Gas, it a /" NPT male thread. Apply thread sealant
Remove cap /" NPT pipe thread
Elbow required for the flexible tube to be connected to... a flexible tubing connection kit that comes out of the rear of your dryer has on the pipe at the back of the dryer for flexible tubing
Completing the Connection
1 Use wrenches to...
Dryers DE70FA* & DG70FA* User Guide (English, Spanish) - Page 29
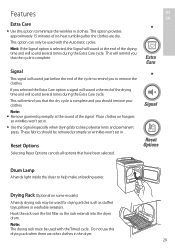
... during the Extra Care cycle. If you that the cycle is complete. These fabrics should remove your clothes.
Drying Rack (Optional on hangers
so wrinkles won 't set in . Note:... Extra Care cycle.
Hook the rack over the lint filter so the rack extends into the dryer drum. Drum Lamp
A handy light inside the dryer to remove the clothes.
Place clothes on some models)
...
Dryers DE70FA* & DG70FA* User Guide (English, Spanish) - Page 42
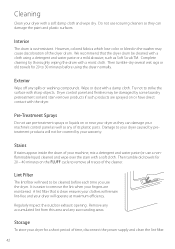
... cleaners as they can damage the paint and plastic surfaces.
Storage
To store your dryer with a moist cloth. Cleaning
Clean your dryer for a short period of time, disconnect the power supply and clean the lint filter.
42 Remove any accumulated lint from this area and any spills or washing compounds. Exterior
Wipe off any surrounding...
Similar Questions

My Dryer Doesn't Stay Running I Can Turn It On And It'll Spin For 30 Seconds
The dryer will turn on and run for 30 seconds the. Shut off and it gives me 151 error code what does...
The dryer will turn on and run for 30 seconds the. Shut off and it gives me 151 error code what does...
(Posted by Ericnev1 3 years ago)

I Have A Fisher And Paykel De7027g1 Dryer And I Am Getting Code 151
My DE7027G1 dryer has code 151 displayed and will not shut off. I disconnected the power and unplugg...
My DE7027G1 dryer has code 151 displayed and will not shut off. I disconnected the power and unplugg...
(Posted by artcartier 5 years ago)

Dryer Mod De70fa1 Timer Question.
The Dryer Is A Few Years Old But It Will Not Completely Dry Clothes On The ''auto Cotton'' Cycle. It...
The Dryer Is A Few Years Old But It Will Not Completely Dry Clothes On The ''auto Cotton'' Cycle. It...
(Posted by elcaminoman863080 6 years ago)

Where Can I Locate A Schematic For The Above Referenced Dryer
Is a schematic available for the above referenced dryer
Is a schematic available for the above referenced dryer
(Posted by nancylmaynard 8 years ago)

Electric Dryer Continuously Runs
My fisher & paykel electric dryer DE70FA1 model continuously runs in all the cycles except for t...
My fisher & paykel electric dryer DE70FA1 model continuously runs in all the cycles except for t...
(Posted by scibowendy 9 years ago)