Epson Artisan 700 Support Question
Epson Artisan 700 Support Question
Find answers below for this question about Epson Artisan 700.Need a Epson Artisan 700 manual? We have 7 online manuals for this item!
Question posted by dawnykerr on March 26th, 2012
Auto Duplexer Has Been Removed
The person who posted this question about this Epson product did not include a detailed explanation. Please use the "Request More Information" button to the right if more details would help you to answer this question.
Current Answers
Related Epson Artisan 700 Manual Pages
Network Installation Guide - Page 29
... settings.
1.
Press r, then press Network Settings.
WorkForce 600 Series and Artisan 700 Series:
Artisan 800 Series:
Press l or r to the Home menu, then select ...Artisan 800 Series:
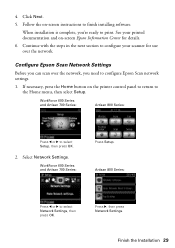
Press l or r to finish installing software. Click Next.
5. When installation is complete, you need to print. WorkForce 600 Series and Artisan 700 Series:
Press Setup.
4. Follow the on the printer...
Network Installation Guide - Page 30
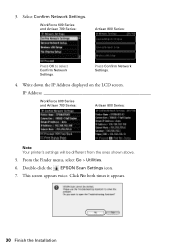
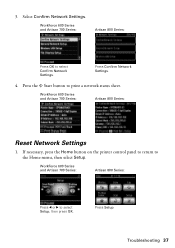
... the Installation Press Confirm Network Settings.
4.
Write down the IP Address displayed on the LCD screen. IP Address
WorkForce 600 Series and Artisan 700 Series:
Artisan 800 Series:
Note: Your printer's settings will be different from the ones shown above.
5. WorkForce 600 Series and Artisan 700 Series:
Artisan 800 Series:
Press OK to select Confirm Network Settings. 3.
Network Installation Guide - Page 36
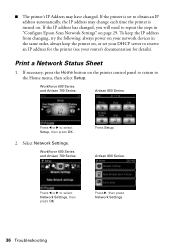
... address has changed, you will need to obtain an IP address automatically, the IP address may have changed.
If the printer is turned on page 29. WorkForce 600 Series and Artisan 700 Series:
Artisan 800 Series:
Press l or r to select Network Settings, then press OK. Press r, then press Network Settings.
36 Troubleshooting Print a Network...
Network Installation Guide - Page 37
.... Troubleshooting 37
WorkForce 600 Series and Artisan 700 Series:
Artisan 800 Series:
Press l or r to print a network status sheet.
WorkForce 600 Series and Artisan 700 Series:
Artisan 800 Series:
Press OK to the Home menu, then select Setup.
Select Confirm Network Settings. If necessary, press the Home button on the printer control panel to return to select...
Network Installation Guide - Page 38
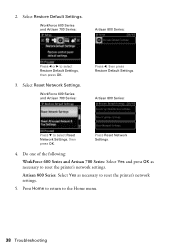
... Restore Default Settings. Select Reset Network Settings. Do one of the following:
WorkForce 600 Series and Artisan 700 Series: Select Yes and press OK as necessary to reset the printer's network settings.
5. WorkForce 600 Series and Artisan 700 Series:
Artisan 800 Series:
Press l or r to the Home menu.
38 Troubleshooting
Press Reset Network Settings.
4. Press Home...
Product Brochure - Page 1

...8226; Perfect photos made easy - copy documents, receipts, recipes and more exclusive benefits - Artisan™ 700
Print | Copy | Scan | ULTHRDAPhoto | Wi-Fi®
Ideal for product protection you... personal and business needs. built-in image quality
• Save paper - Auto Photo Correction and red-eye removal
• Quality color copies - always ready to 38 ppm (black/color...
Product Brochure - Page 2

...174; or Intel® processor)
Epson printer driver, Epson Print CD, Web to Page, Epson Scan, ArcSoft®...support with product registration3
Bluetooth® photo print adapter Duplexer for 2-sided printing2
Artisan 700 photo all -in-one 98 High-capacity Black ...99 copies (PC-free)
8.5" x 11.69" (PC-free)
Auto background removal for text, Fit to page, Reduction and enlargement (25 - 400...
Start Here - Page 2

...
1 Connect the power cable. Caution: Do not connect to your Artisan 700 Series, always press the Unlock button to lower the control panel.
3 Install ink cartridges
Note: Don't load paper before installing the ink cartridges.
1 Lift up the scanner.
2 Unpack the ink cartridges.
3 Remove only the yellow tape from each cartridge.
Caution: Don...
Start Here - Page 3

... back the photo tray and lift it up. Caution: Don't turn off the Artisan 700 Series while the ink system is initializing or you'll waste ink.
4 Select ...Printer Setup, then press OK.
4 Press to select Language, then press OK.
5 Press or to change the language, press the Home button until Setup
is used for priming the Artisan 700 Series. Charging takes about 5 minutes.
Note: Your Artisan 700...
Start Here - Page 6
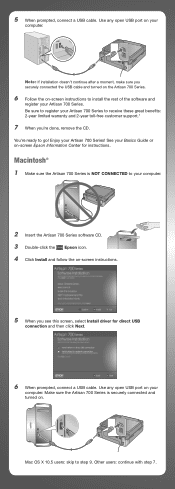
... doesn't continue after a moment, make sure you 're done, remove the CD. Mac OS X 10.5 users: skip to go!
You're ready to step 9.
Use any open USB port on -screen instructions to install the rest of the software and
register your Artisan 700 Series to your
computer. Other users: continue with step...
Start Here - Page 7

... When you see this screen, click Add Printer.
Basics Guide Easy and quick answers to common problems. You can also purchase paper and ink. Epson Technical Support Internet Support Visit Epson's support website at epson.com/support and select your product for solutions to your Artisan 700 Series. Toll or long distance charges...
Basics Guide - Page 5

... status light flashes rapidly, check the control panel for error messages. Caution: To avoid damaging the Artisan 700 Series, always press the the control panel. Using the Control Panel 5 Don't try to lower
Display/Crop
View Auto Correct
Stop/Clear Settings
Blue status light
■ To save energy, the LCD screen goes dark...
Basics Guide - Page 18

... icon on -screen Epson Information Center.)
2. Pull the card straight out of photos to remove the card:
1.
Make sure the memory card access light is flashing; See your photos. After you may lose data on .
3. If the Artisan 700 Series is connected to your photos, follow these requirements:
File format Image size Number...
Basics Guide - Page 19

.... 2.
Insert your USB flash drive or the USB cable for your external drive into your drive, if necessary. 4.
Note: Before removing your Artisan 700 Series.
3. Note: Epson cannot guarantee the compatibility of your USB drive, make sure its access light is not flashing. Insert storage media (such as a USB ...
Basics Guide - Page 34

Select EPSON Artisan 700 Series, then click the Preferences or Properties button. On the Main tab, select the basic print settings. For details, see page 39). To reduce or remove red-eye effects ... From Your Computer For more information about print settings, click Help or see a Setup, Printer, or Options button, click it. Then click Preferences or Properties on -screen Epson Information ...
Basics Guide - Page 40

Note: For detailed instructions on two-sided printing and installing or removing the auto duplexer, see the on both sides of the page automatically. For this paper/media
...Epson Information Center.
40 Printing From Your Computer With Windows, you can configure the printer software and perform two-sided printing even if you don't have the optional auto duplexer, you have the auto duplexer.
Basics Guide - Page 41

... printing setting if you've installed the auto duplexer, or Manual if you don't have the auto duplexer.
Select Auto as necessary.
3. Two-sided Printing 41 Windows
Follow the Windows printing instructions beginning on plain paper and you start printing. 1. Note: When you use the Manual setting, the printer software will prompt you to reduce the...
Basics Guide - Page 42

...window.
3.
If you're printing on plain paper and you notice that the auto duplexer is not installed, open EPSON Printer Utility3 (in the Applications folder on page 35 (Mac OS X 10.5) or ...beginning on your hard drive), select Artisan 700 Series, click OK, click the Printer and Option Information button, and click OK again. Select Auto Duplex Printing Settings from the pop-up menu Click here
...
Basics Guide - Page 52

... control panel when copying or printing (see page 16), or in your printer software (see page 39).
■ Make sure your original away from sleep mode. Open the scanner and remove paper as shown, including any button to wake the Artisan 700 Series from the edges slightly.
■ If you solve the problem, check...
Basics Guide - Page 53

... scanner.
4.
See the on ink. Then remove the paper as the paper cassette, the back cover or auto duplexer (if installed), and underneath the Artisan 700 Series. Check your printouts or they are too...cleaning.
■ If you notice jagged vertical lines, you may need to remove the cover inside the Artisan 700 Series. Problems and Solutions 53 Pull back on -screen Epson Information Center ...
Similar Questions

How To Remove Auto Duplexer For Epson Artisan 710 All-in-one Printer
(Posted by stuasphe 9 years ago)


Epson Artisan 1430 Inkjet Printer How Much Ink Coverage
(Posted by jayiMo 9 years ago)

How Do You Reset The Auto Duplexer On The Artisan 700?
(Posted by manuellinda 12 years ago)