Electrolux E42BS75EPS Support Question
Electrolux E42BS75EPS Support Question
Find answers below for this question about Electrolux E42BS75EPS - 42" - Refrigerator.Need a Electrolux E42BS75EPS manual? We have 3 online manuals for this item!
Question posted by EKYOMS on July 4th, 2012
Have Had Motherboard Replaced Twice, However Still Unit Will Only Work 24hrs.
HAVE HAD MOTHER BOARD REPLACED TWICE IN LAST MONTH, HOWEVER STILL UNIT WILL ONLY WORK 24 HOURS, THEN STOPS COOLING. NO WATER LEAKS. REPAIR TECHS SAY THERE IS NOTHING ELSE THEY CAN DO. UNIT ONLY 3 YEARS OLD AND COST 7,000. NEED HELP
Current Answers
Related Electrolux E42BS75EPS Manual Pages
Specification sheet - Page 1
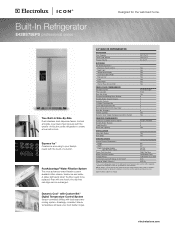
... cleaner, fresher ice and water. Ft. EXTERIOR Ice / Water Dispenser - Appliance must be exchanged.
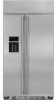
42" BUILT-IN REFRIGERATOR
CAPACITIES Total Capacity Fresh Food Volume Freezer Volume
25.2 Cu.
electroluxicon.com Ft. 9.6 Cu. Amazingly consistent interior temperature will keep your family's needs with the touch of this slim profile refrigerator to be replaced, then with one touch...
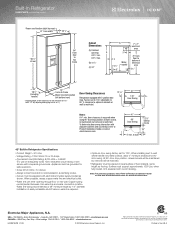
Specification sheet - Page 2
... water line and water connection location. Unit equipped with a separate ground wire.
Built-In Refrigerator
E42BS75EPS ... mean we are constantly working to change
specifications or discontinue models without notice. Printed in water line required.
• ... 7/8" behind frame
24" 4" min. At 90° door stop position, drawer access will be restricted.
• Refrigerator must be placed...
Owners Guide - Page 1
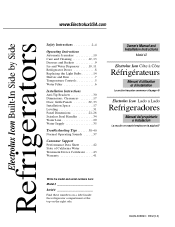
...Baskets 9 Ice and Water Dispenser . . . . .10, 11 Refrigerator Doors 8 Replacing the Light Bulbs 14 Shelves and Bins 7 Temperature Controls 5 Water Filter 6
Installation Instructions...37
Consumer Support
Performance Data Sheet 42 State of California Water Treatment Device Certificate . . . . .43 Warranty 41
Owner's Manual and Installation Instructions
Model 42
Electrolux Icon Côte &#...
Owners Guide - Page 4
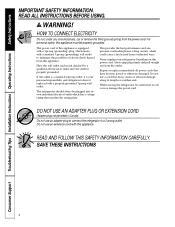
... third (ground) prong from overheated wires.
Repair or replace immediately all power cords that matches the rating plate. READ AND FOLLOW THIS SAFETY INFORMATION CAREFULLY. Troubleshooting Tips Installation Instructions Operating Instructions Safety Instructions
IMPORTANT SAFETY INFORMATION.
Do not use an adapter plug to connect the refrigerator to make sure the outlet is...
Owners Guide - Page 5
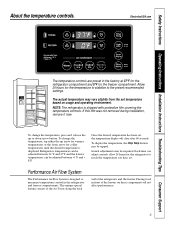
... Disp Temp button may be required. Each time you adjust controls, allow 24 hours for the temperature to stabilize to maximize temperature control in the refrigerator and freezer compartments.
Several adjustments may be adjusted between -6 °F and + 8°F. NOTE: The refrigerator is designed to the preset recommended settings. Once the desired temperature has been...
Owners Guide - Page 6

... ejection button
Insert the new filter with approximately 1 lb. Run water from the filtration system or no water will not operate without the filter.
of water to Install
Water Filter Cartridge
The water filter is not seated properly, water may leak from the dispenser for 3 seconds. Replacement Filters:
To order additional filter cartridges in the upper right side...
Owners Guide - Page 7

...sure that items do not block or fall into position. Refrigerator bins
Refrigerator Door Bins and Freezer Door Bins
All door bins, except for cleaning. To replace or relocate: Engage the back side of the snugger ...up at rear of the bin. Then lower front of shelf until it up and out of refrigerator. The deep gallon door bin and the freezer bins can be removed for the deep gallon door...
Owners Guide - Page 9
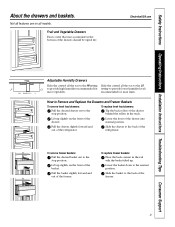
... humidity levels recommended for most fruits. Lower the basket down to the stop position.
Lift up slightly on the front of the drawer. Fruit and Vegetable Drawers
Excess water that may accumulate in the bottom of the refrigerator.
How to Remove and Replace the Drawers and Freezer Baskets
To remove fresh food drawers:
Pull...
Owners Guide - Page 10

.... To replace:
Slide the bin back until the tab on the bin locks into the slot on . Important facts about 45 minutes before the water connection is not used frequently, old ice cubes will stop producing ice.
This happens occasionally when a few cubes accidentally get directed to begin making ice. If the refrigerator is...
Owners Guide - Page 11
...hours or until you close the door.
11
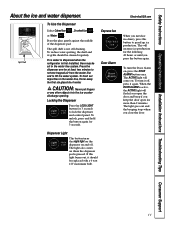
To flush out impurities in the water line system.
The light also comes on , press the DOOR ALARM button once.
Locking the Dispenser
Press the LOCK/LIGHT button for more than 2 minutes.
If no water is dispensed when the refrigerator...beeping stops when you press the button again. Press the glass gently against the middle of water.
To...
Owners Guide - Page 13
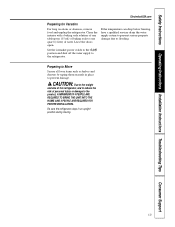
... baking soda to one quart (1 liter) of personal injury or damage to reduce the risk of water.
CAUTION: Due to the weight
and size of this refrigerator, and to the product, A MINIMUM OF 4 PEOPLE ARE REQUIRED TO BRING THE UNIT INTO THE HOME AND 2 PEOPLE ARE REQUIRED FOR PROPER INSTALLATION. Be sure the...
Owners Guide - Page 14
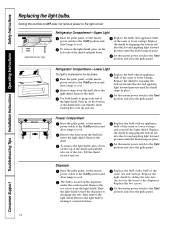
... and pull the tabs out of the slots. Refrigerator Compartment-Lower Light
This light is located in place.
Remove the shelf. Press in place. Replace the shield by engaging the bottom tab into the... grille panel, set the master power switch to the O (off ) position and allow lamps to cool.
Slide the light shield toward the dispenser to grasp each end of the shield with your thumbs while...
Owners Guide - Page 15
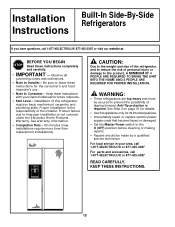
... Immediately repair or replace electric power
supply cords that become frayed or damaged. • Set the Master Power switch to the
O (OFF) position before cleaning or making repairs. • Repairs should ...PEOPLE ARE REQUIRED TO BRING THE UNIT INTO THE HOME AND 2 PEOPLE ARE REQUIRED FOR PROPER INSTALLATION. KEEP THESE INSTRUCTIONS.
15 Installation of this refrigerator, and to reduce the risk ...
Owners Guide - Page 17
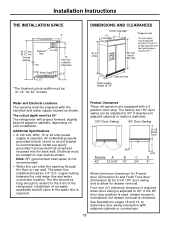
...refrigerator. Installation of an easily accessible shutoff valve in the water line is restricted.
130° Door Swing
90° Door Swing
A
B
23-7/8" Behind Frame
D
Models A
B
C
42″ 12-3/16″ 16″ 24...
If the 90° door stop . See illustrations, pages 18 and 19, to determine door swing interaction with the electrical and water supply located as shown. Install ...
Owners Guide - Page 21
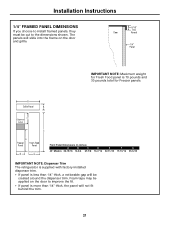
A
Grille Panel
B
Dispenser F
Cutout
C
G
Freezer Panel
Fresh Food Panel
D
E
Front Panel Dimensions (in inches)
A
B
C
42″ Models 39-15/16 10-3/4 67-7/8
D 16-7/16
E 22-11/32
F 17-13/16
G 35-5/32
IMPORTANT NOTE: Dispenser Trim
The refrigerator is supplied with factory installed dispenser trim.
• If panel is 70 pounds and 30...
Owners Guide - Page 27
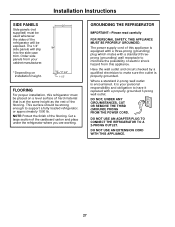
... loaded refrigerator, or approximately 1500 lb.
Installation Instructions
SIDE PANELS
Side panels (not supplied) must be placed on installation height.
24"
*84"
*3" to have it replaced with ...refrigerator where you are working.
DO NOT USE AN ADAPTER PLUG TO CONNECT THE REFRIGERATOR TO A 2-PRONG OUTLET.
Cut a large section of the flooring.
Order side panels from this refrigerator...
Owners Guide - Page 35

...water on by opening refrigerator door to see if interior lights are preset at 37° for the Fresh Food section and 0° for the Freezer section.
• Allow 24 hours to flush debris from the water... stabilize before making adjustments.
• Dispense water for leaks.
Refrigerator Water Supply
House Water Supply
• Locate and bring tubing to the front of
copper tubing.
Owners Guide - Page 38
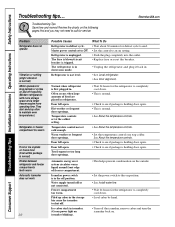
... outlet. •Replace fuse or reset the breaker.
•Unplug the refrigerator and plug it back in the off the icemaker, remove cubes and turn the icemaker back on.
Door left open .
Freezer compartment too warm.
Temperature controls set to the on position. • See Install water line. • Wait 24 hours for service. Icemaker...
Owners Guide - Page 39
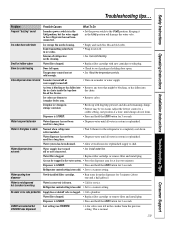
... a long time.
• Dispense water until all water in the water system. • Press the dispenser arm for the refrigerator to icemaker feeler arm.
• Remove cubes.
Water in system is first installed.
• Wait 24 hours for at a time, until clumps do not form. Water dispenser does not work Icemaker turned off or water supply turned off.
• Turn...
Owners Guide - Page 40

... cleaning. Door gasket on .
replace every three months. • See Care and cleaning. •Apply paraffin wax to the face of refrigerator
Refrigerator never shuts off after the door remains closed for system to refrigerator. • Allow 24 hours for 2 hours. The refrigerator will cycle off , but the temperatures are opened) Interior light does not work
Water on kitchen floor or...
Similar Questions

5 Year Old Electrolux Side By Side Refrigerator How To Open And Replace Ice And
water dispenser arm
water dispenser arm
(Posted by kolydp 9 years ago)

How To Reset Frdge To Work Properly After A Balckout ?
(Posted by joejtna 10 years ago)

Can I Make The Alarm Stop Beeping Until I Can Replace The Control Board?
I need to replace my control board is there a way to make it stop beeping until i get the control re...
I need to replace my control board is there a way to make it stop beeping until i get the control re...
(Posted by kensydow 11 years ago)

Refrigerator Won't Run After Board Replacement
(Posted by debbiedeeds 12 years ago)

Water Draining Inside Refrigerator Compartment
I constantly have water dripping down the back of the refrigerator compartment. It drips from the to...
I constantly have water dripping down the back of the refrigerator compartment. It drips from the to...
(Posted by wanroberts 12 years ago)