Electrolux E36EC65ESS Support Question
Electrolux E36EC65ESS Support Question
Find answers below for this question about Electrolux E36EC65ESS - Icon 36"Drop-in Electric Cooktop.Need a Electrolux E36EC65ESS manual? We have 4 online manuals for this item!
Question posted by louisvigo on October 29th, 2010
One Of My Heating Elements Wont Turn Off.
When I turn the knob to "off" it read 2.4. I tired to turning it on and off several times and it never turns off
Current Answers
Related Electrolux E36EC65ESS Manual Pages
Specification sheet - Page 1

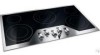
..., 120 / 240 V or 120 / 208 V, 60 Hz, fused on both sides of line with a wide variety of this 36" cooktop is flat, smooth and easy to clean and maintain, with an Electrolux ICON® Downdraft Vent. Electric Drop-In Cooktop
E36EC65ESS
5 Element Configuration The versatility of pan sizes. PN # 903061-9010
Optional
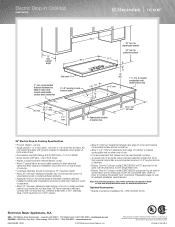
SPECIFICATIONS Overall Exterior Dimensions -
electroluxicon.com
Specification sheet - Page 2
....com for detailed instructions.
Electric Drop-In Cooktop
E36EC65ESS
36 3/4"
13" max. for protected surface
4" 18" min.
6" min.
7 1/2" min.
cabinet depth
36 3/4"
Side inset 3/8"
2".... • Electric Drop-In Cooktop model E36EC65ESS is NOT approved to be used over any Electrolux ICON® Single Wall Oven. • Electric Drop-In Cooktop model E36EC65ESS is recommended that...
Specification sheet - Page 3
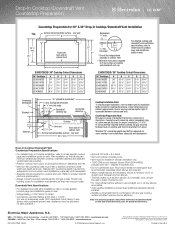
...E 24 3/16" 24 1/16" 23 11/16" 23 9/16" 24 5/16"
E36DD75ESS / 36" Cooktop Cutout Dimensions
36" Cooktops E36EC65ESS E36EC70FSS E36GC65ESS E36GC70FSS E36IC80ISS
A
36" 36" 33 3/4" 34 1/2" 36"
B 33 3/4" 33 3/4" 33 3/4" 33 3/4" 33 3/4"
C 20 3/8" 20 1/2" 19 ...-
Refer to product-specific electrical specifications.)
• Always consult local and national electric and gas codes. Electrolux ...
Owners Guide - Page 1

B Use & Care Guide
Electric Cooktop
Dishwasher
318 200 625 (0505) Rev.
Owners Guide - Page 4
... your electric cooktop, follow all instructions given. Install only per installation instructions provided in the manuals. Do not allow children to the cooktop. WARNING
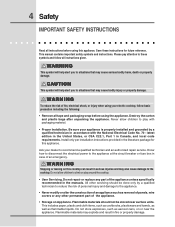
To reduce the risk of the appliance unless specifically recommended in the literature package for future reference. Do not store explosives, such as flammable liquids. 4 Safety
IMPORTANT SAFETY INSTRUCTIONS
Read...
Owners Guide - Page 5
... be hot even though they have had sufficient time to hood manufacturer's instructions for warming or heating the room.
• Do Not Use Water or Flour on any part of a pot holder.
• Do Not Heat Unopened Food Containers. This appliance is not turned off the cooktop. Safety 5
CAUTION
Do not store items of grease...
Owners Guide - Page 6
...Turned Inward and Not Extend Over Adjacent Surface Units. Boilovers cause smoking and greasy spillovers that may scratch the cooktop...cooktop surface. If an element is used as recommended for future reference. FOR CERAMIC-GLASS COOKTOP ONLY • Do Not Clean or Operate a Broken Cooktop... if the hot covers are suitable for cooktop use of electric shock or fire or short circuit.
&#...
Owners Guide - Page 7
...
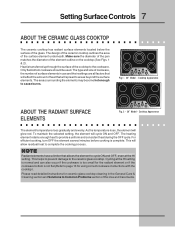
Fig.1 - 30" Model - For efficient cooking, turn OFF the element several minutes before cooking is transferred up through the surface of this Use and Care Guide. Cooktop Appearance
ABOUT THE RADIANT SURFACE ELEMENTS
ELEMENT ON
ELEMENT ON
Fig. 2 - 36" Model - As the temperature rises, the element will cycle ON and OFF. Please read detailed instructions for using correct cookware...
Owners Guide - Page 10

... SURFACE RADIANT ELEMENTS
ELEMENT ON
ELEMENT ON
Fig. 1
ELEMENT ON
ELEMENT ON
Fig. 2
The cooktop has single radiant surface elements at 2 locations; When cooking has completed, turn the surface control knob in the display after they have cooled after turning the control knob to glow until the heating surface area has cooled sufficiently.
Turn the knob to finish cooking...
Owners Guide - Page 11
.... The glass surface may still be cooled after turning the control knob to glow until the heating surface area has cooled sufficiently. When cooking has completed, turn ON and will glow when one or more elements are equipped with dual radiant surface elements located at any time during cooking. NOTE
See the Recommended Setting for larger cookware...
Owners Guide - Page 12
... the ESEC digital display window for Surface Elements chart, on .
When cooking has completed, turn ON and will heat. 12 Setting Surface Controls
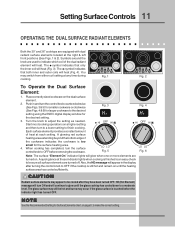
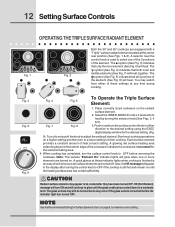
OPERATING THE TRIPLE SURFACE RADIANT ELEMENT
ELEMENT ON
ELEMENT ON
Fig. 1
ELEMENT ON
ELEMENT ON
Fig. 2
Both the 30" and 36" cooktops are equipped with a "Triple" surface radiant element located at each setting. Push in the...
Owners Guide - Page 13
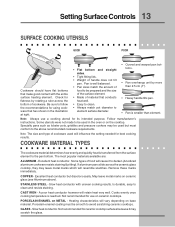
... sure to follow the recommendations for using cookware that has shown in the oven or on the cooktop. Excellent heat conductor. Remove these marks immediately. STAINLESS STEEL - Slow heat conductor with the entire surface heating element. CAST IRON - Slow heat conductor. Some utensils were not made to clean and resists staining. The most popular materials avalaible...
Owners Guide - Page 15
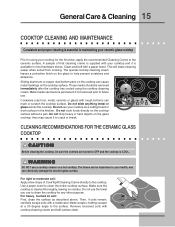
... your health, and can be sure the controls are turned to clean the cooktop for the first time, apply the recommended Cleaning Creme to the surface. Do not slide anything metal or
ELEMENT ON
ELEMENT ON
glass across the cooktop. Do not use the towel you use your cooktop as described above. Remove loosened soils with a paper...
Owners Guide - Page 17
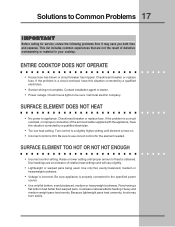
...electric company. If the problem is properly connected to appliance. Be sure appliance is a circuit overload, or improper connection of heat is incorrect. Because lightweight pans heat unevenly, foods may save you both time and expense. Solutions to Common Problems 17
I M P O R TA N T
Before calling for the element... or material in your cooktop. ENTIRE COOKTOP DOES NOT OPERATE
•...
Owners Guide - Page 20
...Smoothtop,
Seal & Elements)
Provide a replacement for any defective surface heating element, deteriorated rubberized-silicone... Puerto Rico, and Canada.
LIMITED
Time periods listed
WARRANTY
above and the exclusion...product. 2. 20 Warranty Information
COOKTOP WARRANTY Your cooktop is protected by this limitation...from original Pay all local plumbing, electrical and/or gas codes. 3.Proper...
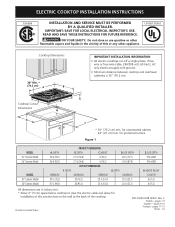
Installation Instructions - Page 1
...
21 ½ (54.6)
4 (10.2)
CUT OUT DIMENSIONS
f. C English -
WIDTH 30 ¾ (78.1) 36 ¾ (93.3)
MINIMUM 29 5/8 (75.2) 35 5/8 (90.5)
PRODUCT DIMENSIONS
B. hEIGHT BELOW COOKTOP 6 (15.2) 6 (15.2)
All dimensions are in United States
P/N 318201428 (0901) Rev. ELECTRIC COOKTOP INSTALLATION INSTRUCTIONS
Canada
INSTALLATION AND SERVICE MUST BE PERFORMED BY A QUALIFIED INSTALLER...
Installation Instructions - Page 2
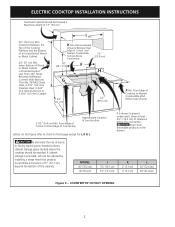
... K 2'' (5.1 cm) 2'' (5.1 cm)
L 30'' (72.6 cm) 36'' (91.4 cm)
Figure 2 - Recommended
Distance Between Rear Edge of Junction ... fire by reaching over heated surfaces, cabinet storage space located above the cooktop should be reduced by ....5 cm) of 13" (33 cm)
30" (76.2 cm) Min. ELECTRIC COOKTOP INSTALLATION INSTRUCTIONS
Overhead Cabinet Should Not Exceed a Maximum Depth of clearance below the...
Installation Instructions - Page 3
...the cooktop 2.
Figure 3
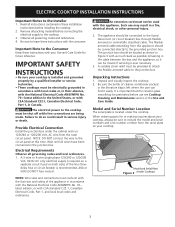
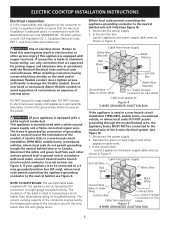
3 Read all governing codes and local ordinances. 1. NOTE: DO NOT connect the wire to do so could result in the United States, or with the National Electrical Code ... or making inquires about your cooktop. Be sure to the grounded junction box.
Electrical Requirements
Observe all instructions contained in Figure 3 with this time. latest edition, or with the...
Installation Instructions - Page 4
... rather than temperature rating of household wiring.
Connect the ground wire before turning on the steel and/or aluminum flexible conduit, do not permit grounding through...) wire (US Only) (see figure 5): 1. Disconnect the power supply. 2. ELECTRIC COOKTOP INSTALLATION INSTRUCTIONS
Electrical connection
It is the responsibility and obligation of the consumer to contact a qualified installer...
Installation Instructions - Page 5
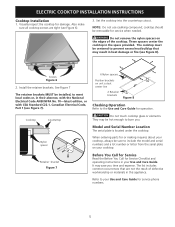
... Figure 6
2.
Before You Call for Service
Read the Before You Call for or making inquires about your cooktop, always be sure to prevent excess heat buildup that are tight (see Figure 7). Set the cooktop into the countertop cutout. CAUTION Do not touch cooktop glass or elements. ELECTRIC COOKTOP INSTALLATION INSTRUCTIONS
Cooktop Installation
1. WARNING Do not remove the nylon...
Similar Questions


I Coudn't Turn The Burners On Because The Stem That Holds The Knob Got Stuck....
(Posted by thelistingladyoh 11 years ago)

Can An Oven Be Installed Beneath A 36' Electrolux Drop In Cook Top?
(Posted by Anonymous-61330 11 years ago)

What Size Ventilation Hood Do I Need To Buy For A 36 Inch Gas Cooktop? 36 Or 42
(Posted by cweskamp 12 years ago)

One Burner Comes On, Heats Up, Then Shuts Off. It Won't Come Back On And The He
(Posted by sherryk333 13 years ago)