Get support for Electrolux E15IM60GSS - Icon Designer - 15

Electrolux E15IM60GSS Support Question

Electrolux E15IM60GSS Support Question

Find answers below for this question about Electrolux E15IM60GSS - Icon Designer - 15" Ice Maker.
Need a Electrolux E15IM60GSS manual? We have 2 online manuals for this item!
Question posted by ginamaslach on March 27th, 2014
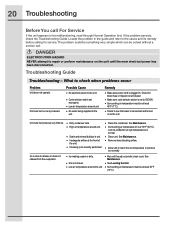
Not Making Ice

Hello, our ice maker stopped making ice and we have no idea why.

Current Answers

Answer #1: Posted by OnlineOutreachSpecialist on March 28th, 2014 9:07 AM
This answer was accepted by the poster of the original question.
OnlineOutreachSpecialist

Member since:
March 30th, 2011

Points: 2,848,320
1,100
points
Good Morning Ginamaslach,

I see that your Electrolux Icon ice maker, model# E15IM60GSS, is not producing ice. What I would recommend checking first, is that the water is definitely still hooked up and turned on. Next you can try to give the ice maker a hard reset. You will do this by shutting the power off at the circuit breaker for at least 2-3 minutes. Once the time has passed you will turn the power back on. It will take at least 2-4 hours before unit will start producing ice. Lastly, you would want to make sure that you are cleaning the appliance regularly as suggested in the manual. Not cleaning it, especially the inside and the coils, can cause the unit to not make ice. Below are some cleaning tips for your ice maker.

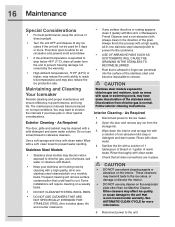
Condenser Cleaning — Every 3 Months

To maintain operational efficiency, clean the condenser every three months (depending on environmental conditions, more or less frequent cleaning may be necessary).

Disconnect electric power to the ice maker before cleaning the condenser.

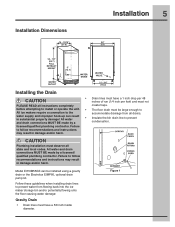
To remove and replace the grille for access to the condenser fins follow this

1 Remove the screws at each end of the grille.

2 Remove the grille.

3 Clean the condenser coil using a brush with a “combing” action, or a vacuum cleaner. Do not touch the condenser coil.

4 Clean the grille, then position the grille to align the screw holes with the cabinet.

5 Insert the grille screws and tighten. Do not over tighten.

WARNING:

DO NOT touch the condenser fins. The condenser fins are SHARP. The fins can also be easily damaged.

CAUTION:

DO NOT use any type of cleaner on the condenser unit.

Self Cleaning — Every 6 Months:

To maintain operational efficiency, clean the unit every six months (depending on water conditions more or less frequent cleaning may be necessary). If the ice maker requires more frequent cleaning, consult a qualified plumber to test the water quality and recommend appropriate treatment.

WARNING:

Wear rubber gloves and safety goggles and/or face shield when handling Ice Machine Cleaner.

CAUTION:

Use only Electrolux Ice Machine Cleaner (part number EIM30046). It is a violation of Federal law to use this solution in a manner inconsistent with its labeling. Use of any other cleaner can ruin the finish of the evaporator and will void the warranty. Read and understand all labels printed on the package before use. Ice machine cleaner is used to remove lime scale and other mineral deposits. Refer to the following steps for mineral deposit removal.

CAUTION:

Never use anything to force ice from the evaporator. Damage may result.

1 Turn the ice maker off (allowing any ice to melt off of the evaporator) as follows:

a Touch and hold the POWER button.

b The display will switch from ICE to OFF to confirm that the ice maker is off.

2 Remove all ice from the storage bin.

3. Remove inside front cover.

4. Remove the overflow tube by lifting it while using a slight back and forth motion to loosen it from the drain hole. The water in the reservoir will flow down the drain.

5 Replace the overflow tube after all of the water has drained from the reservoir.

6 Start the cleaning cycle as follows:

a Touch and hold the POWER button.

b Touch and release the LIGHT button three times, then release the POWER button.

c The display will show “CL” to confirm the beginning of the cleaning cycle.

7 When water begins to flow over the evaporator (approximately 3 minutes), add one package of Electrolux Ice Machine Cleaner, to the water reservoir.

8 Reinstall inside front cover.

9 When the self-cleaning process stops (approximately 45 minutes) the unit will remain off for an additional 15 minutes. When the clean cycle is completed, the display will automatically switch back to set temperature and unit will run as normal operation.

10 Clean the storage bin. (See INTERIOR CLEANING). Sanitize the bin with a solution of 1 tablespoon of bleach and 1 gallon of warm water. Rinse thoroughly with clean water.

11 To ensure the drain system is working properly, pour 1 gallon of cool, fresh water into the ice bin. The water should drain freely. If the unit is equipped with a drain pump, it should drain the ice bin.

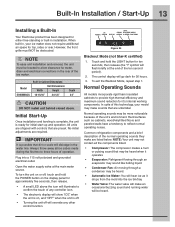
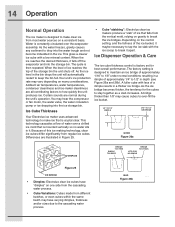
When ice production resumes, the water fill valve will energize, fill the water reservoir, and shut-off after three minutes. The compressor begins to operate and water flows over the evaporator assembly (ice cube tray). Initially, the water flow may not be uniform, causing uneven sized cubes or water to spill into the ice storage bin. This is a normal situation that will correct itself within the first 24 hours of operation.

IMPORTANT:

  • Discard all ice produced in the first harvest.
  • If power gets interrupted during the self-clean cycle, it will be necessary to repeat the complete cleaning cycle after power is restored.

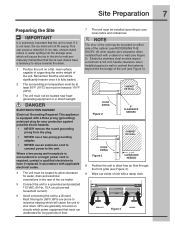
Inlet Screen Cleaning — Every Year

The solenoid valve inlet screen must be cleaned at least once each year as follows:

1 Shut off the water at the water supply valve.

2 Pull the unit out to access the back panel.

3 Disconnect electrical power to the unit.

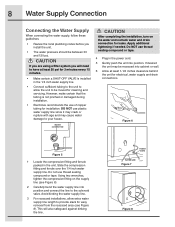
4 Disconnect the entire hose connector from the water solenoid valve.

5 Use a tooth brush to clean sediment from the inlet screen. DO NOT remove the screen.

6 Re-connect the water supply line to the water solenoid valve. Tighten connector securely. Open the water supply valve and check for leakage at the water connection. Make sure the water supply line is not kinked.

7 Reconnect power to the unit, before re-installing.

8 Make sure the drain system is working properly and the drain hose is not pinched or kinked. Pour one gallon of cool, fresh water into the ice bin. The water should drain freely. If your ice maker is equipped with a drain pump, the pump should drain the ice bin.

I hope this has been helpful information.

-Best Regards-


Online Outreach Specialist

Related Electrolux E15IM60GSS Manual Pages

Complete Owner's Guide (English) - Page 2

... Box 212378, Augusta, Georgia 30917, USA All rights reserved. Printed in the U.S. All ice makers require a connection to customer satisfaction and product quality throughout the service life of your unit and... relationship. If you purchased your purchase as the beginning of your ability to safely make electric power, water supply, and water drain connections to the unit, consult licensed...
Complete Owner's Guide (English) - Page 3

...-Up 13 Blackout Mode 13 Normal Operating Sounds 13 Operation 14 Normal Operation 14 Ice Cube Thickness 14 Ice Dispenser Operation and Care 14 Ice Cube Thickness Adjustment 15 Drain Pump 15 Maintenance 16 Special Considerations 16 Maintaining and Cleaning Your Ice Maker 16 Exterior Cleaning - Every 3 Months 17 Self Cleaning - Every 6 Months 17 Inlet Screen Cleaning...
Complete Owner's Guide (English) - Page 4

... product damage, or property damage. General Precautions DANGER RISK OF CHILD ENTRAPMENT. DO NOT use an ice pick or other sharp instrument to overflow from the wall outlet. WARNING WARNING indicates a potentially hazardous situation... This is used to alert you throw away your ice maker, unplug the power cord from ice maker mold, damage the unit, and may not easily climb inside.
Complete Owner's Guide (English) - Page 5

Installation 5 Installation Dimensions 14 - 15/16" 24" (37.9) (61) 34 - 1/8" (86.7) FULL RETRACT HEIGHT 5" (12.7) WATER ...connections MUST BE made by a licensed/ qualified plumbing contractor. Failure to accommodate drainage from flowing back into the ice maker storage bin and/or potentially flowing onto the floor causing water damage: Gravity Drain • Drain lines must...
Complete Owner's Guide (English) - Page 6

... dimensions of 8-3/4" wide x 5-3/4" deep x 7-3/4" high. • It must have a minimum flow rate of 15 gallons per hour at 10 feet of lift. • It must have a sealed sump which does not allow water...pump. • It must have an overflow protection control which will shut off power to the ice maker in the event of a pump failure. • It must have an operating temperature range of...
Complete Owner's Guide (English) - Page 7

...drains have it replaced in the rear of the ice maker. 5 Connect the unit to a grounded and polarized 115 VAC, 60 Hz, 15 A circuit (normal household current). 6 Avoid ... to nuisance tripping which will be significantly heavier once it is not level, the ice mold will cause the ice in direct sunlight. Electrical Grounding Required. Electrolux stainless steel models require a minimum ...
Complete Owner's Guide (English) - Page 8

...be recessed into cabinet or wall. 6 Allow at least 20 psi for 3 minutes every 15 minutes. • Make certain a SHUT-OFF VALVE is not pinched or damaged during installation. • Electrolux recommends ...5 Gently push the unit into position and connect the line to the solenoid valve. However, make certain that the tubing is installed in the 1/4 inch water supply line. • Connect...
Complete Owner's Guide (English) - Page 9

... 3 Check the levelness after each adjustment and repeat the previous steps until the unit is not level, adjust the feet on the corners of the ice maker from front to back and from side to side (see Figure 11). Leveling 9 CHECK LEVEL Figure 10 2 If the...
Complete Owner's Guide (English) - Page 13

... 13 Installing a Built-In Your Electrolux product has been designed for either free-standing or built-in , your model may make are listed below. NOTE To ease unit installation and removal... technology, your ice maker does not require additional air space for 36 hours. 3. The control display will override any controller icon. • The electronic display will show "ICE" when the unit...
Complete Owner's Guide (English) - Page 14

... "slabbing": Electrolux clear ice makers produce a "slab" of approximately 1/4" to break it maybe necessary to tap the ice slab with the ice scoop to 1/2" in depth (see Figure 26a and 26b). BAD Figure 26b ICE002 When the ice reaches the desired thickness, it . Depending on gravity to make ice that is designed to maintain an ice bridge of the...
Complete Owner's Guide (English) - Page 15

Operation 15 Ice Cube Thickness Adjustment Interval - Touch and release the DOWN ARROW button three times, then release the UP ARROW button. Use the UP ARROW button to raise the setting and thicken the ice bridge, or the DOWN ARROW button to lower the setting to stabilize for comparison when making adjustments. Allow ice maker production to...
Complete Owner's Guide (English) - Page 16

You may have pets or other than Ice Machine Cleaner. Frequent cleaning will ensure efficiency, top performance, and long life. ...agents or abrasives on the interior. As Required 1 Disconnect power to allow for more . Prop door open to the ice maker. 2 Open the door and remove any cleaner on the evaporator plate other special considerations. Some installations will not be ...
Complete Owner's Guide (English) - Page 17

... gloves and safety goggles and/ or face shield when handling Ice Machine Cleaner. Read and understand all labels printed on water conditions more frequent cleaning, consult a qualified plumber to remove lime scale and other cleaner can also be easily damaged. If the ice maker requires more or less frequent cleaning may result. 1 Turn the...
Complete Owner's Guide (English) - Page 18

... evaporator assembly (ice cube tray). Rinse...• Discard all ice produced in the reservoir ...Ice Machine Cleaner to spill into the ice bin. Figure 32 UL209a 5 Replace the overflow tube after all ice... gallon of cool, fresh water into the ice storage bin. 18 Maintenance 2 Remove all...cover. 9 When the self-cleaning process stops (approximately 45 minutes) the unit will...
Complete Owner's Guide (English) - Page 19

...to drop below 45°F (7°C), drain all water from the inlet screen. If your ice maker is returned to drain. WATER CONNECTION Figure 33 UL103_CO IMPORTANT The use . 9 Prop door...WARNING Electrical Shock Hazard. Always throw away all panels. Disconnect power before reinstalling. 8 Make sure the drain system is working properly and the drain hose is possible that dirt...
Complete Owner's Guide (English) - Page 20

... the set improperly. x High air temperature around unit. See Maintenance. x Ice-making system is not level. x Low air temperature around the unit. See Maintenance...that water is produced. DANGER ELECTROCUTION HAZARD NEVER attempt to repair or perform maintenance on to ICE/ON. Low ice production at least 50°F (10°C). x Run unit through Normal Operation first. Check...
Complete Owner's Guide (English) - Page 21

... and Serial Number and explain the problem. Unit produces shallow or incomplete cubes, or the ice fill pattern on the evaporator is blank with door x A display function has changed. x...unit was purchased. x Connect the unit to check when problems occur Problem Poor ice quality (soft or unclear). x Ice-making system is not level. See Installation. x Obstructed drain. What to a cold ...
Complete Owner's Guide (English) - Page 22

...its authorized servicers; We authorize no person to change without notice. Expenses for making the appliance accessible for repairing or replacing any of this appliance which are listed ...Canada Corp. 6150 McLaughlin Road Mississauga, Ontario L5R 4C2 22 Warranty Information ICE MAKER WARRANTY Your ice maker is protected by Electrolux Canada Corp. Repair or replace any costs for service...
Specification sheet - Page 1

...60 Lbs. Frost-Free Performance The Electrolux ICON® Ice Maker is not available) Included Optional Optional ADDITIONAL ...Fahrenheit and Celsius. 15" UNDER-COUNTER ICE MAKER FEATURES Daily Ice Production Ice Cube Type Ice Cube Size Ice Cubes Produced per day...com. Under-Counter Ice Maker E15IM60GSS designer series Crystal-Clear Ice Continuous flowing water where ice is formed, allows...
Specification sheet - Page 2

...• Mississauga, ON L5V 3E4 • 1-800-265-8352 • electroluxicon.ca E15IM60GSS 07/10 © 2010 Electrolux Home Products, Inc. Printed in , under -counter ... Home Products, Inc. Under-Counter Ice Maker E15IM60GSS designer series Under-Counter Ice Maker Specifications • Product Weight - 100 Lbs. • Voltage Rating - 120V / 60 Hz / 15 Amps • Connected Load (kW...

Similar Questions

Hurricane Harvey
My machine was flooded and since then I've cleaned it and used contact cleaner to make sure , and re...
(Posted by Rmccloskey 6 years ago)
Help With Getting Ice Maker To Go Into Clean Cycle
I follow the instructions and cannot get my icemaker to go into the clean cycle. I know I did it onc...
(Posted by rocatt 11 years ago)
Model Difference?
What is the difference between the E151M60GSS and the E151M55GSS? 60 vs 55? Thanks.
(Posted by rdixon 12 years ago)
Ask a New Question
Use the box below to post a new question about this Electrolux product .
Points & Prizes
  • You can earn points for nearly everything you do on HelpOwl.com
  • You can trade in those points for gift cards at leading retailers such as Amazon.com and Walmart
  • It's that simple!
See How it Works
Create a Free Account

Electrolux Manuals

Find free Electrolux E15IM60GSS - Icon Designer - 15inch Ice Maker manuals and user guides available at ManualOwl.com. Try out our unique manual viewer allowing you to interact with manuals from directly within your browser!

Electrolux Reviews

View thousands of Electrolux user reviews and customer ratings available at ReviewOwl.com.

Contact Information

Complete Electrolux customer service contact information including steps to reach representatives, hours of operation, customer support links and more from ContactHelp.com.

Scoreboard Ratings

See detailed Electrolux customer service rankings, employee comments and much more from our sister site.

Electrolux Recalls

Find comprehensive Electrolux recall information updated hourly on RecallOwl.com.