Dell Vostro 2520 Support Question
Dell Vostro 2520 Support Question
Find answers below for this question about Dell Vostro 2520.Need a Dell Vostro 2520 manual? We have 2 online manuals for this item!
Question posted by abhishektomer691 on December 1st, 2012
Dell Vostro 2520 Touchpad Doesn't Works Properly While Lappy Is On Charge
I have dell vostro 2520,windows 7 home basic,i3 2nd gen,2gb ramm,500gb hard drive.when i put my lappy on charge its touchpad doesn't work properly some time it hangs and sometimes it zoom,etc.But when lappy is on not charge touchpad works properly
Current Answers
Answer #1: Posted by NiranjanvijaykumarAtDell on December 4th, 2012 12:15 AM
NiranjanvijaykumarAtDell

Member since:
May 12th, 2012 Points: 807,180

Member since:
May 12th, 2012 Points: 807,180
Hello abhishektomer691,
I am from Dell Social Media and Community.
Check your power settings from control panel and verify if there is any option related to touchpad changes when the AC Adapter is connected. (Which usually is not the case)
Log on to www.support.dell.com and download the latest drivers to update it.
If you need any further assistance, feel free to message me on Twitter. I will be happy to assist and Happy Holidays to you and your family.
Dell-Niranjan
Twitter: @NiranjanatDell
NiranjanAtDell
Dell Inc

Answer #3: Posted by gtmluvmj on March 15th, 2013 11:38 PM
gtmluvmj

Member since:
March 15th, 2013 Points: 10
Member since:
March 15th, 2013 Points: 10
I am using the same laptop and I used to face the same problem as yours. But then I recognized that when you put your laptop for charging in the wall socket then it hangs because of some voltage fault. Try to connect your charger with the external cord connected to a wall socket. It will run smoothly. Because the input voltage required is 19.5v.
Related Dell Vostro 2520 Manual Pages
User Manual - Page 1

... And Back View
Figure 1. camera status light 2. display 4. memory card reader 12. touchpad buttons (2) 13. camera 3. Front View
1.
audio connectors
9. touchpad 11. device status lights 14. Vostro 2420 - microphone 10. optical drive 7. keyboard 15. Dell Vostro 2420/2520
Setup And Features Information
About Warnings
WARNING: A WARNING indicates a potential for property...
User Manual - Page 3

Front And Back View
Figure 3. USB 2.0 connectors (2) 8. touchpad buttons (2) 10. optical drive 6. microphone 11. device status lights 13. memory card reader 12. speakers (2) 5. keyboard 14. camera status light 2. power button
3 touchpad
9. camera 3. Front View
1. Vostro 2520 - display 4. optical drive eject button 7.
User Manual - Page 4
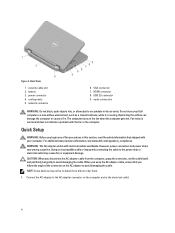
... in this section, read the safety information that you begin any of the procedures in the air vents.
For additional best practices information, see www.dell.com/regulatory_compliance
WARNING: The AC adapter works with the fan or the computer. When you wrap the AC adapter cable, ensure that shipped with your...
User Manual - Page 5

... vary by law to view information about your computer.
The following specifications are only those required by region. Figure 5.
Figure 6. Figure 7. Power AC adapter
Vostro 2420 / Vostro 2520 with your computer at least once before you install any cards or connect the computer to turn on and shut down your computer. Connect USB...
User Manual - Page 6

...document in this publication is available at www.dell.com/regulatory_compliance for more information on:
• Safety best practices • Regulatory certification • Ergonomics
See www.dell.com for additional information on the device ...inches) 342.00 mm (13.46 inches) 244 mm (9.60 inches) 2.20 kg (4.85 lb)
Vostro 2520 31.50 mm to 34.50 mm (1.24 inches to 1.35 inches) 376.00 mm (14....
Owner's Manual - Page 3
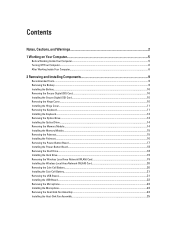
...
Notes, Cautions, and Warnings 2
1 Working on Your Computer...5
Before Working Inside Your Computer...5 Turning Off Your Computer...6 After Working Inside Your Computer...6
2 Removing and Installing... the Power-Button Board...17 Installing the Power-Button Board...18 Removing the Hard Drive...18 Installing the Hard Drive...19 Removing the Wireless Local Area Network (WLAN) Card 19 Installing the ...
Owner's Manual - Page 5

... disconnecting this type of your computer (see the Regulatory Compliance Homepage at www.dell.com/ regulatory_compliance
CAUTION: Many repairs may appear differently than shown in this document... computer and then unplug the cable from the network device. 4. WARNING: Before working inside your product documentation, or as directed by periodically touching an unpainted metal surface...
Owner's Manual - Page 6

...remove the main battery before turning on a flat work , periodically touch an unpainted metal surface to ground the system board. Remove the main battery. 8. In Windows XP: Click Start → Turn Off Computer &#... for about 6 seconds to the computer, use batteries designed for this particular Dell computer. Ensure that the computer and all open files and exit all attached ...
Owner's Manual - Page 15
...
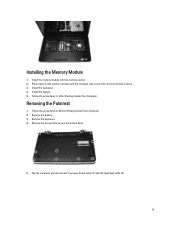
1. Insert the memory module into the memory socket. 2.
Removing the Palmrest
1. Flip the computer and disconnect the power board cable (1) and the touchpad cable (2).
15 Follow the procedures in After Working Inside Your Computer. Remove the keyboard. 4. Install the keyboard. 4. Remove the screws that secure the bottom base.
5. Install the battery. 5. Press...
Owner's Manual - Page 18

... the power-button board cable to its compartment. 3. Remove the screws that secure the hard-drive bracket.
4. Follow the procedures in After Working Inside Your Computer. Fix the power-button board to the palmrest. 5. Removing the Hard Drive
1. Slide and lift the hard drive and lift it out of the computer.
18 Follow the procedures in Before...
Owner's Manual - Page 19

...Local Area Network (WLAN) Card
1. Follow the procedures in After Working Inside Your Computer. Disconnect the antennae connected to the hard drive. 2.
Place the hard drive in its compartment.
19 Follow the procedures in Before Working Inside Your Computer. 2. Install:
a) palmrest b) keyboard c) battery 5. Install the hard-drive bracket to the WLAN card.
4. Pry the latch to release...
Owner's Manual - Page 26
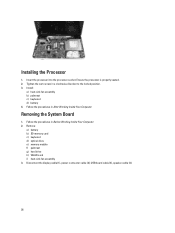
...keyboard d) battery 4. Follow the procedures in Before Working Inside Your Computer. 2. Follow the procedures in After Working Inside Your Computer. Insert the processor into the ...is properly seated. 2. Tighten the cam-screw in a clockwise direction to the locked position. 3. Remove:
a) battery b) SD memory card c) keyboard d) optical drive e) memory module f) palmrest g) hard drive h) ...
Owner's Manual - Page 28
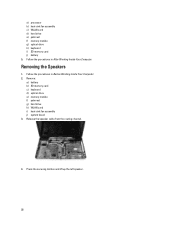
...Remove:
a) battery b) SD memory card c) keyboard d) optical drive e) memory module f) palmrest g) hard drive h) WLAN card i) heat-sink fan assembly j) system board 3. Follow the procedures in Before Working Inside Your Computer. 2. a) processor b) heat-sink fan assembly c) WLAN card d) hard drive e) palmrest f) memory module g) optical drive h) keyboard i) SD memory card j) battery 5. Release the...
Owner's Manual - Page 30
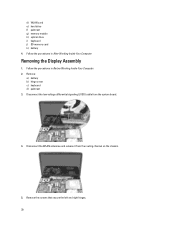
... Your Computer. 2. Follow the procedures in After Working Inside Your Computer. Removing the Display Assembly
1. Disconnect the low-voltage differential signaling (LVDS) cable from the ...right hinges.
30 Disconnect the WLAN antennae and release it from the system board.
4. d) WLAN card e) hard drive f) palmrest g) memory module h) optical drive i) keyboard j) SD memory card k) battery 4.
Owner's Manual - Page 41

...• Bring up the one-time boot menu by pressing key
The one-time boot menu displays the devices that you make are :
• Removable Drive (if available) • STXXXX Drive
NOTE: XXX denotes the SATA drive number. • Optical Drive • Diagnostics
NOTE: Choosing ...8208;defined boot device order and boot directly to a specific device (for example: optical drive or hard drive).
Owner's Manual - Page 42

... Date System Time BIOS Version Product Name Service Tag Asset Tag CPU Type CPU Speed CPU ID L1 Cache Size L2 Cache Size L3 Cache Size Extended Memory System Memory Memory Speed Fixed HDD SATA ODD
AC Adapter Type
Displays the computer model number. Displays the type of the hard drive. Displays the...
Owner's Manual - Page 44

...desktops, the service tag label is fully charged and connected to step 5. 4. Updating ...tag label is available. The File Download window appears. 8.
Restart the computer. 2.
Specifies...Boot
Boot Priority Order Hard Disk Drives USB Storage Device CD/DVD ROM Drives Network
Specifies the order...Follow the instructions on the front of all Dell products 5. If you have your computer's ...
Owner's Manual - Page 51

Keyboard Feature Number of keys
Table 12. Touchpad Feature Active Area:
X-axis Y-axis
Specification one RJ-45 connector three 4-pin USB, 2.0-compliant connectors one 3-in-1 (SD/MMC/MS)
Vostro 2420
Vostro 2520
HD WLED TrueLife; Display Feature Type Size Dimensions:
Height Width Diagonal Active area (X/Y) Maximum brightness Maximum resolution Operating angle Refresh rate Minimum viewing...
Owner's Manual - Page 52

AC Adapter Feature Type:
Vostro 2420 / Vostro 2520 with integrated video card Vostro 2420 with discrete video card Input voltage Input current ...176;F) 3 V CR2032 lithium coin cell
Table 14. Table 13. Battery Feature Type Dimensions:
Height Width Depth Weight Charge time Voltage Temperature range: Operating Non-operating Coin-cell battery
Specification 6-cell lithium ion (2.20 Whr)
20.20 mm ...
Owner's Manual - Page 53

Feature Operating Non-operating
Table 15. Physical Feature Vostro 2420:
Height (with a WLED panel) Width Depth Weight (minimum) Vostro 2520: Height (with a WLED panel) Width Depth Weight (minimum)
Table 16. Environmental Feature Temperature:
Operating Storage Relative humidity (maximum): Operating Storage Altitude (maximum): Operating Non-operating ...
Similar Questions


Speakers Problem In Dell Vostro 2520
i have updated my os to windows 8.1..i have installed dell audio drivers,but still i cant enable to ...
i have updated my os to windows 8.1..i have installed dell audio drivers,but still i cant enable to ...
(Posted by swethab6193 9 years ago)


Remove Hard Drive Dell Vostro 1440 Laptop
how i remove hard drive dell vostro 1440 laptop step by step.
how i remove hard drive dell vostro 1440 laptop step by step.
(Posted by hiteshsethi73 12 years ago)