Dell Vostro 1540 Support Question
Dell Vostro 1540 Support Question
Find answers below for this question about Dell Vostro 1540.Need a Dell Vostro 1540 manual? We have 2 online manuals for this item!
Question posted by manojmscgis1 on April 11th, 2012
When I Press 7 In My Keyboard It Shows '7n'? Same Problem In The Following Keys
key n have "7n" and space key not working
Current Answers
Related Dell Vostro 1540 Manual Pages
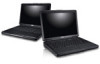
User Manual - Page 2
... block, push objects into, or allow dust to accumulate in a low-airflow environment, such as a closed briefcase, while it is normal and does not indicate a problem with the fan or the computer.
2 7. touchpad buttons (2) 13. optical drive eject button 8. keyboard 15. power connector 4. Fan noise is running. power button
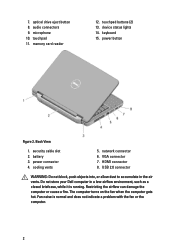
Figure 2. Back View
1.
User Manual - Page 5
Network Connector
3.
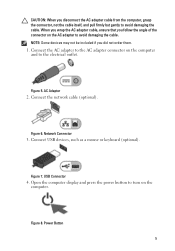
Open the computer display and press the power button to turn on the AC adapter to avoid damaging the cable. CAUTION:...wrap the AC adapter cable, ensure that you did not order them. 1. NOTE: Some devices may not be included if you follow the angle of the connector on the computer. Figure 5.
Figure 8. Figure 7. Power Button 5 Connect the AC adapter to the...
Owners Manual - Page 7
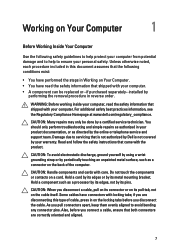
...its pull-tab, not on a card. Working on Your Computer
1
Before Working Inside Your Computer
Use the following conditions exist:
• You have performed the steps in Working on Your Computer. • You have ...with locking tabs; Hold a component such as a connector on the back of cable, press in this type of the computer. Some cables have read the safety information that came ...
Owners Manual - Page 8
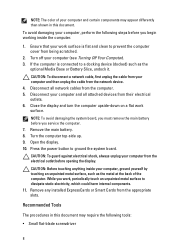
...To guard against electrical shock, always unplug your computer and certain components may require the following steps before opening the display. While you service the computer. 7. CAUTION: To disconnect ... document. Disconnect your work surface.
To avoid damaging your computer (see Turning Off Your Computer). 3. Remove the main battery. 8. Open the display. 10. Press the power button to...
Owners Manual - Page 13
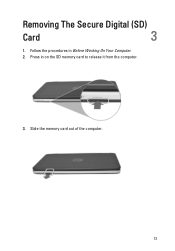
Removing The Secure Digital (SD)
Card
3
1. Press in Before Working On Your Computer. 2. Follow the procedures in on the SD memory card to release it from the computer.
3. Slide the memory card out of the computer.
13
Owners Manual - Page 16

Install the battery. 4. Follow the procedures in After Working Inside Your Computer.
16 Flip the computer around and install the screws that secure the hinge
cover. 3. Install the hinge cover and press on it to secure its connection to the
computer. 2. Installing The Hinge Cover 1.
Owners Manual - Page 17
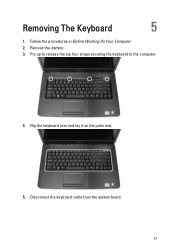
Remove the battery. 3. Flip the keyboard over and lay it on the palm rest.
5. Pry up to release the top four snaps securing the keyboard to the computer.
4. Disconnect the keyboard cable from the system board. 17 Follow the procedures in Before Working On Your Computer. 2. Removing The Keyboard
5
1.
Owners Manual - Page 18
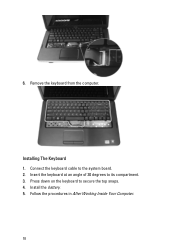
Insert the keyboard at an angle of 30 degrees to secure the top snaps. 4. Install the battery. 5. Press down on the keyboard to its compartment. 3. Connect the keyboard cable to the system board. 2.
Installing The Keyboard 1. 6. Remove the keyboard from the computer. Follow the procedures in After Working Inside Your Computer.
18
Owners Manual - Page 19
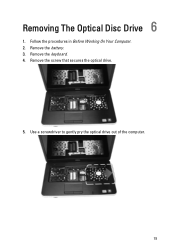
Removing The Optical Disc Drive 6
1. Remove the keyboard. 4. Follow the procedures in Before Working On Your Computer. 2. Remove the screw that secures the optical drive.
5. Use a screwdriver to gently pry the optical drive out of the computer.
19 Remove the battery. 3.
Owners Manual - Page 20

Tighten the screw to secure the optical drive to the computer. 3. Install the keyboard. 4. Follow the procedures in After Working Inside Your Computer.
20 Install the battery. 5. Installing The Optical Disc Drive 1. Slide the optical drive into the compartment on the left side of the chassis. 2.
Owners Manual - Page 21
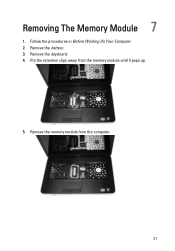
Remove the memory module from the memory module until it pops up.
5. Pry the retention clips away from the computer.
21 Remove the battery. 3. Follow the procedures in Before Working On Your Computer. 2. Removing The Memory Module 7
1. Remove the keyboard. 4.
Owners Manual - Page 22

Press down on the memory module until the retention clips secure the
memory module in After Working Inside Your Computer.
22 Install the keyboard. 4. Install the battery. 5. Installing The Memory Module 1. Insert the memory module into the memory socket. 2. Follow the procedures in place. 3.
Owners Manual - Page 23
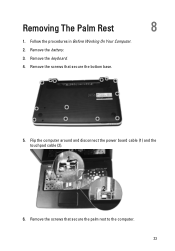
Remove the screws that secure the palm rest to the computer. 23 Remove the keyboard. 4. Flip the computer around and disconnect the power board cable (1) and the touchpad cable (2).
6. Remove the screws that secure the bottom base.
5. Removing The Palm Rest
8
1. Follow the procedures in Before Working On Your Computer. 2. Remove the battery. 3.
Owners Manual - Page 25
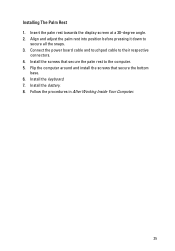
...rest to their respective
connectors. 4. Follow the procedures in After Working Inside Your Computer.
25 Install the... battery. 8. Connect the power board cable and touchpad cable to the computer. 5. Installing The Palm Rest 1. Align and adjust the palm rest into position before pressing it down to
secure all the snaps. 3. Install the keyboard...
Owners Manual - Page 27
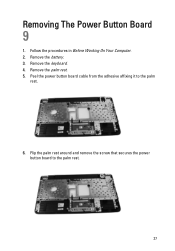
Removing The Power Button Board
9
1. Remove the keyboard. 4. Follow the procedures in Before Working On Your Computer. 2. Remove the battery. 3. Remove the palm rest. 5. Peel the power button board cable from the adhesive affixing it to the palm rest.
27 Flip the palm rest around and remove the screw that secures the power button board to the palm
rest.
6.
Owners Manual - Page 28
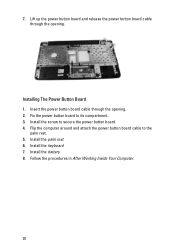
... 1. Follow the procedures in After Working Inside Your... Computer.
28 Fix the power button board to secure the power button board. 4.
Install the screw to its compartment. 3. Install the battery. 8. Flip the computer around and attach the power button board cable to the
palm rest. 5. Insert the power button board cable through the opening . 2. Install the keyboard...
Owners Manual - Page 47
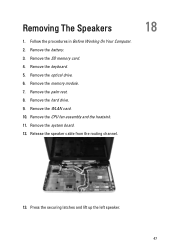
... system board. 12. Follow the procedures in Before Working On Your Computer. 2. Remove the battery. 3. Remove the memory module. 7. Release the speaker cable from the routing channel.
18
13. Remove the SD memory card. 4. Remove the optical drive. 6. Press the securing latches and lift up the left speaker. 47 Remove the keyboard. 5. Remove the...
Owners Manual - Page 71

...Screens
Menu Options List
Appears on top of the System Setup window.
Press < Left Arrow > and < Right Arrow > keys to wait until you add, change a user-selectable option such as...your computer. 2. Press < Left Arrow >
71 This prompt can cause your computer. As a Menu option is recommended that the keyboard has initialized. This field provides a menu to work incorrectly. NOTE: ...
Owners Manual - Page 72

... model number. Options Field
and < Right Arrow > keys to the Options List. Press < Enter> to make changes to navigate through the ...Press to return to navigate. In this field you can view information about each option listed in the System Setup.
< Up Arrow > or < Down Arrow Select an item to display. >
< Left Arrow > or < Right Arrow Select a menu to your computer. Use the following keys...
Owners Manual - Page 77
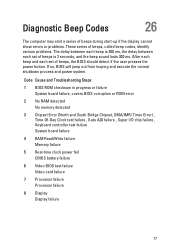
... , Keyboard controller ...show errors or problems. These series of beeps, called beep codes, identify various problems.... The delay between each beep is 300 ms, the delay between each set of beeps is 3 seconds, and the beep sound lasts 300 ms. After each beep and each set of beeps, the BIOS should detect if the user presses...
Similar Questions


New Laptop Vostro 1540 Purchased In Feb 12 And Key Bod Is Not Working. What To D
DEAR SIR KEDY BOARD OF ABOVE SAID LAPTOP IS NOT WORKING. MY ALL WORKS ARE HELD UP. PLEASE ADVICE WH...
DEAR SIR KEDY BOARD OF ABOVE SAID LAPTOP IS NOT WORKING. MY ALL WORKS ARE HELD UP. PLEASE ADVICE WH...
(Posted by sureshnairmb 11 years ago)

Dell Vostro 1540 Drivers
I want the drivers to make my keyboard function keys work (of my DELL VOSTRO 1540) - and also driver...
I want the drivers to make my keyboard function keys work (of my DELL VOSTRO 1540) - and also driver...
(Posted by sshande1960 12 years ago)

Problem With Key Board Layout Setting
pls hw do i change my keboard layout setting to meet that of the hard ware. the setting i have is di...
pls hw do i change my keboard layout setting to meet that of the hard ware. the setting i have is di...
(Posted by lordamissah 12 years ago)